Workspace Management
RapidCanvas platform supports multiple workspaces. Each workspace operates independently, ensuring complete isolation from others. Users and projects within a workspace are restricted to that specific workspace, and projects from one workspace cannot be viewed or accessed by another. For users with access to multiple workspaces, projects and associated resources—such as DataApps, environments, and prediction services—can be copied between workspaces, provided the necessary permissions are in place.
Access to workspaces is strictly controlled, allowing users to interact only with those they are authorized for, ensuring secure and organized collaboration.
Only admin users who have permission can create workspaces.
Creating and managing workspaces
Use this procedure to create a workspace in an instance.
To create a workspace:
From the current workspace drop-down on the top-right corner of the screen, click +Create a new workspace
This displays the Create Workspace window.
Specify the Workspace details:
- Workspace Name:
The name of the workspace.
- Workspace description:
The description for the workspace.
- License key:
A valid license key to create a workspace. This license key is provided by the service provider.
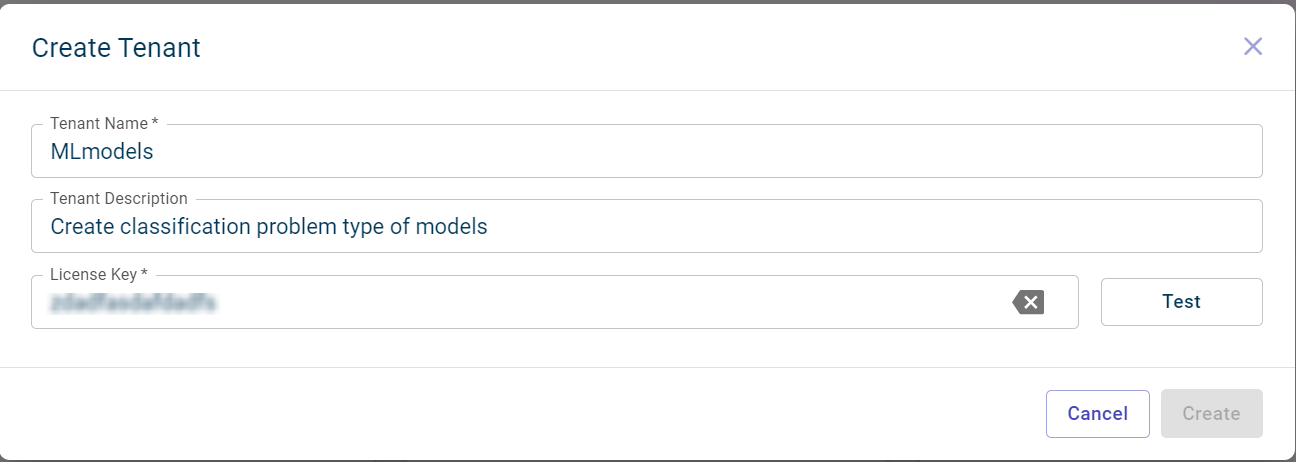
Click TEST to check whether the license key provided is valid or not. The Create button will be enabled only if the license key is valid.
Click Create. This creates a new workspace in your instance and directs you to the workspace management dashboard page.
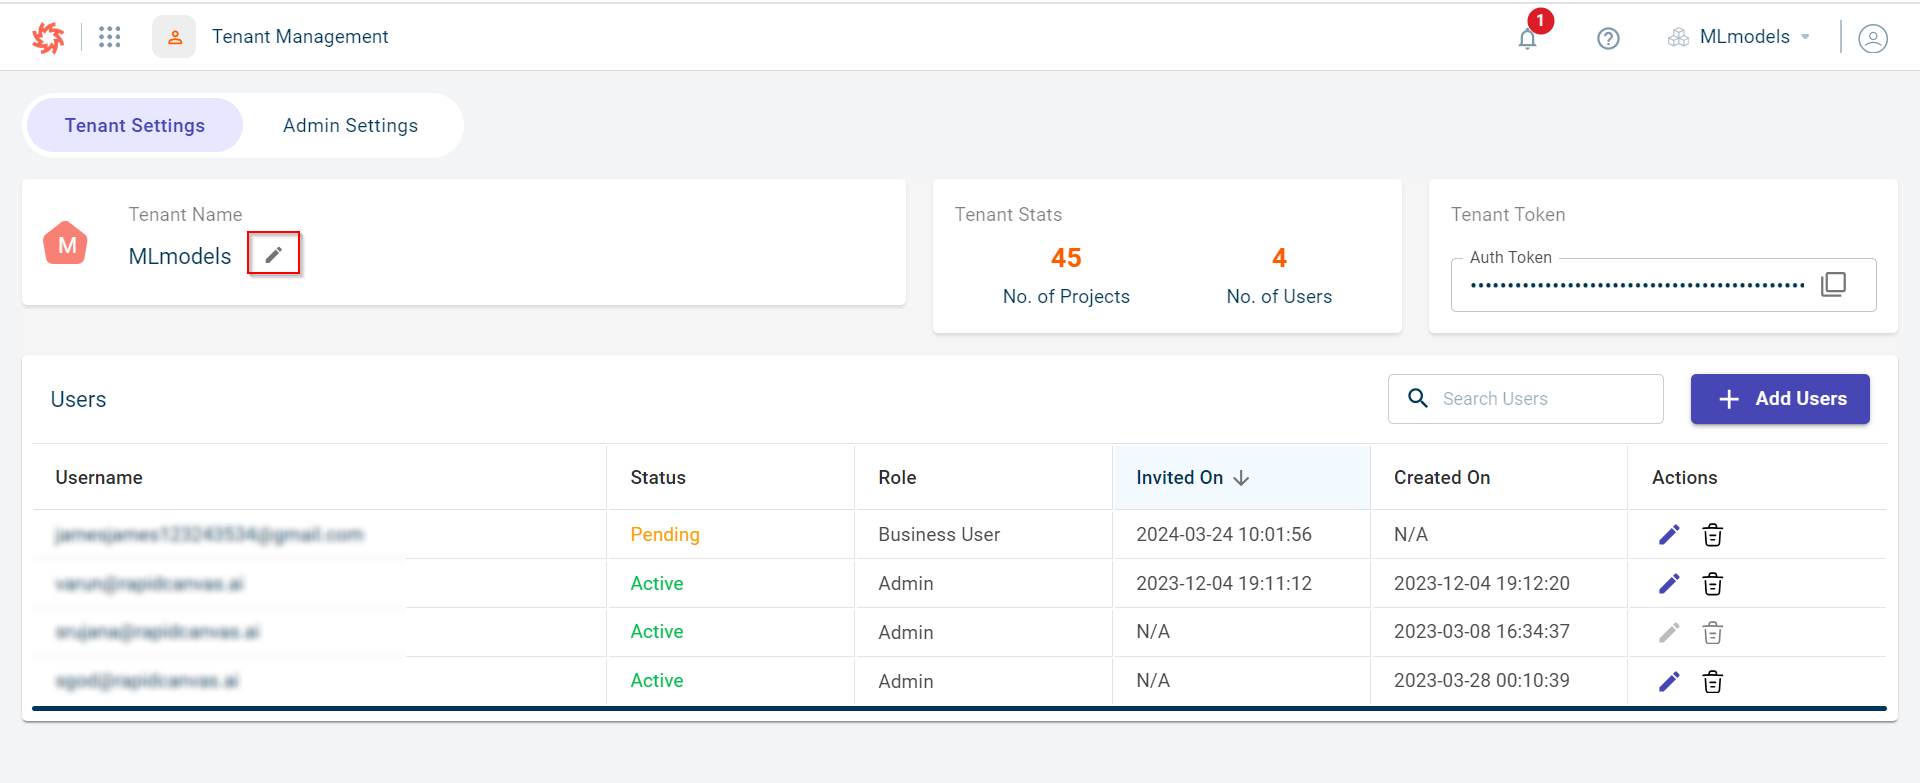
Click the Edit icon to change the workspace’s name, on the Workspace Settings tab.
Settings
The settings page gives you access to workspace and Admin settings.
Admin settings - You can update the license key, change the DataApp settings and view the license quotas. For more information, see Admin settings.
Workspace settings - You can add users, generate workspace token, view total users and projects in your workspace, and edit workspace details. For more information, see Workspace settings.
Workspace Settings
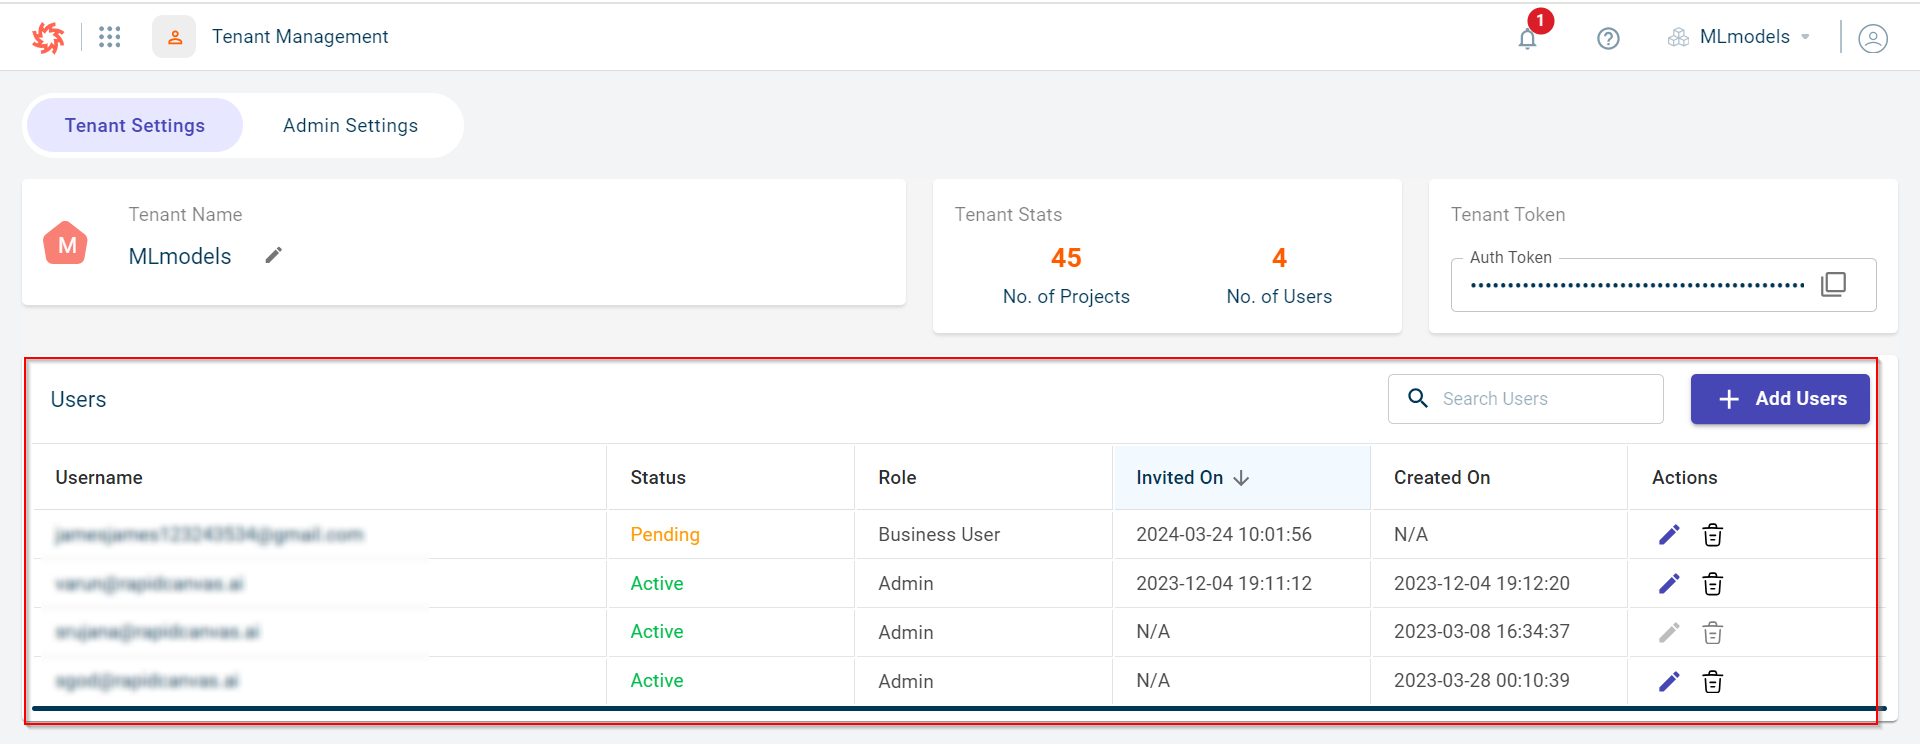
The workspace Settings tab provides an overview of the number of projects available for a workspace. The following are the widgets you can view on the dashboard. The tasks you can perform depend on user permissions.
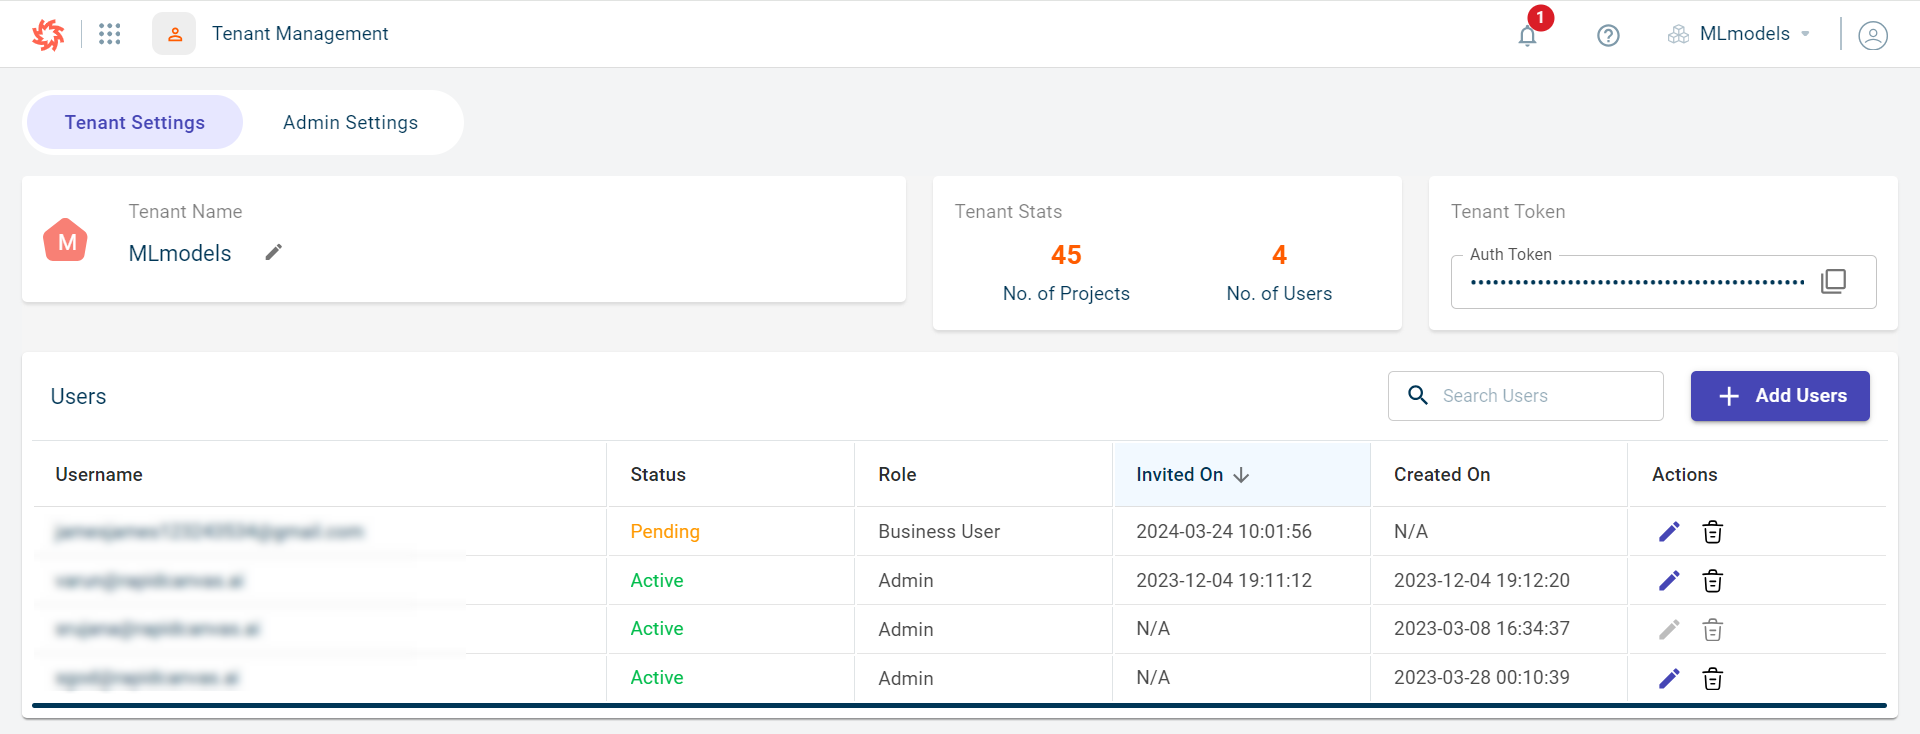
Workspace name Displays the workspace’s name. Visible only to Admin users who are also allowed to edit the workspace name and description.
Workspace Stats Displays the total number of projects in a workspace and the users associated with this workspace.
Workspace token You can also generate workspace auth token to make API calls to the platform.
Users Displays the total number of users in the workspace. Users with the Admin role can view and create users, while those with the DataApp-View role can only access the DataApps module within the workspace.
Users assigned the User role have access to all features but cannot invite new users or modify existing user details. Those with the Business User role have access limited to specific features.
For a detailed breakdown of permissions associated with each user role, See details in this table User roles and permissions
Admin settings
The Admin users can view the permissions, license status, and license quotas on this tab.
To access the Admin settings area:
Click the current workspace drop-down and select Settings. The workspace Settings tab is displayed by default.
Click the Admin Settings tab to view the information organized into four distinct tabs.
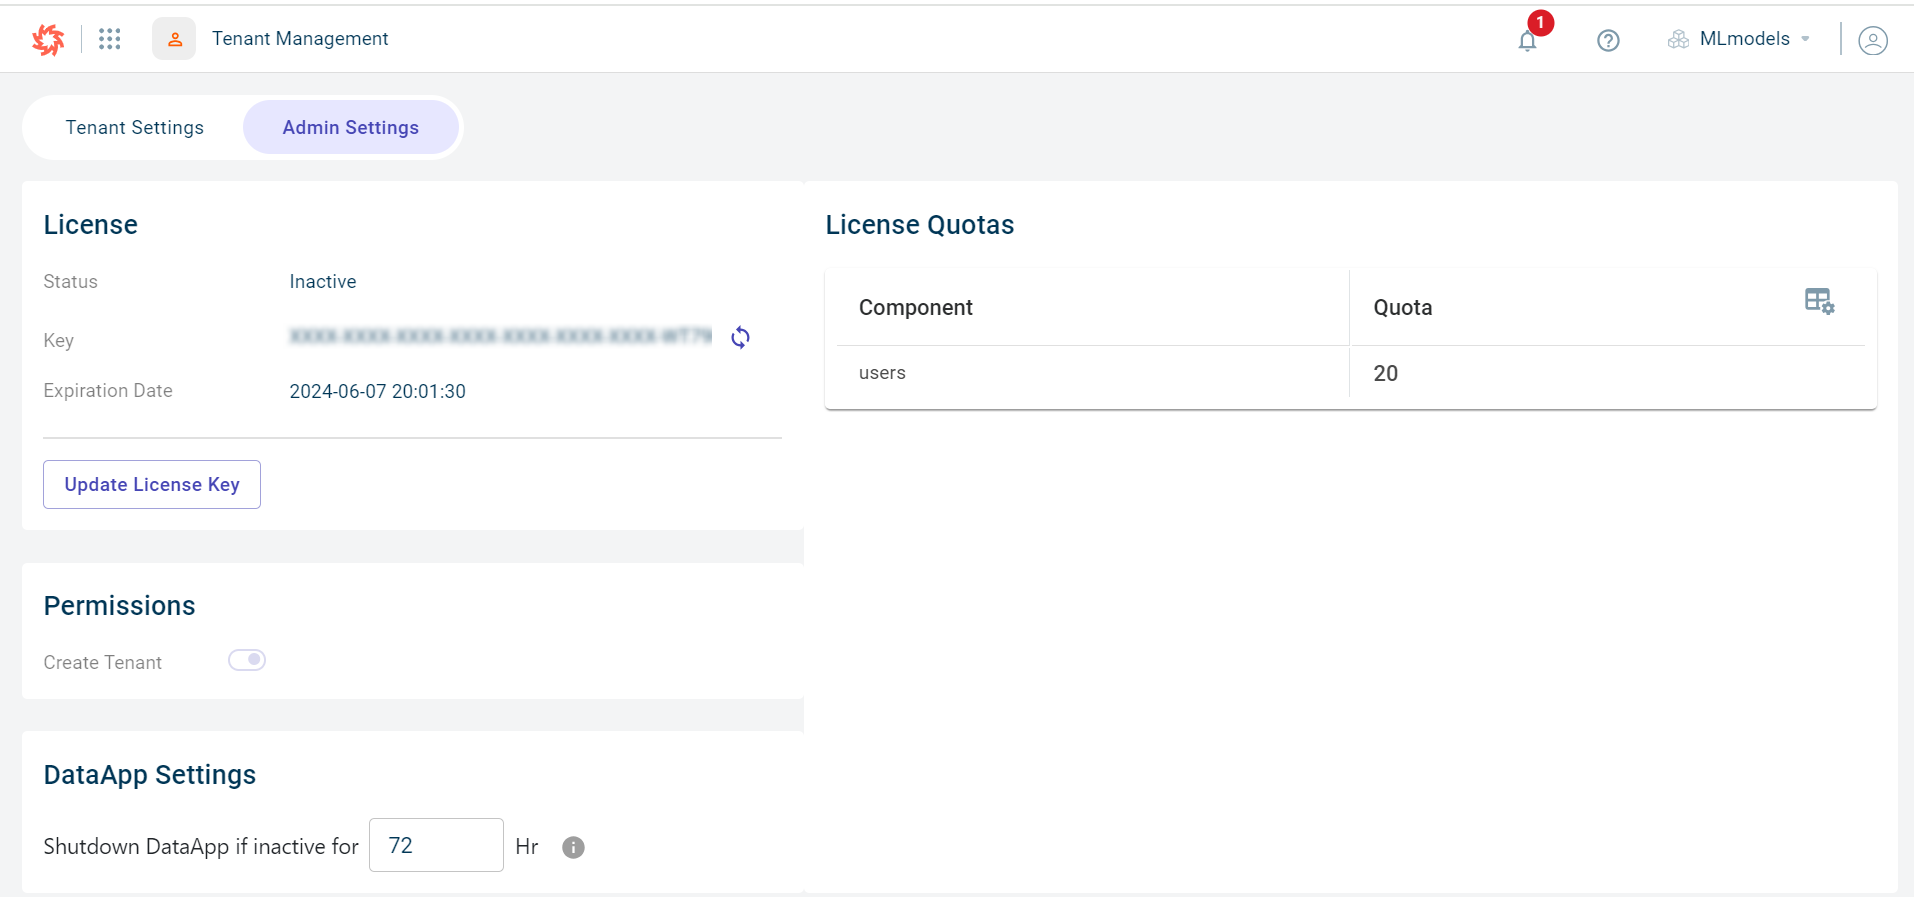
Click the License & Permissions tab to review the license information:
Under License section view this information:
- Status:
The status of the license.
- Key:
The license key of this workspace. Whenever the license key is updated, the sync happens automatically and the expiration date gets updated accordingly.
- Expiration Date:
The expiration date of this license key. When the expiry date is nearing, there is an alert displayed corresponding to this field to inform the Admin about the number of days left for the renewal of the license key.
Click Update License Key to update the expired license.
View the Create workspace toggle under the Permissions section. This option is enabled only if Admin users have permission to create a workspace and remains disabled if users do not have the permission to create workspaces.
Review the license quotas to view the restrictions set for the workspace, including the maximum number of users that can be added, the accepted email addresses, and other related limitations.
Click the DataApp Settings tab to modify the duration after which the DataApp should automatically shut down. This duration is specified in hours, and you can set it between 0 and 262,800 hours. If you set the duration to 0, the DataApp will remain active indefinitely. The configured time applies to all DataApps created within the workspace. However, if a shutdown time is set at the individual DataApp level, that setting will take precedence.
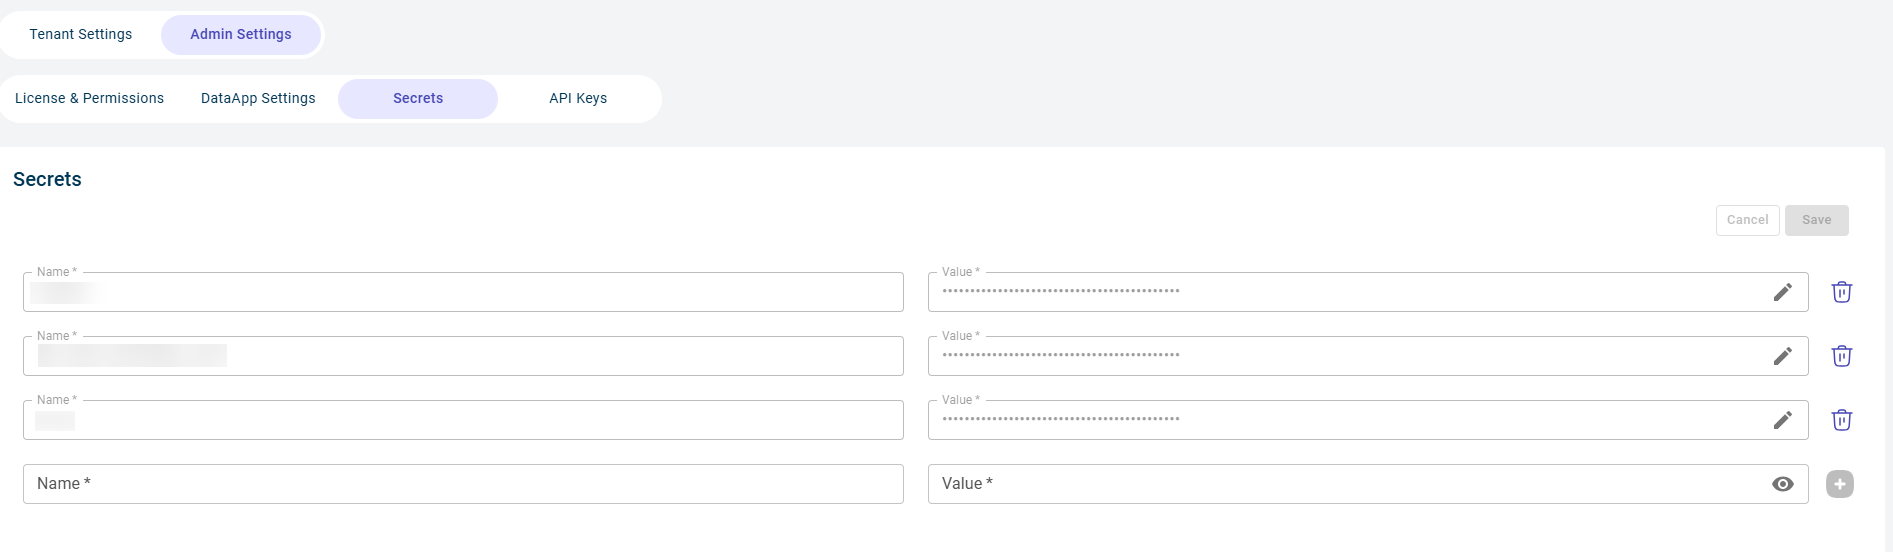
Click the Secrets tab to configure secrets by providing the Name and Value in the respective fields, then click Save. You can add as many secrets as you want here. The configured secrets can be used in the helper functions of AskAI. You can also modify the secret key values at a later time, using the Edit option.
Click the API Keys tab to create and manage API keys. For more information, see Creating and managing API keys.
Creating and managing API keys
Use this procedure to create and manage API keys.
Click the current workspace drop-down and select Settings. The Workspace Settings tab will be displayed by default.
Navigate to the Admin Settings tab and select the API Keys tab.
Click the Plus (+) button to create a new API key. This will open the Create API Key modal.
Enter the following details:
- API Key Name:
Provide a clear and descriptive name to easily identify the API key.
- Expiry Date:
Select the date when the API key will expire.
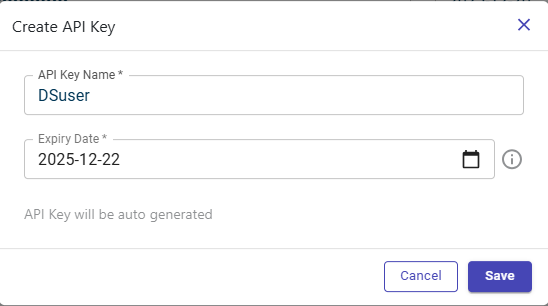
Click Save. The system will generate an API key, which you can either copy immediately or download as a markdown file for safekeeping.
Once you have successfully copied or downloaded the token, click Done to close the modal.
If you’re unsure how to use the API key, click Syntax. This will display the correct format and examples showing how to include the key in an endpoint for both cURL and Python requests.
Viewing the list of Users
The workspace management screen allows you to view the list of users linked to a workspace.
To view list of users in a workspace:
Click the current workspace drop-down on the right-corner of the page and select Settings. This opens the workspace management screen.
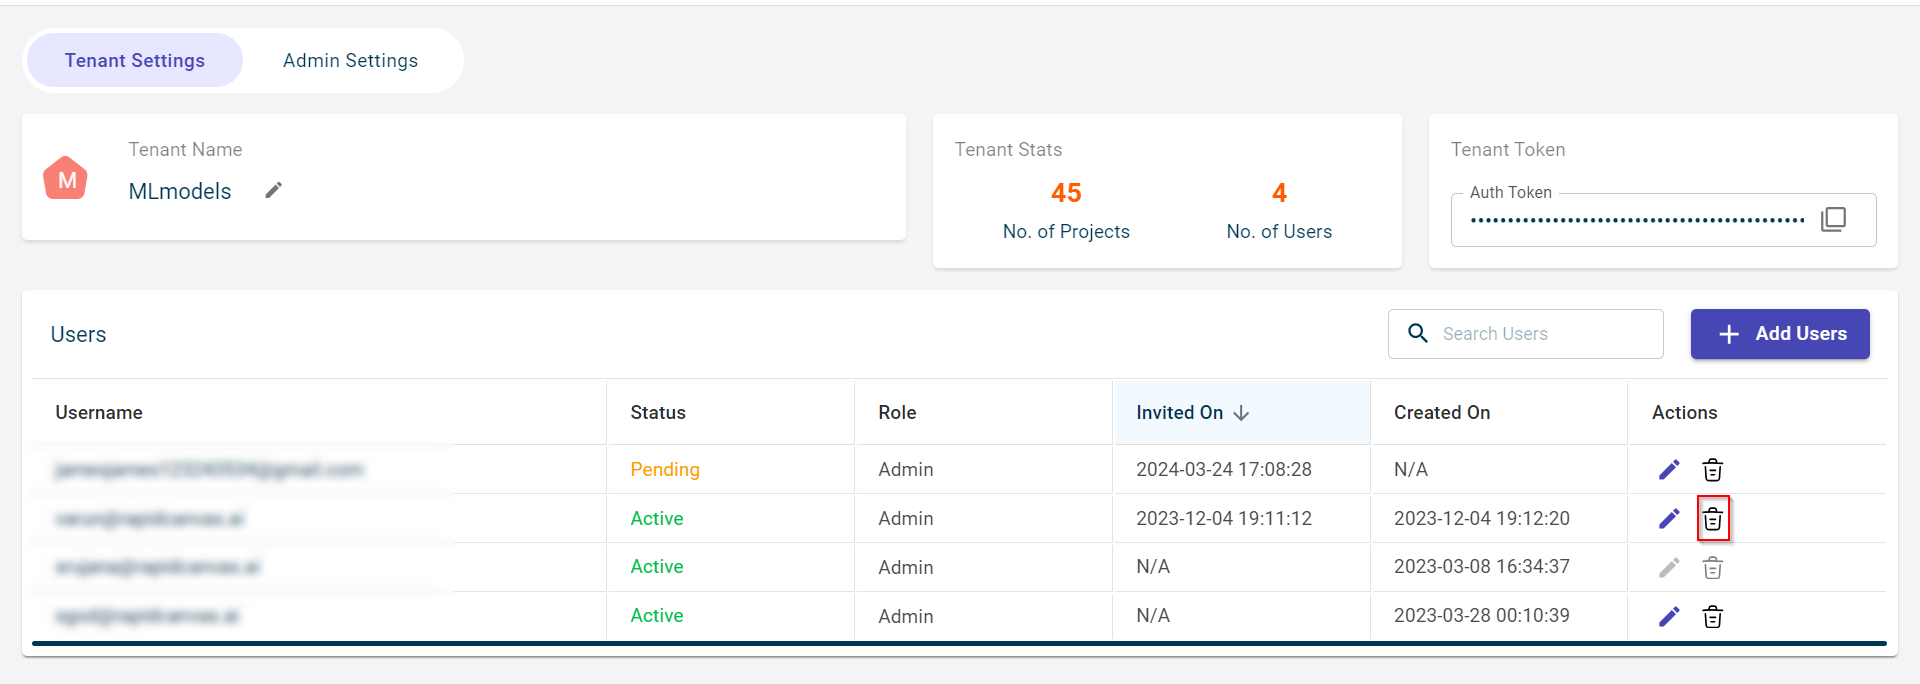
Review the user details on the workspace Settings tab:
Username- The name of the user who has access to this workspace.
Status- The status of the workspace. Possible values:
Pending - The user is yet to sign up to the workspace.
Active - The user account is active.
Link Expired - The sign up link sent to the user has been expired and you must resend the invitation.
Canceled - The invitation sent to the user has been deleted by the admin.
Role – The role assigned to the user for this workspace. Possible values:
Admin - User with this role can access all features on the platform.
DataApp-View - User with this role can only access the DataApp module.
User Role - User with this role can access all features on the platform, but cannot invite new users or edit the details of existing users.
Business User - User with this role can access projects, DataApps, AI-assisted recipe, Rapid Model Recipe, and Dataconnector modules only. These users cannot create scenarios, segments, workspaces, and add models and artifacts. Also, the global variables in projects are not visible. They cannot set the recipe timeout period for AI-assisted and Rapid model recipes.
Created on- The date on which the user has been created.
Last Login- The most recent login of the workspace with date and time is shown.
Actions
Click the delete button to delete the user permanently. For more information, see Deleting a user.
Click the edit button to change the user role. For more information, see Editing a role.
Click the REINVITE button to resend an invitation to the user for joining the platform or workspace. This option appears only if the user’s original invitation link has expired.
Note: You are allowed to change the details of other users, but not self.
Inviting users to join the platform
Use this procedure to invite a user to access the projects in a workspace by giving them a role. Only users with Admin role can send the invitation emails.
To invite users:
Select the workspace drop-down on the right-corner of the page and select Invite user. This opens the Invite users window for the workspace.

Select the User role. Possible values:
Admin
DataApp-View
User Role
Business Role
Select Invite type. Possible values:
Email Invite – An email invite is sent to the users.
Using Link (URL) – An auth link is shared with users.
Here, we are selecting the Invite type as Email Invite.
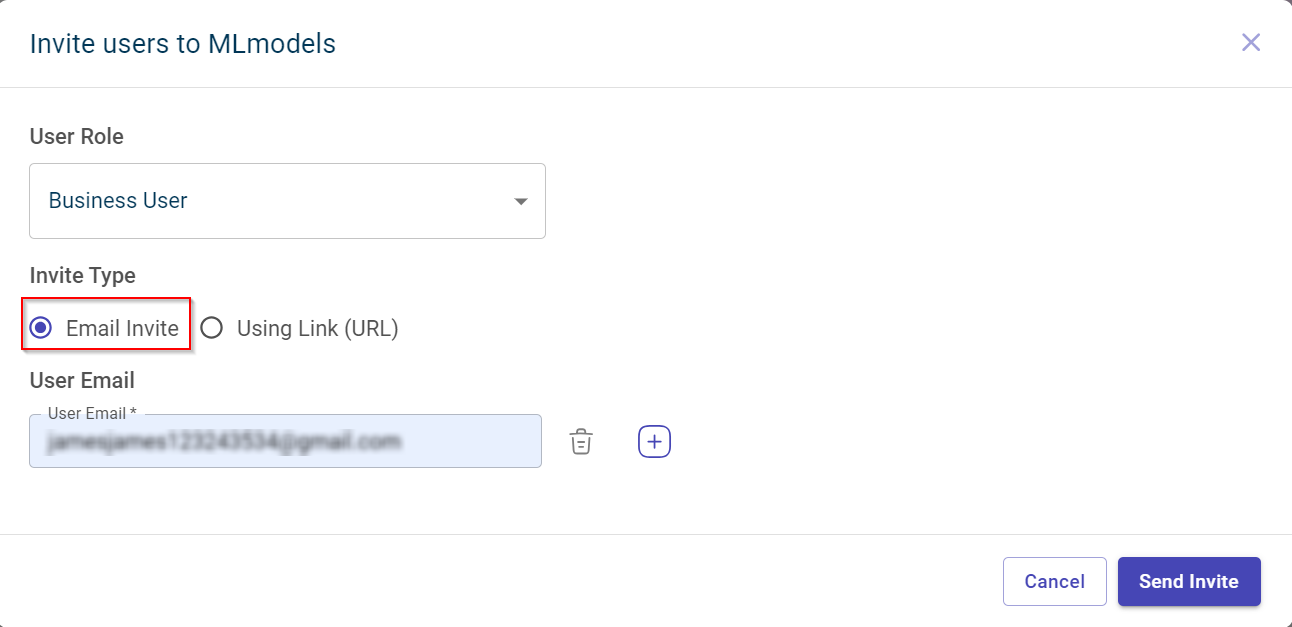
Provide the email address of the user in the User Emails field.
Note: This field is only displayed when the invite type is set to Email Invite. You can also enter multiple email addresses separated by comma or space at once.
Note
Use the cross button to clear the provided email addresses in this field.
Click Send Invite. An invite is sent to the user to the provided email address(es).
In the Users section, view the list of users and the invitations sent to them. The status of invited users is displayed as Pending until they accept the invitation. Once accepted, the status updates to Active.
Inviting users through link
Use this procedure to send an invite to users through link.
Select the Invite type as Using Link (URL).
Provide the email address of the user and click Generate Auth Link. The Auth link is populated in the Auth link field.

Click the Copy icon corresponding to the Auth link field to copy the link and share with the user(s).
Note
You can send invitation for one user to join multiple workspaces.
Editing a role
Use this procedure to change the user roles.
To edit a role:
Select the current workspace and select switch workspace to switch to the workspace in which you want to change the user role.
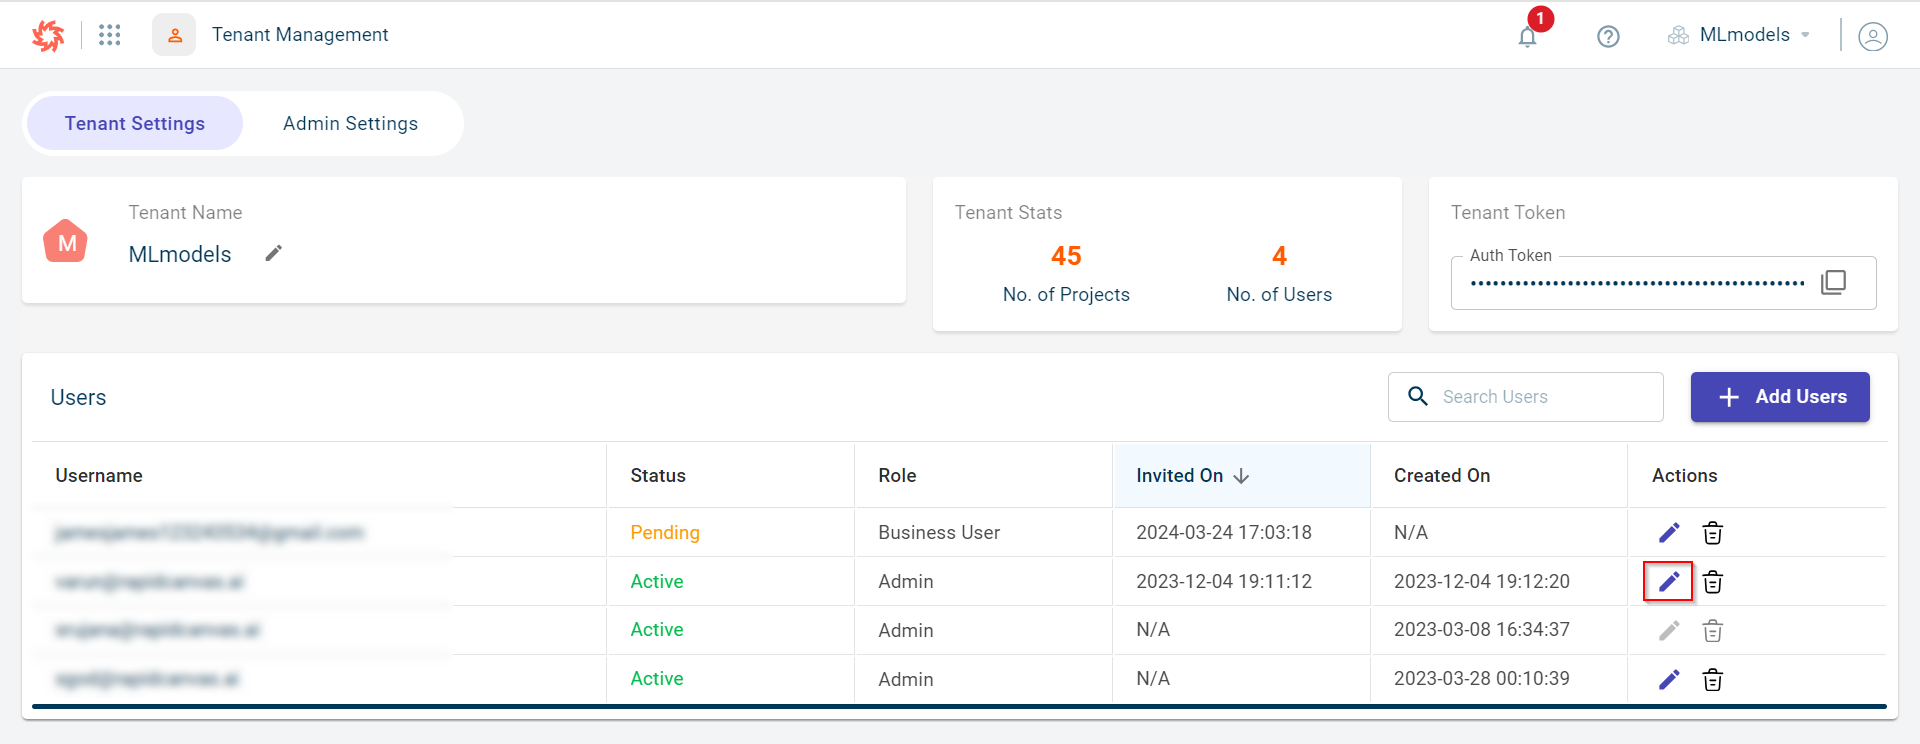
Select workspace Settings. The workspace Management page appears.
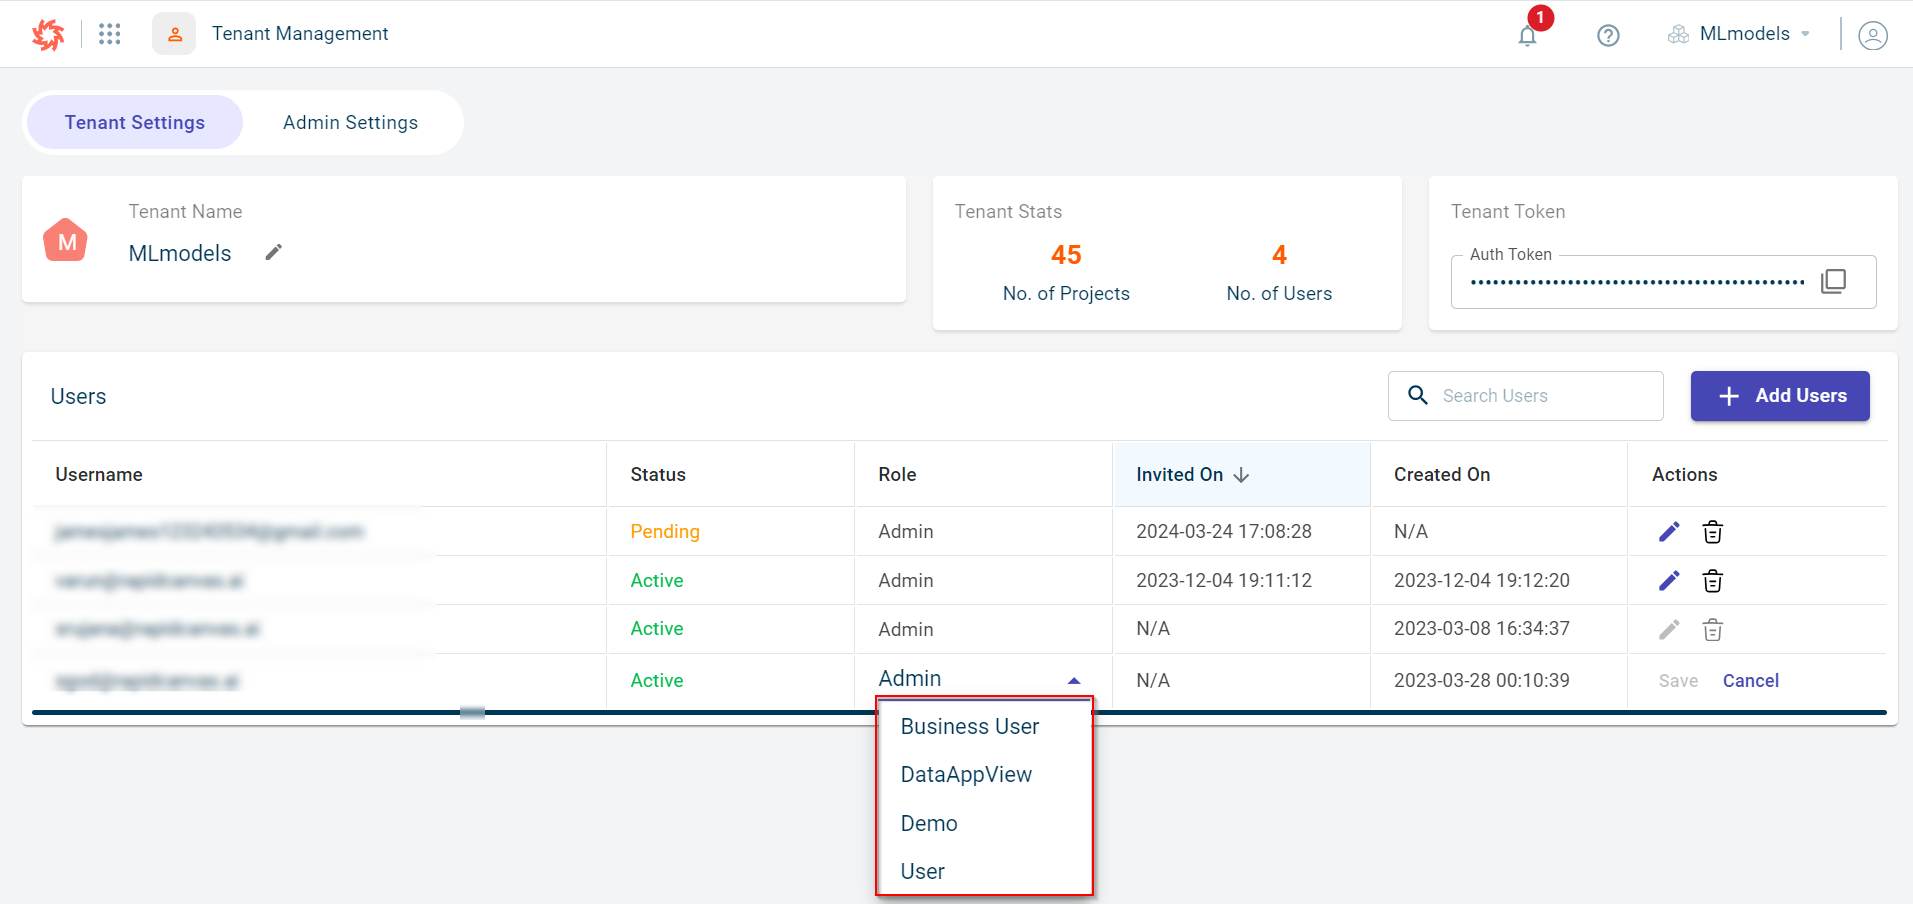
Click the Edit icon corresponding to the user whose role must be changed. The role Column is enabled with the drop-down to change the user role.
Select the appropriate role of the invited user. Possible values:
Admin- Can invite new users and remove users and have all permissions.
DataApp-View - Can only view the DataApp module.
User role - Can access all the features on the platform, but cannot invite new users or edit the details of existing users.
Business user - Can access projects, DataApps, and Connectors modules. The user with this role will not have permission to create, edit, and view some of the features on the platform. See details in this table User roles and permissions
Click Save once done.
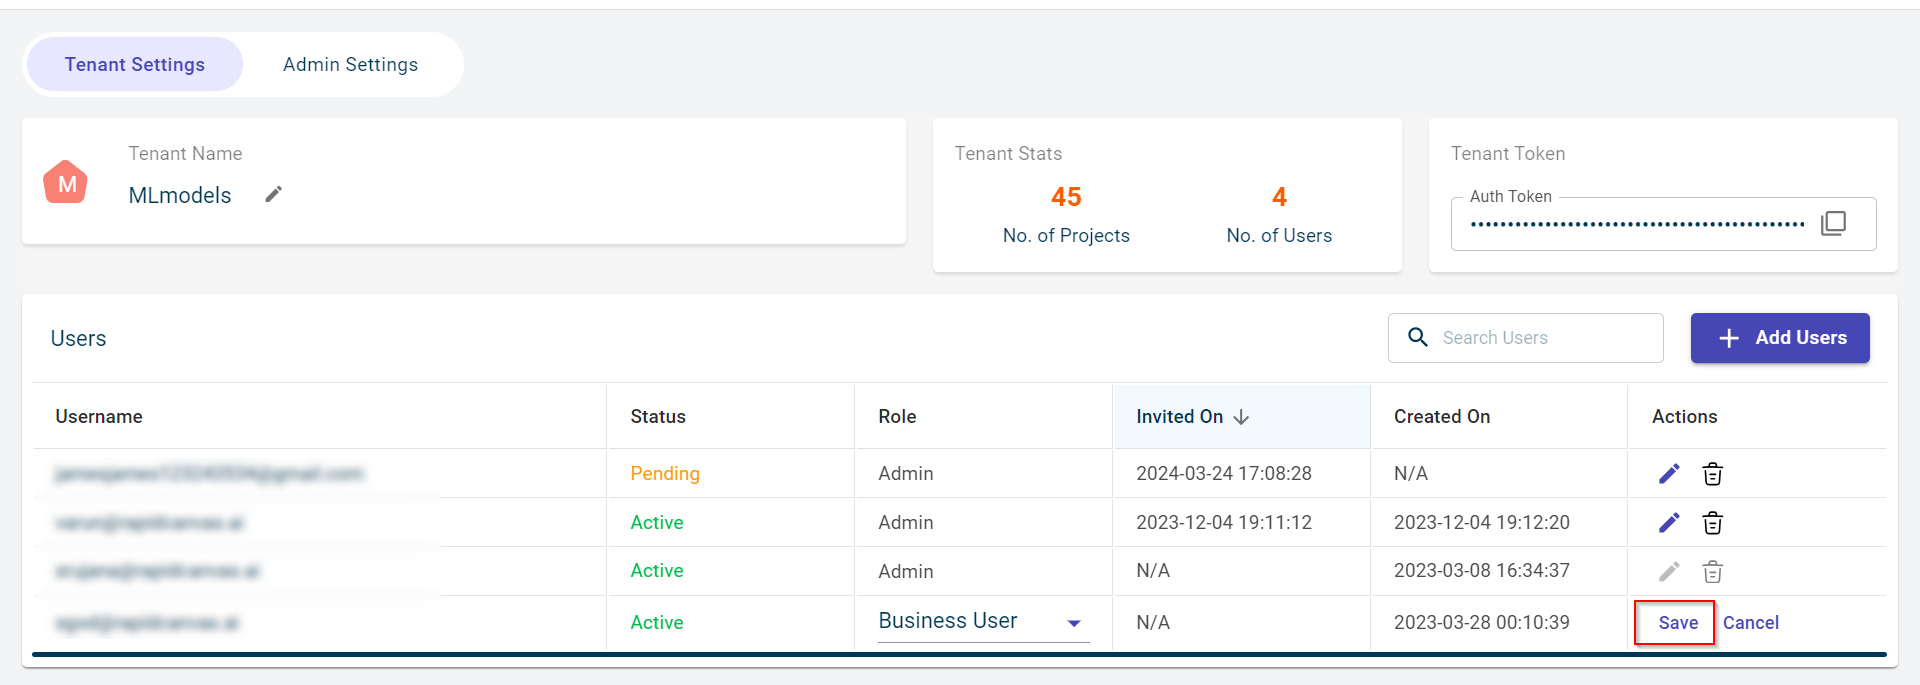
Note
Click Cancel to discard the changes.
Deleting a user
Only Admin users have permissions to delete a user from the workspace.
To delete users from a workspace, follow these steps:
Select the workspace and select Switch workspace. This opens the list of workspaces to which the admin has access to.
Select the workspace to which you would like to add the user.
Select workspace Settings of a workspace from which you want to delete a user. The workspace Management page appears.
Click the delete icon corresponding to the user whom you want to delete. The following prompt is displayed.
Click Remove to permanently remove the user from the workspace.
Reinviting the users
Administrators can resend the invitation to users in case the user has not received, deleted or could not sign up or join the workspace.
Note
The invitation link will be valid only for 14 days.
Select the workspace and select Switch workspace. This opens the list of workspaces to which the admin has access to.
Select the workspace to which you would like to add the user.
Select workspace Settings of a workspace from which you want to re-invite any user. The workspace Management page appears.
Click Re invite corresponding to the user to which the invitation must be resent. The Reinvite modal displays the email address to which the authentication link has been sent.
Switching between Workspaces
Some user accounts may have access to multiple workspaces. When logged in to the platform, the user will see the active workspace name on the dashboard. The switch workspace feature enables you to switch between multiple workspaces without having to log out. This is only for users who have access to more than one workspace.
To switch to another workspace from the dashboard:
Select the current workspace drop-down and select the arrow corresponding to this workspace to open the list of workspaces to which the user has access to.
Here, you can see the list of workspaces under workspace switch, workspaces with invalid license, and new workspaces.
Select the desired workspace from the Workspace Switch to access resources associated with it. If there are multiple workspaces, you can use the search function to quickly locate the specific workspace you need.
You can also view the workspaces with invalid license.
You can also accept to join the new workspaces from here.
To switch workspaces from settings:
Click the Profile icon on the dashboard and select Settings. The profile page appears.
Review this information in the workspaces section:
- Workspace Name:
The name of the workspace.
- Projects:
The number of projects linked to the workspace or available in this workspace.
- Users:
The total number of users associated with this workspace.
- Role:
The role of the logged in user.
Perform any of the following actions:
Switch - You can use this option to switch to another workspace in this environment.
Leave - You can leave the workspace. This option is displayed against the currently active workspace in an instance.
Accept - You can view and accept the invitation you received to join a new workspace from here.
Click Switch corresponding to the workspace to which you want to make a switch.
You can use the table settings icon to select only the columns you want to view and reorder them in the table using the reordering icon.
Changing the memory and CPU usage limit for Notebook
Use this procedure to change the CPU and memory resources allocated for Notebook based on the projects you are running.
To change the memory and CPU usage:
Click the Profile icon on the dashboard and select Settings. The profile page appears.
Allocate resources to run projects in Jupyter Notebook by specifying the desired RAM and CPU. You can allocate up to a maximum of 16GB RAM and 8 GHz CPU.
Click Apply to allocate the resources. Once allocated, the settings are saved automatically. However, you have to relaunch the Notebook if you are already on Notebook after changing the settings.
User roles and permissions
A role in the RapidCanvas platform defines the specific actions a user can perform and the features they can access. Roles are designed to ensure that users have the appropriate level of access based on their responsibilities and requirements. The platform provides four predefined roles: Admin, DataApp-View, User, and Business User. Each role is configured with distinct permissions to streamline workflows, maintain security, and prevent unauthorized access.
Admin
Admins have full read and write access to all modules and features across the RapidCanvas platform, allowing complete control and management capabilities.
DataApp-View
This role provides read-only access to DataApps, enabling users to view information without making changes.
User
Users with this role have comprehensive read and write access to all platform features. However, they cannot invite new users or modify the details of existing users.
Business User
Business users have read and write access to projects, DataApps, Rapid Model recipes, AI-assisted recipes, and connectors. However, they are restricted from creating, editing, or deleting scenarios, segments, and global variables. They are also unable to configure the timeout period for Rapid and AI-assisted recipes.
Each role has permission to perform the tasks mentioned in the table below.
Module |
Admin |
DataApp-View |
User role |
Business User |
|---|---|---|---|---|
Projects |
||||
View a project |
✓ |
✓ |
✓ |
|
Run a project |
✓ |
✓ |
✓ |
|
Create a project |
✓ |
✓ |
✓ |
|
Update or delete a project |
✓ |
✓ |
✓ |
|
Entity |
||||
View an entity |
✓ |
✓ |
||
Create an entity |
✓ |
✓ |
||
Update or delete an entity |
✓ |
✓ |
||
Template Recipe |
||||
View a recipe |
✓ |
✓ |
||
Create a recipe |
✓ |
✓ |
||
Update or delete a recipe |
✓ |
✓ |
||
AI-assisted Recipe |
||||
View a recipe |
✓ |
✓ |
✓ |
|
Create a recipe |
✓ |
✓ |
✓ |
|
Update or delete a recipe |
✓ |
✓ |
✓ |
|
Rapid Model Recipe |
||||
View a recipe |
✓ |
✓ |
✓ |
|
Create a recipe |
✓ |
✓ |
✓ |
|
Update or delete a recipe |
✓ |
✓ |
✓ |
|
Environments |
||||
View an environment |
✓ |
✓ |
||
Create an environment |
✓ |
✓ |
||
Update or delete an environment |
✓ |
✓ |
||
Data connectors |
||||
View a dataconnector |
✓ |
✓ |
✓ |
|
Create a dataconnector |
✓ |
✓ |
✓ |
|
Update or delete a dataconnector |
✓ |
✓ |
✓ |
|
Notebooks |
||||
Can access the notebook editor |
✓ |
✓ |
||
DataApps |
||||
View a dataApp |
✓ |
✓ |
✓ |
✓ |
Create a dataApp |
✓ |
✓ |
✓ |
|
Update or delete a dataApp |
✓ |
✓ |
✓ |
|
Artifacts and Models |
||||
View artifacts and models |
✓ |
✓ |
||
Create artifacts and models |
✓ |
✓ |
||
Update or delete artifacts and models |
✓ |
✓ |
||
workspace Management |
||||
View workspaces |
✓ |
✓ |
||
Create a workspace |
✓ |
✓ |
||
Update or delete a workspace |
✓ |
✓ |
||
User Invitation |
||||
View users |
✓ |
✓ |
||
Invite users |
✓ |
✓ |
||
Assign roles to users |
✓ |
✓ |
||
Scenarios |
||||
Create a scenario |
✓ |
✓ |
||
View scenarios |
✓ |
✓ |
||
Run scenarios |
✓ |
✓ |
||
Update or delete a scenario |
✓ |
✓ |
||
Segments |
||||
Create a segment |
✓ |
✓ |
||
View segments |
✓ |
✓ |
||
Update or delete a segment |
✓ |
✓ |