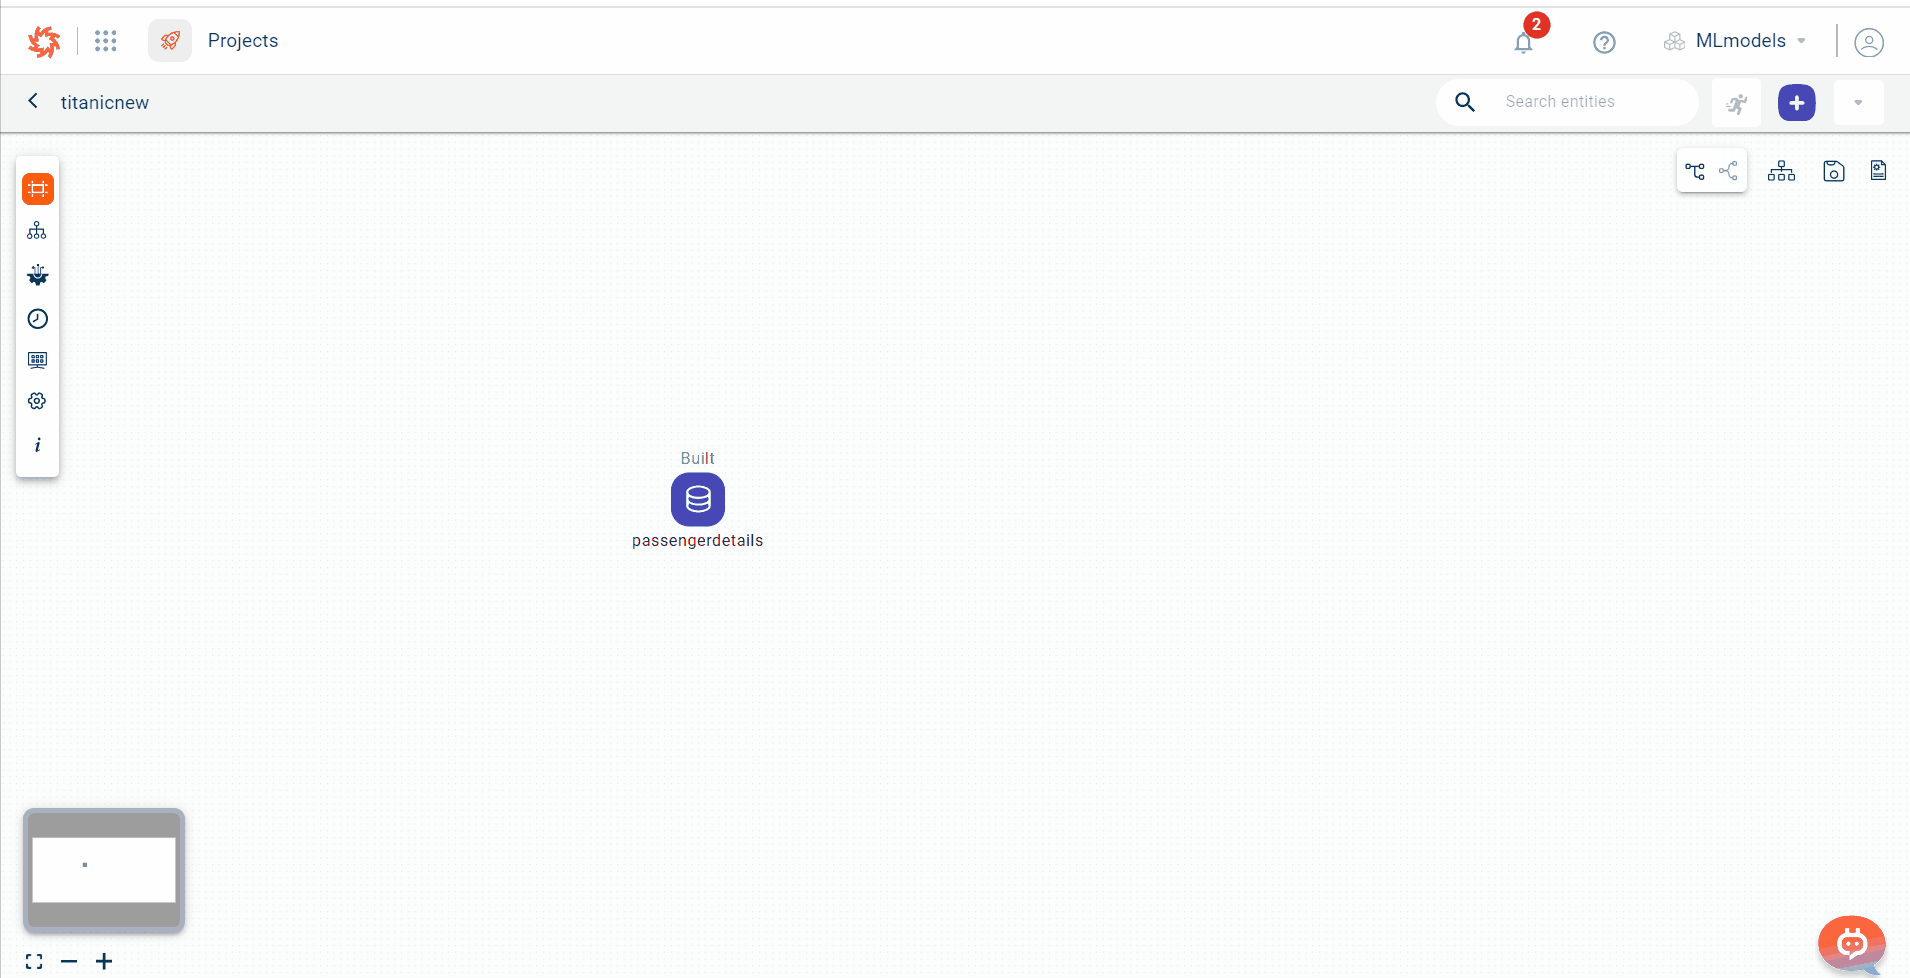
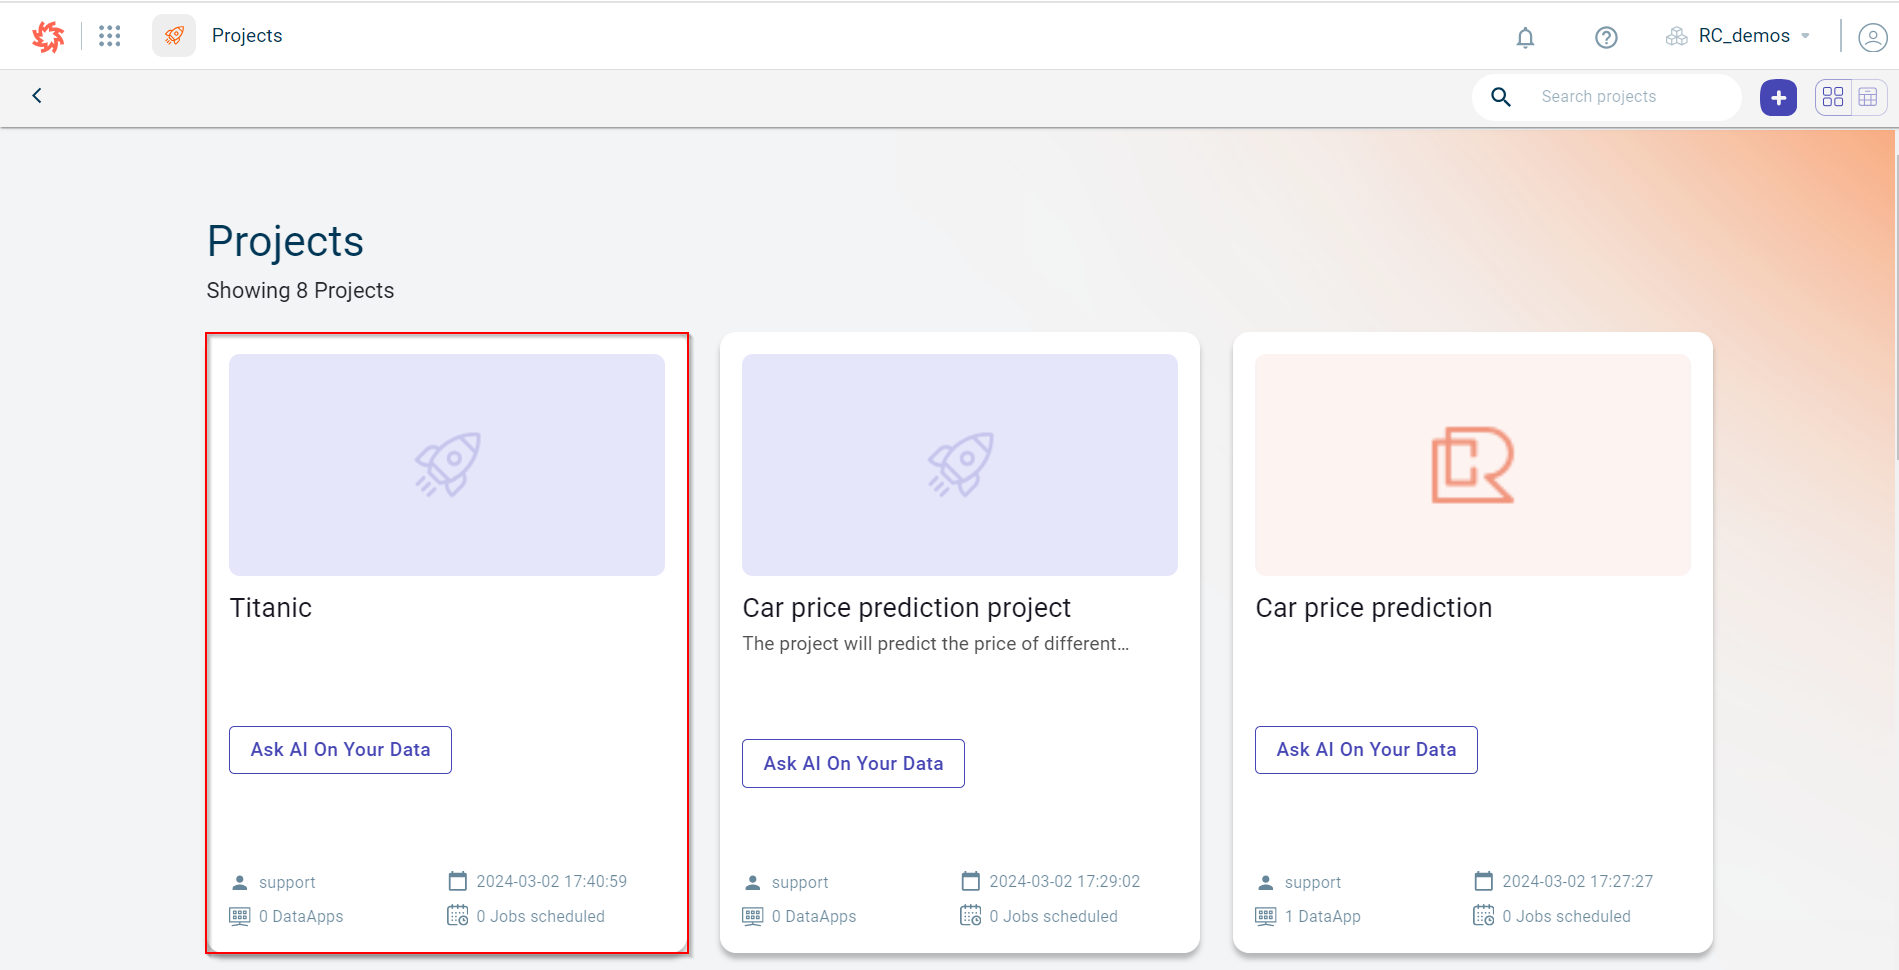
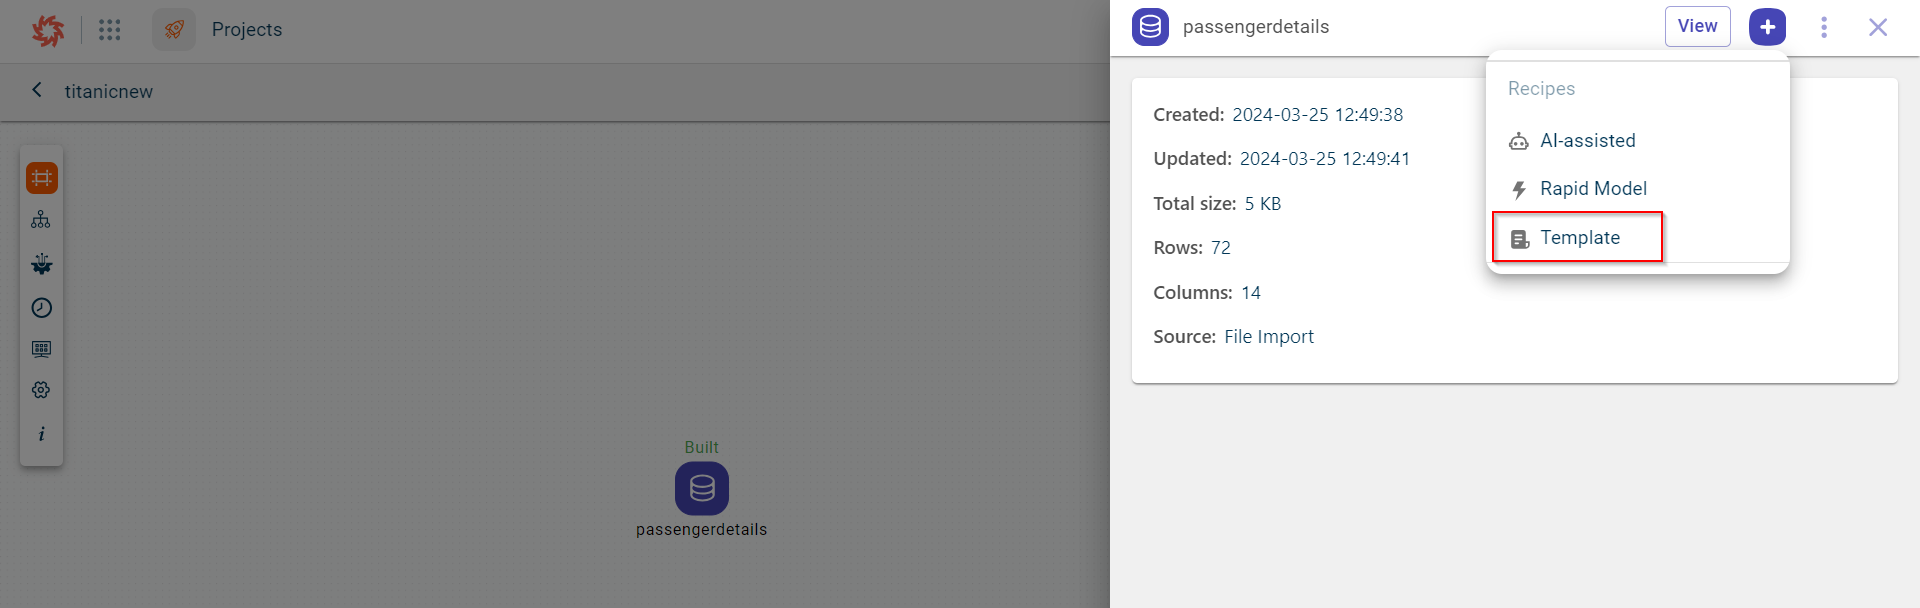
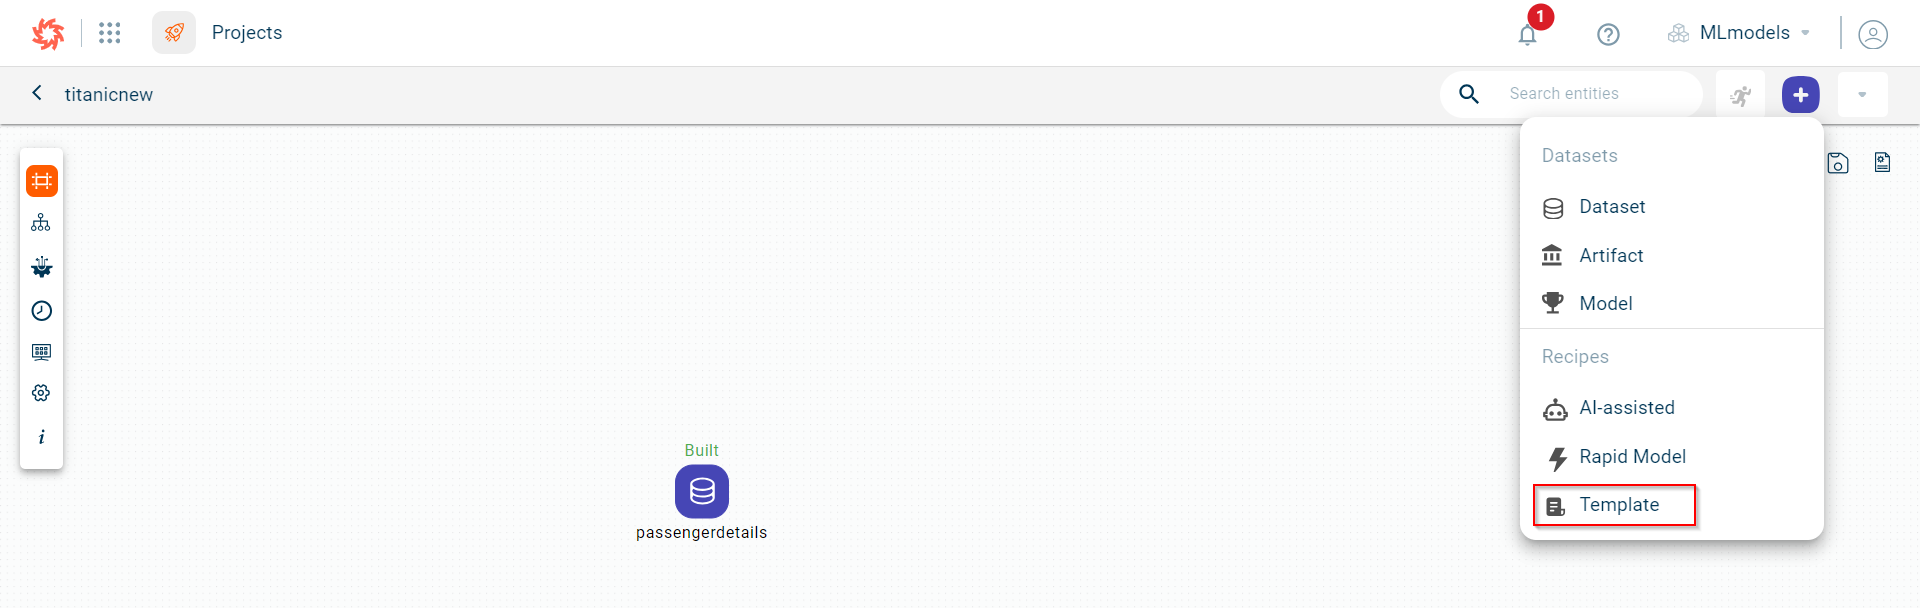
Recipes
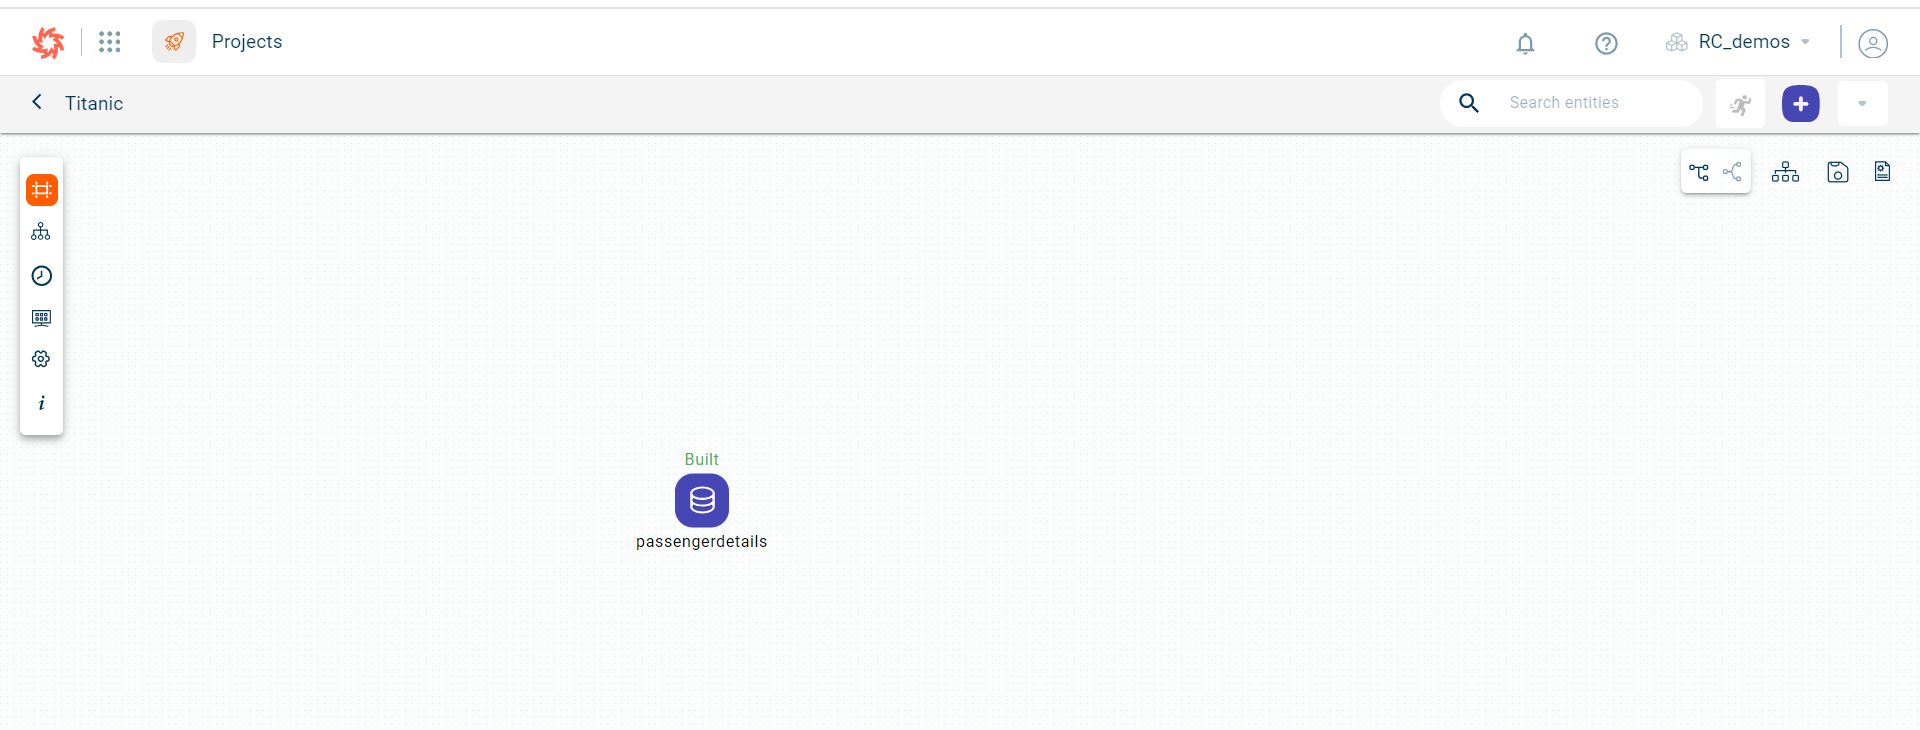
A collection of recipes is used to build a machine learning model. Each recipe consists of a series of transformations that are applied to a dataset. These transformations perform specific actions at different stages of the model-building process. You can run these recipes on an uploaded dataset to achieve the desired transformations. After running a recipe, the transformed output is generated, which could be a dataset or a chart. You can then apply additional recipes to this output, continuing the process until you achieve the desired result.
Recipe Types
The platform provides users with four distinct types of recipes to build and transform machine learning models:
AI-Assisted Recipe: This type of recipe leverages the power of artificial intelligence to assist users in creating code-based solutions. Users can either allow the AI to generate the code automatically or write their own custom logic using Python. This feature is particularly useful for those who want to develop complex transformations or model-building steps with the help of AI.
Rapid Model Recipe: This option is designed for users who may not have coding expertise. Without the need for programming or using advanced recipe types, users can quickly build machine learning models with just a few clicks. The Rapid Model recipe simplifies the process, allowing even non-technical users to develop data pipeline and thereby models efficiently.
Template Recipe: The Template recipe allows users to apply predefined templates for data transformation and model-building tasks. These templates are pre-configured to handle common data transformation operations, streamlining the process for users who need ready-made solutions for their datasets.
API Connector Recipe: This recipe type is designed for users who wish to integrate external APIs into their workflow. By writing Python code, users can create or manipulate datasets by connecting to external services, running recipes on the dataset, and generating the desired outcomes.
AI-assisted recipe
If there are no standard templates for performing data transformations, AI-assisted recipes can be used. This functionality integrates AI capabilities, allowing business users to prompt AI to generate code based on their input. Once the code is generated, it can be added to the recipe and run through the data pipeline, displaying the output as datasets or charts.
You can also ask questions about the dataset directly in the chat and receive accurate answers from the AI. After receiving the AI response, you can easily express your satisfaction using the thumbs-up or thumbs-down options.
Ask AI
Click on the dataset block in the canvas and select the AI-assisted option from the Add recipes drop-down. This opens the code editor, where you can prompt the AI to generate a code snippet based on your input.
Select the Dataset
You need to select the dataset on which you want to apply the data transformation and generate code based on the given prompt. You also have the option to choose the output type: dataset, chart, text, or model. If you select dataset as the output, up to five datasets can be generated and added to the data pipeline, depending on the given prompt.
Add the Generated Code to Recipes in the Data Pipeline
Use the +Add to recipe option in the AI-assisted code editor to include the AI-generated code in the data pipeline. This option becomes available only after running the text prompt.
Save and Run the Code Recipe in the Flow
After saving the code, click on the run option to execute the AI-assisted (code) recipe and generate the output, which can be in the form of a dataset or a chart. You can continue building custom templates or code recipes using the Ask AI feature.
Adding an AI-assisted recipe
Use this procedure to add an AI-assisted recipe to the data pipeline or ML flow using the integrated AI tool. The recipes can be related to data pre-processing or building a model.
Note
If the application is installed in the customer’s Virtual Private Cloud (VPC) environment, features that rely on external API calls will be restricted. If a user tries to access these features, a notification will inform them that the admin has disabled these features.
To add and run an AI-assisted recipe:
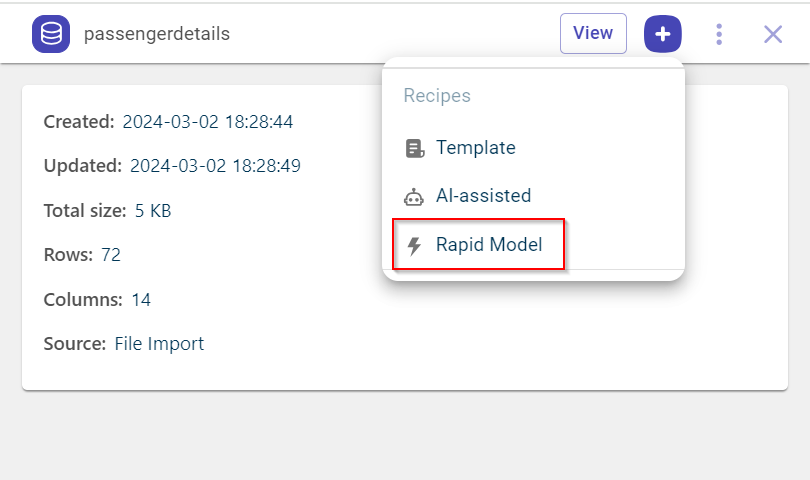
Click the dataset block on the canvas to open the pull-out window.
Select the recipe
Click the plus icon
 and select the AI-assisted recipe in the pull-out window.
This opens the Ask AI tab where you can type the text prompt in the provided query box to generate the code recipe.
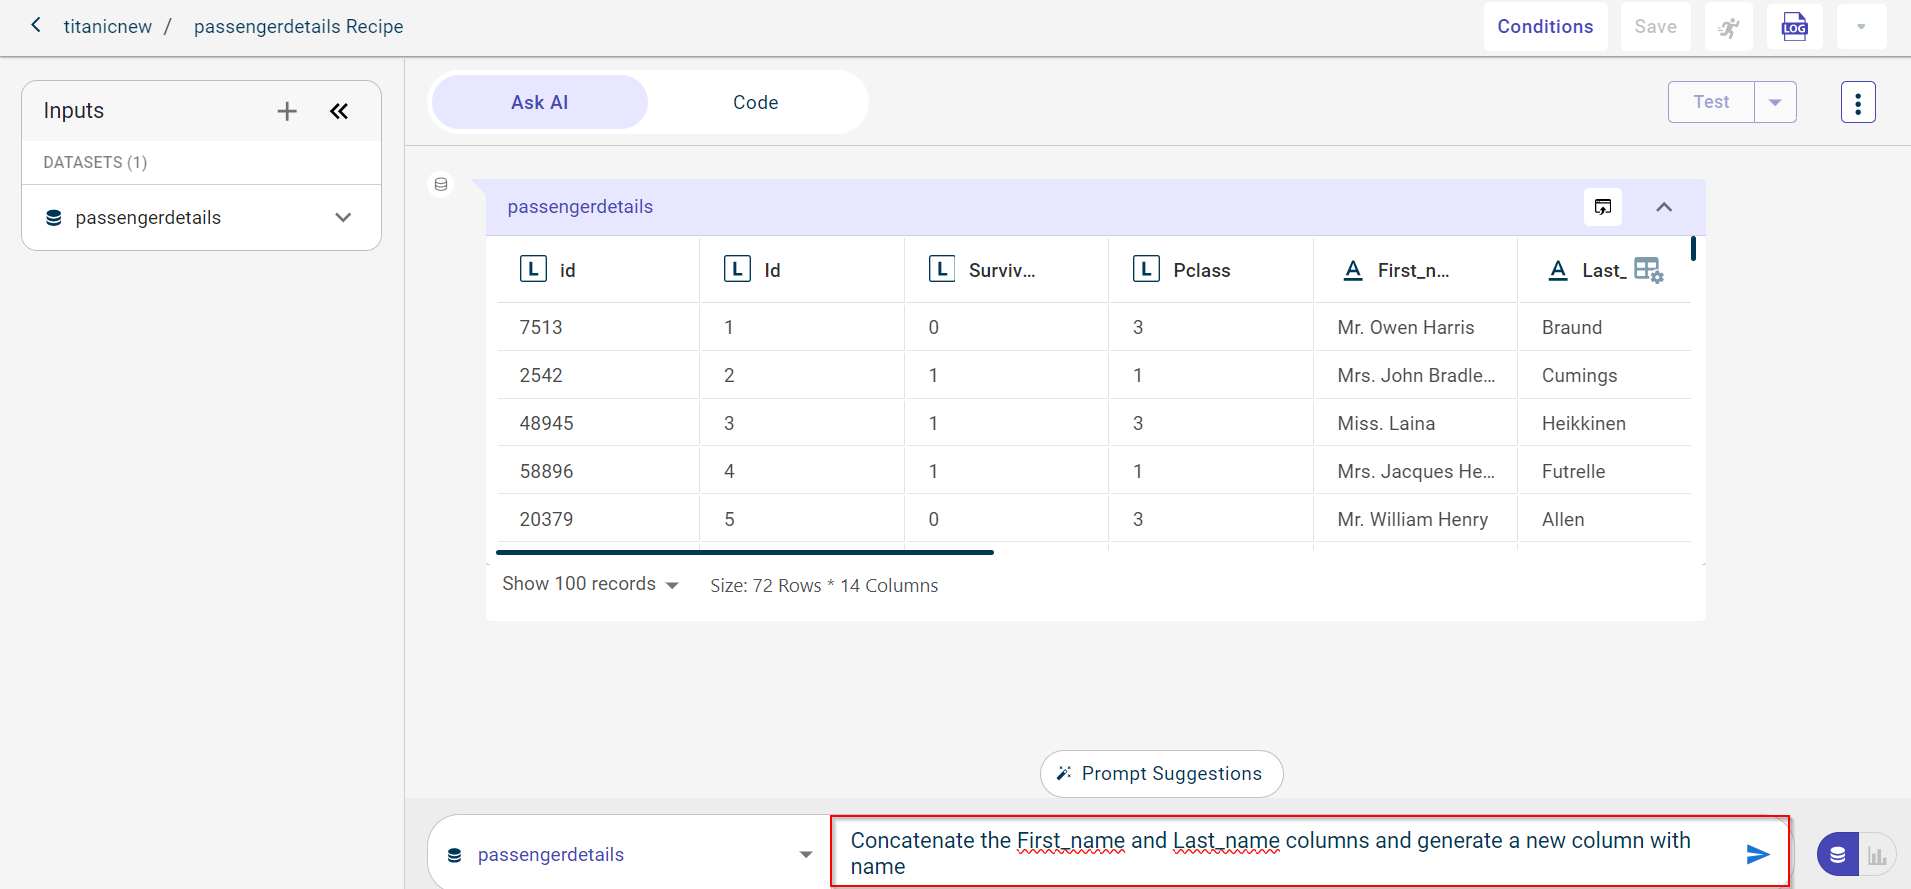
If you want to view the column names and data type of each column in the uploaded dataset, you can expand the datasets in the Inputs section on the left.
Note
Use the delete icon to delete the uploaded dataset.
Use the plus button to add multiple datasets to use in the code recipe. In the drop-down, you can only find the datasets that you have added onto your Project canvas. If there is only one dataset on the canvas, this button remains disabled.
Select the dataaset to run the recipe
By default, the input dataset is selected from the list. Here, the input dataset is Titanic.
Note
You can select maximum of four datasets.
Enter the text prompt
Enter the query in the provided query box. In this example, we have provided the query to concatenate two columns in the dataset and generate the code for this, “Concatenate the First_name and Last_name columns and generate a new column with name”.
You can use @ in the query box to get the list of column names available in the selected dataset.
Note
(Optional) From the ellipses icon, select Generate Query Limit to run the query only on the selected number of rows in the dataset. You have three options to select from:
Full data
100k rows
1 million rows
Select the output type you want to generate
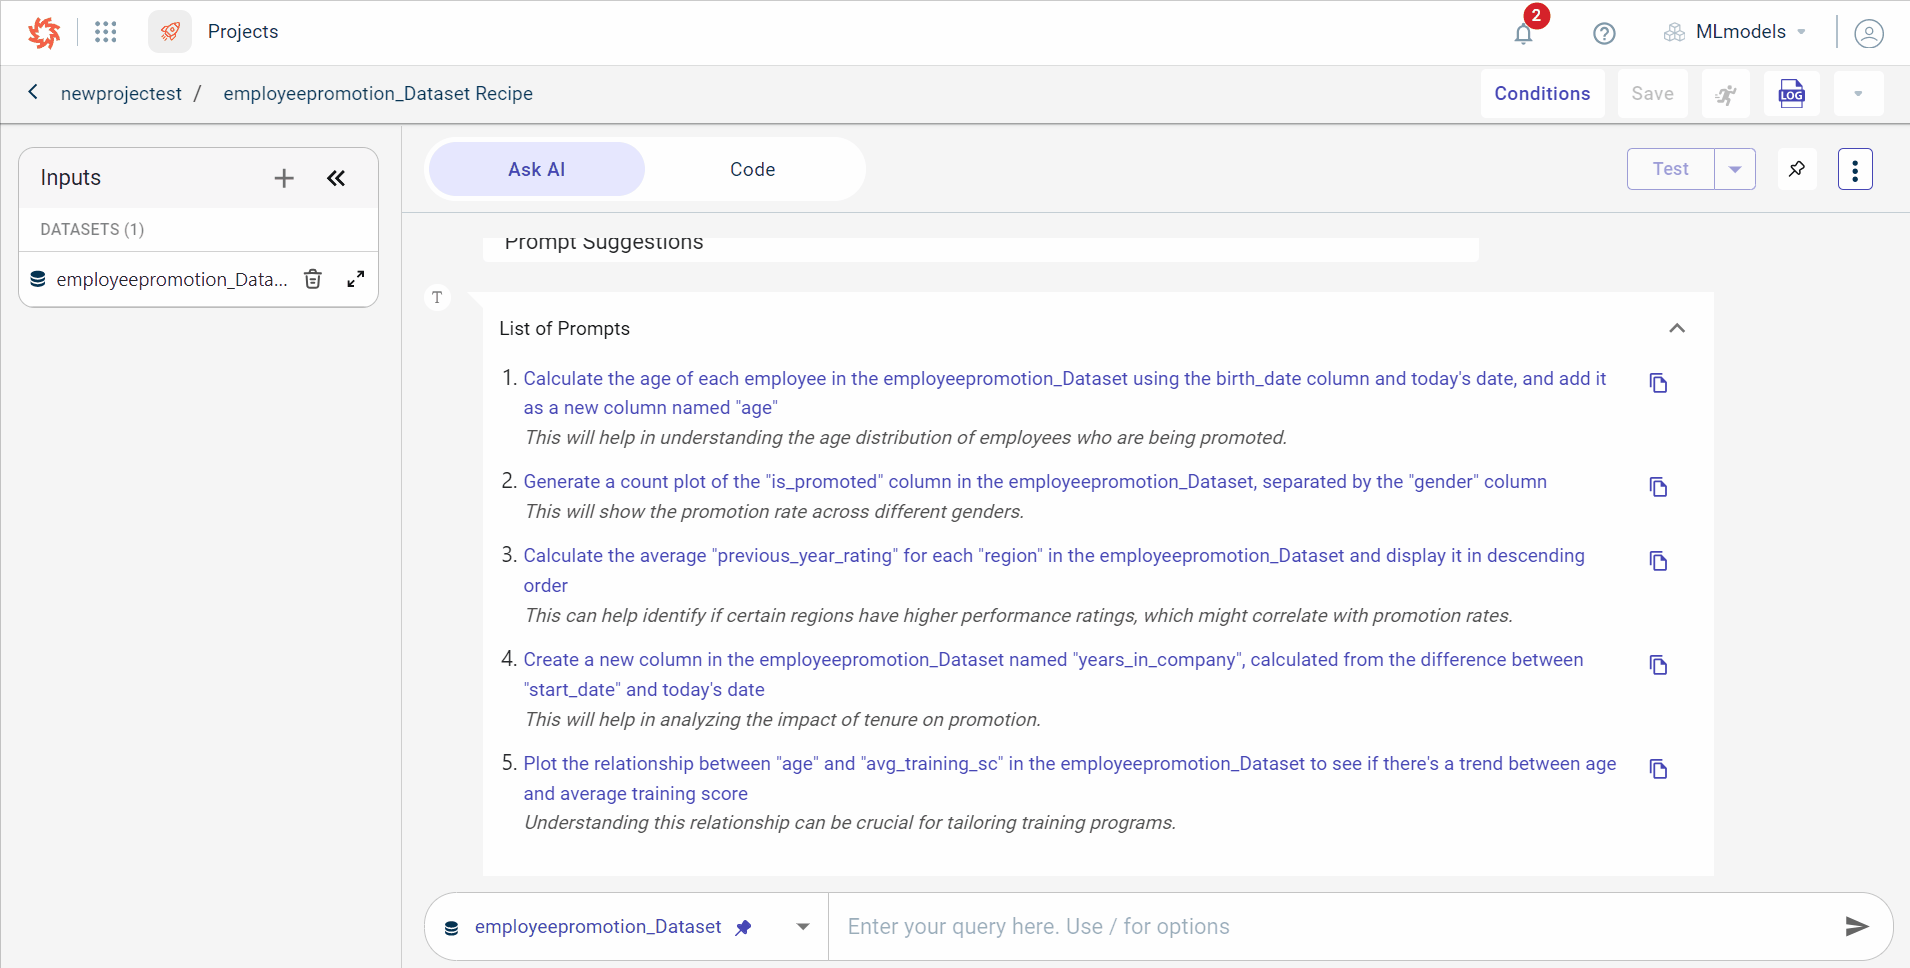
Type a slash (/) in the query box to choose the type of output you want the AI to generate for your query, such as a dataset, chart, model, or text. You can also view prompt suggestions option. Select this option and press enter to view prompt suggestions for the selected dataset. Besides the suggested prompts, you can also ask a query to generate additional prompt suggestions.There is also a run button appears next to each prompt. You can run the prompt directly from the chat window.
If you do not select the output type, the platform will auto-detect the output type based on the entered prompt.
Generate the code
Click the generate icon
 to generate the code. The generate button is enabled only after you select the dataset and provide the query.
The AI consumes the text prompt and generates the related code for concatenating two columns. You can see the output generated by the AI with the dataset size (total columns and rows)
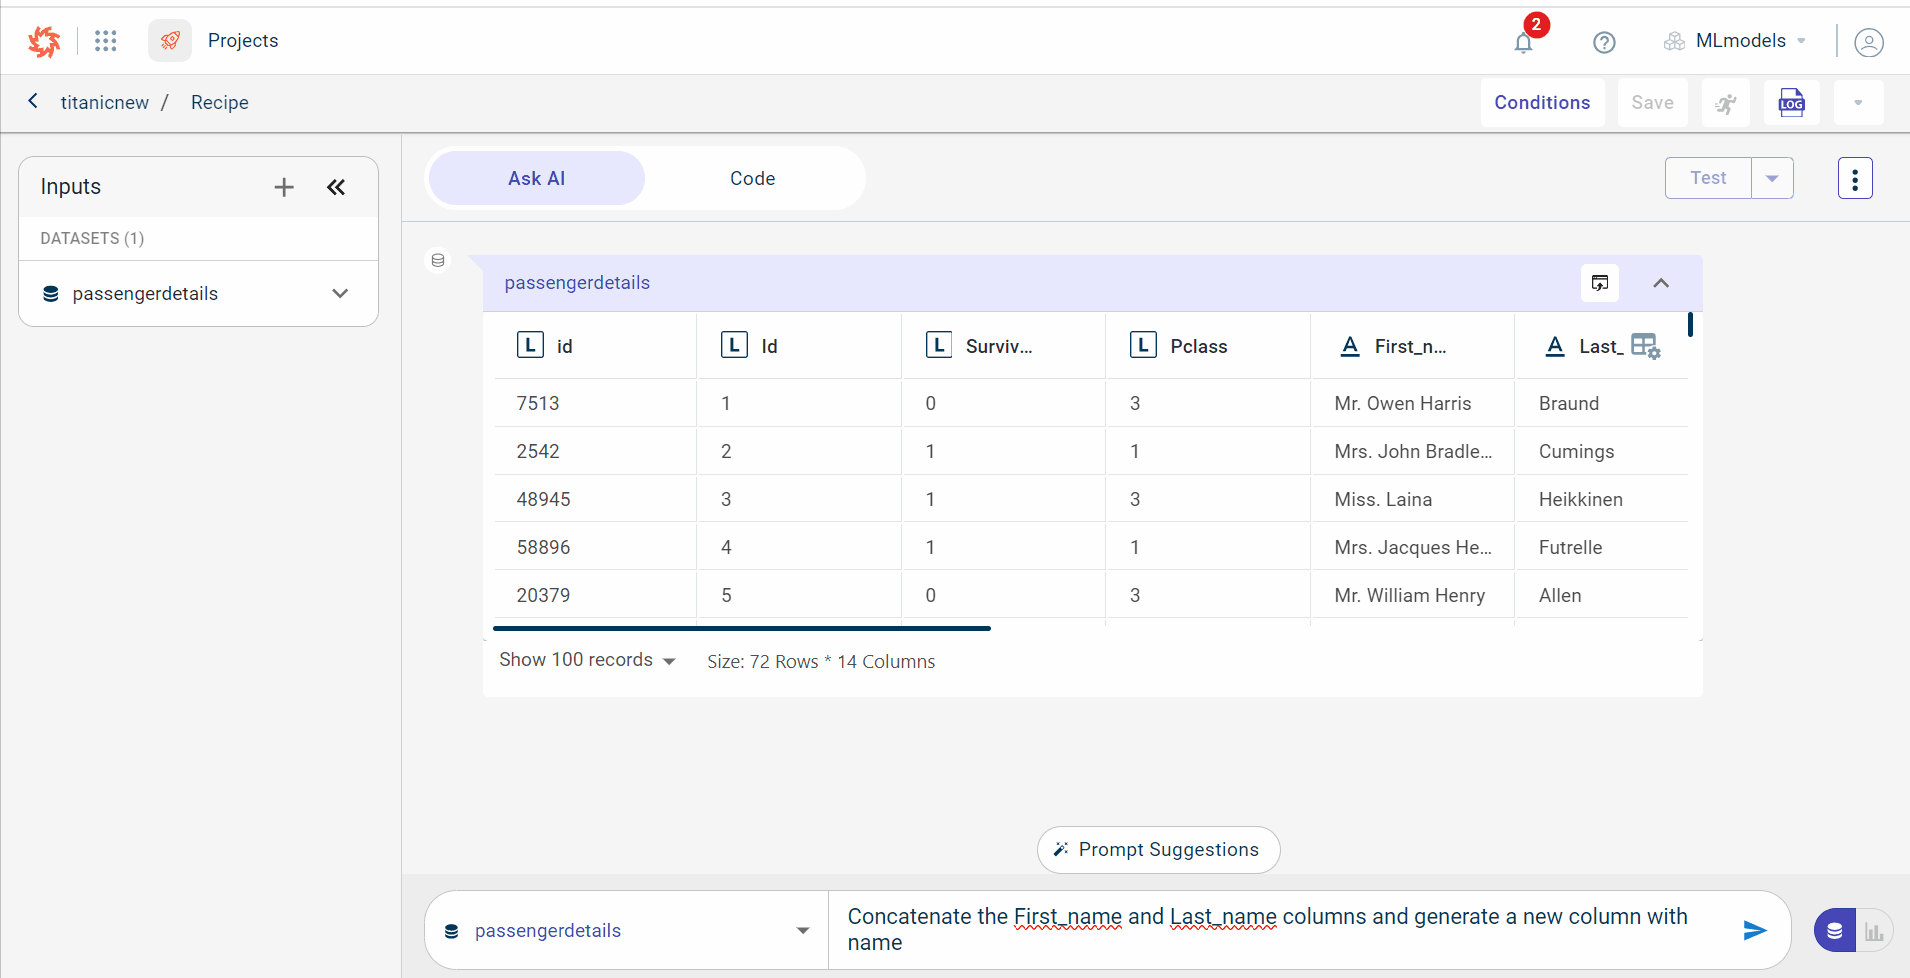
You can only view 100 records in the output dataset. If you want to see lesser record, select the number of records you want to view from the drop-down list. You can also view the size of the dataset.
You can pin the generated dataset to use this dataset as a source to run the subsequent set of recipes. If you want to unpin, you can click on the unpin icon that is next to the Test button to unpin all datasets.
For the text responses, you can use the Copy answer option to copy the responses.
View the code
Click the View Code icon
 to view the code generated by the AI for the given prompt for all types of outputs, such as datasets, text, and charts. It is optional to view the code. You can go back to View output using the View Output icon.
You can use the thumbs up and thumbs down to indicate your satisfaction with the output generated by AskAI for a given query. When you select the thumbs up, you can report whether the response generated by AskAI was incorrect, an error, gibberish, an incomplete response, or if there was another issue.
You can generate up to five datasets based on the given prompt in the AskAI.
You can click View Code to access the Explain option. This feature adds comments to each line or code block generated by Ask AI, helping users understand the logic and functionality behind the code.

Add the generated code to recipe
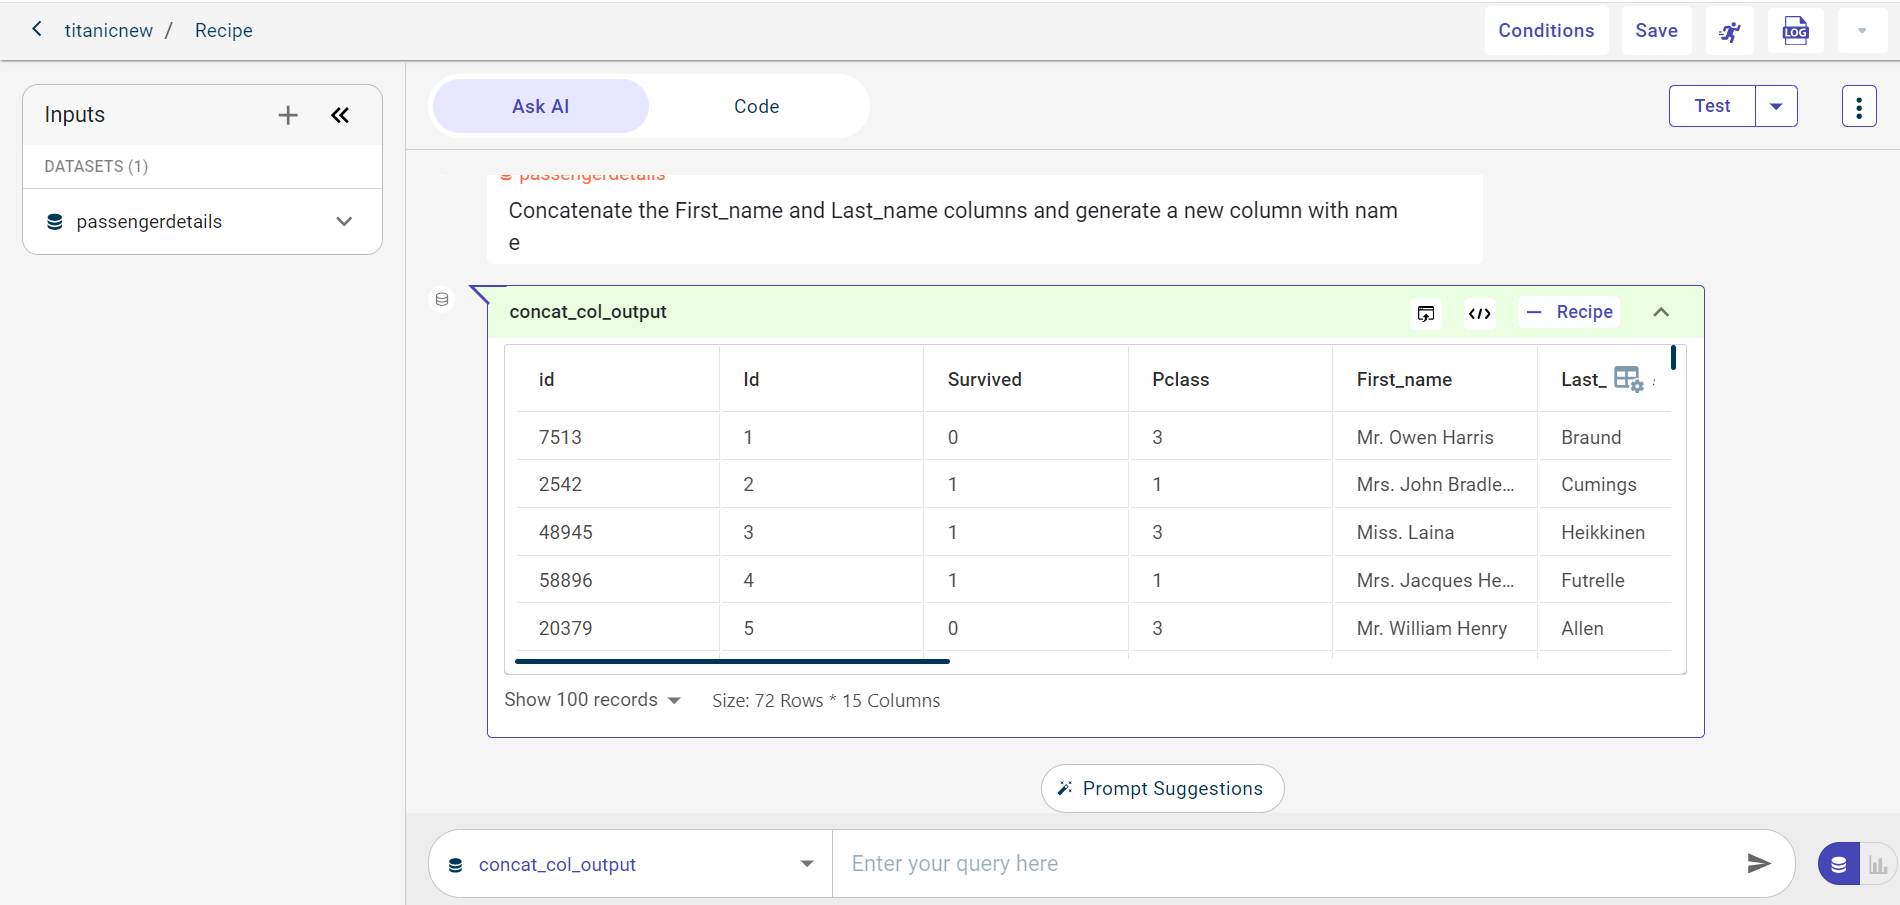
Click + Recipe to add the template for concatenating two columns to the recipe in the data pipeline. If you want to remove the recipe, click Remove from Recipe to remove from the pipeline.
Note
You can use the dataset generated by this recipe as an input for the next prompt using the Query icon.
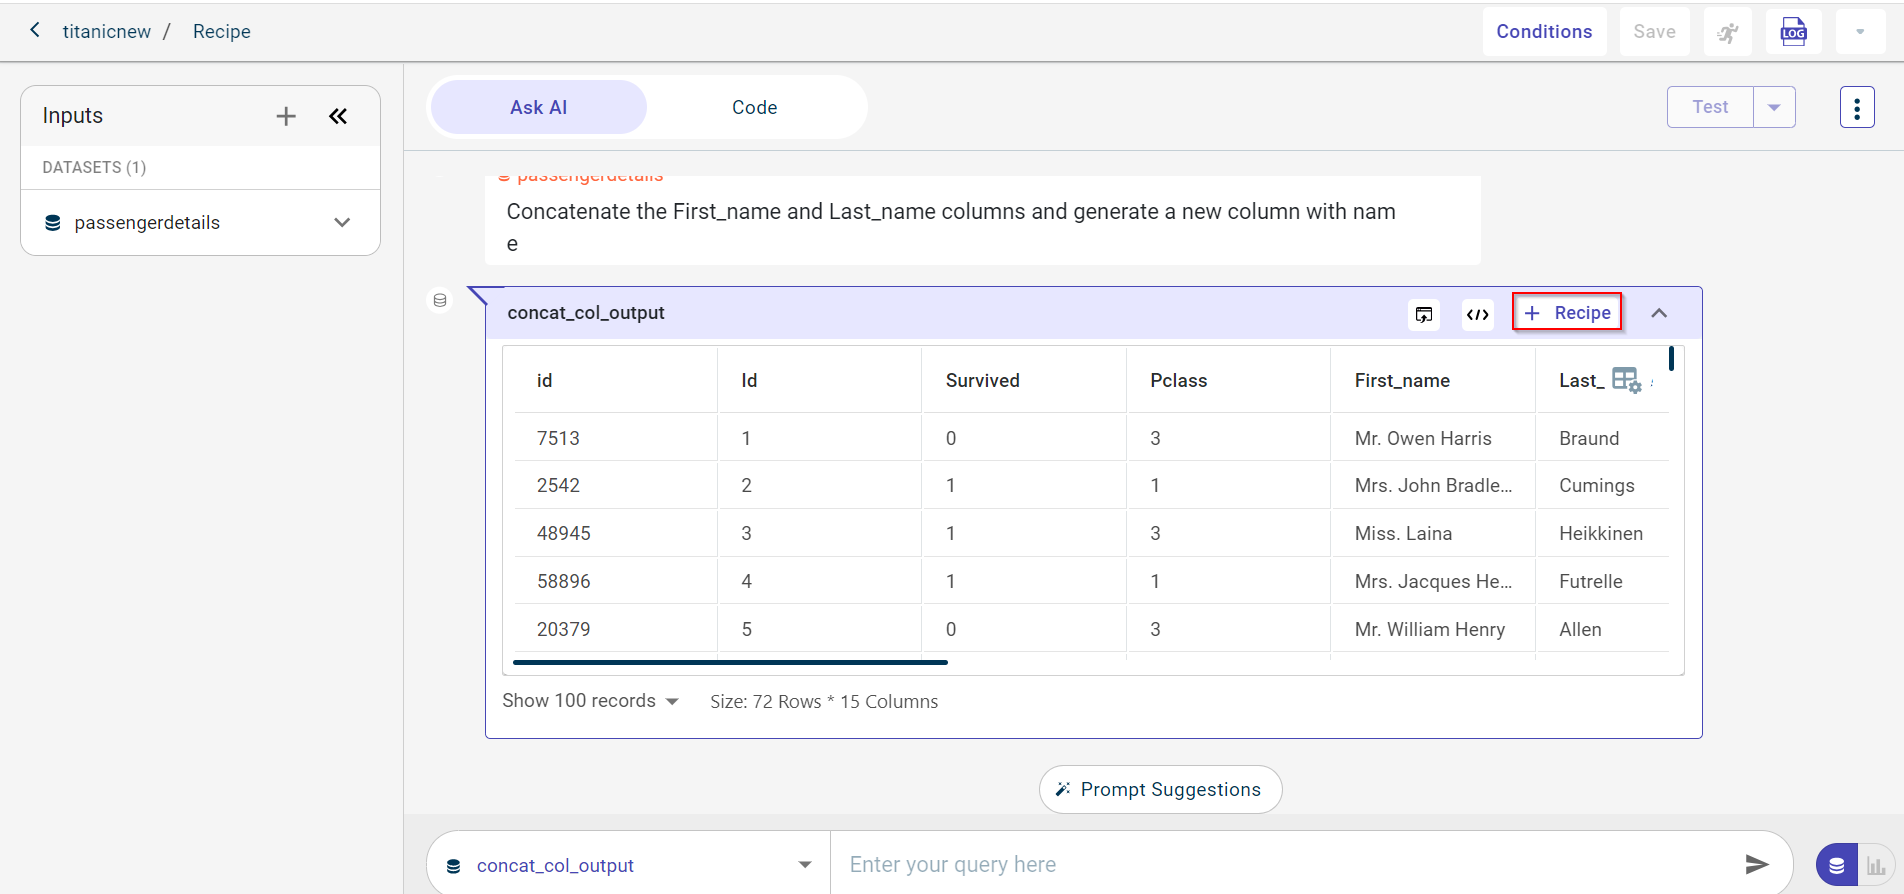
Provide the custom name for the recipe.

Click Add to Recipe. After adding, you can see a green color line indicating the addition of this recipe to the data pipeline.
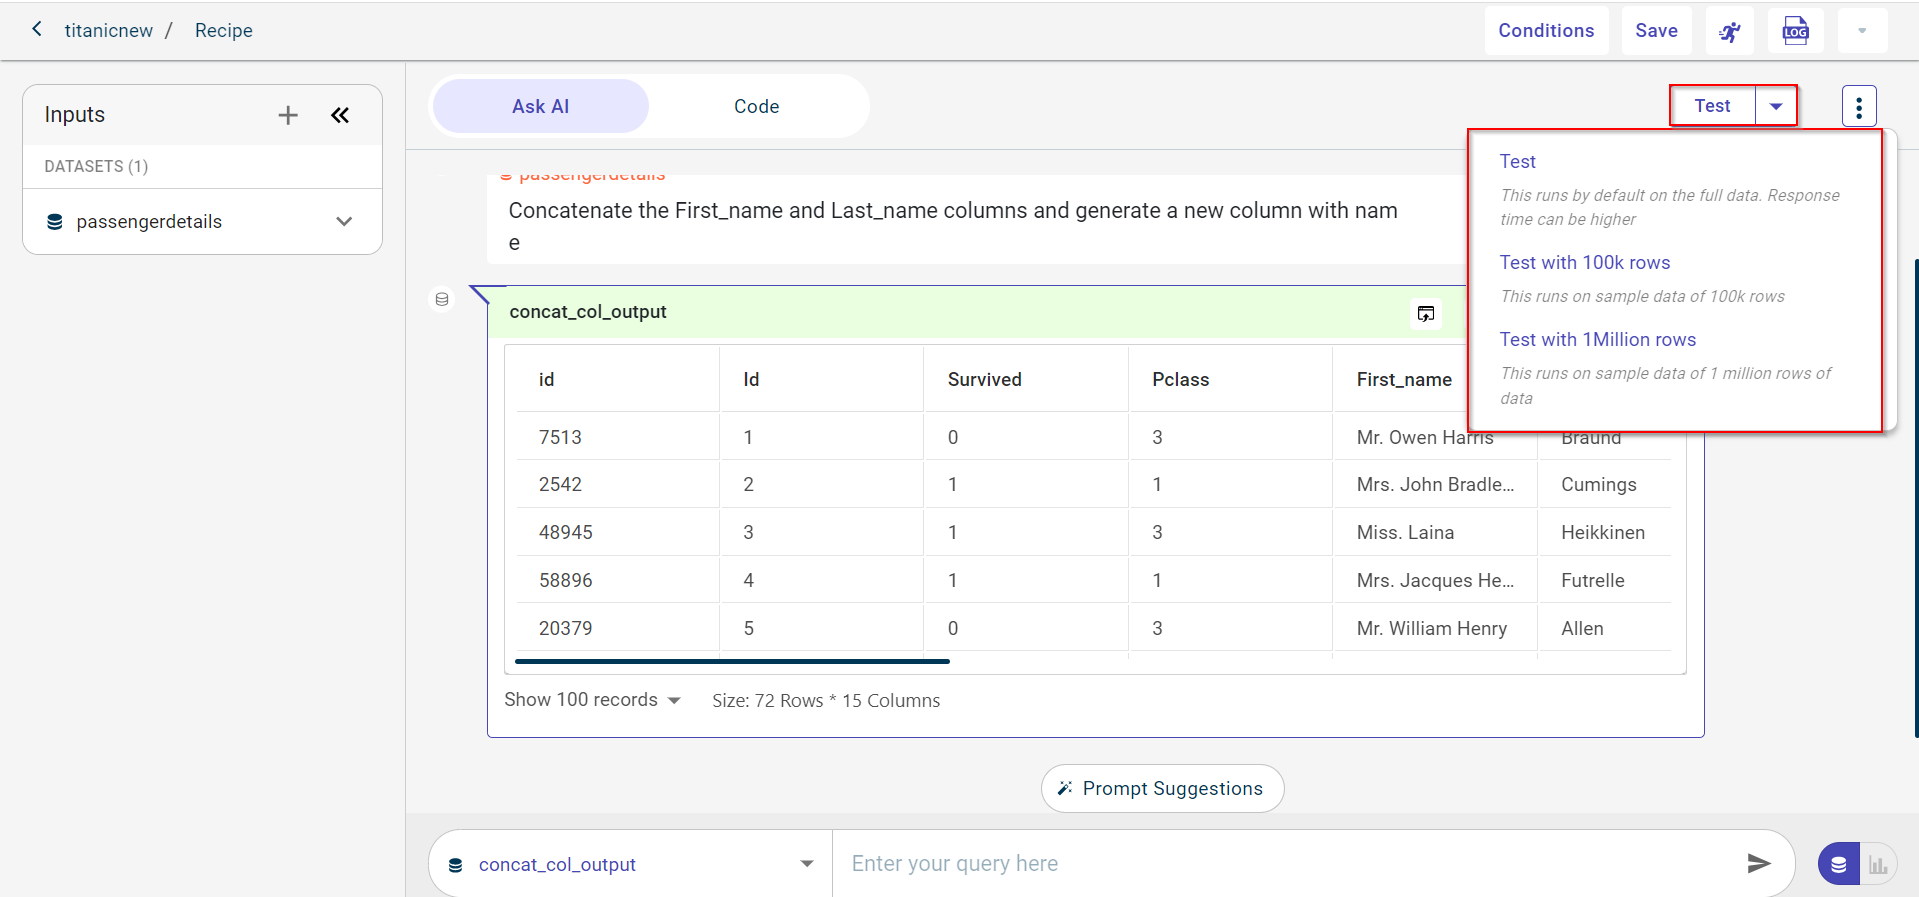
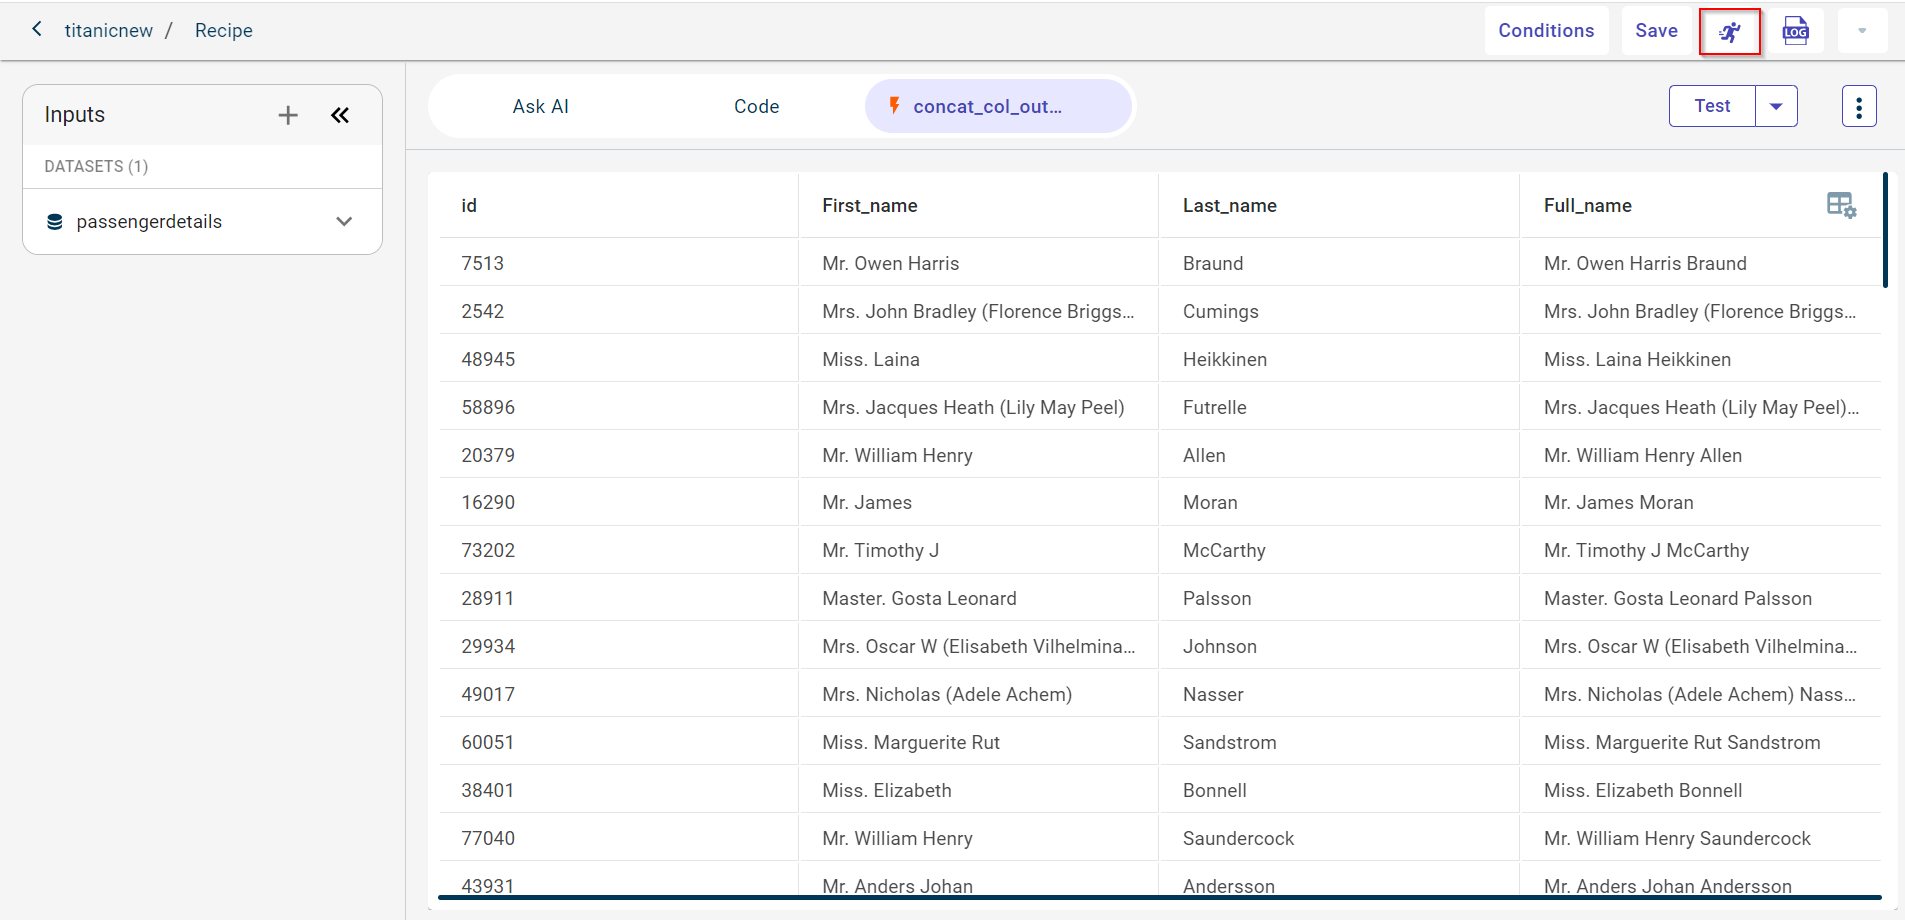
Test the recipe on the dataset
Click Test and select a test option to test the recipe on full dataset, 100k rows, or 1 million rows before saving and running this recipe in the data pipeline. Possible options:
Test (full data)
Test with 100k rows
Test with 1 Million rows
Note
You can use the Stop button to halt the recipe execution at any point during its test run. Additionally, you can view the test outputs for the dataset, artifact, and model.
You can see the test output dataset in a new tab as shown in the screenshot below:
You can also view logs while testing the recipe by clicking the Log for Test option. This provides access to detailed records and allows you to either download the logs as a text file or open them in a new browser tab for a more detailed view.
Save and run the recipe in the datapipeline
Click the Run button to run the recipe and view the output on the canvas. If needed, you can stop the recipe at any time by clicking the Stop button.
Keyboard Shortcuts:
Ctrl+T (or Cmd+T on Mac) → Test a recipe
Ctrl+R (or Cmd+R on Mac) → Run a recipe
Ctrl+S (or Cmd+S on Mac) → Save code changes
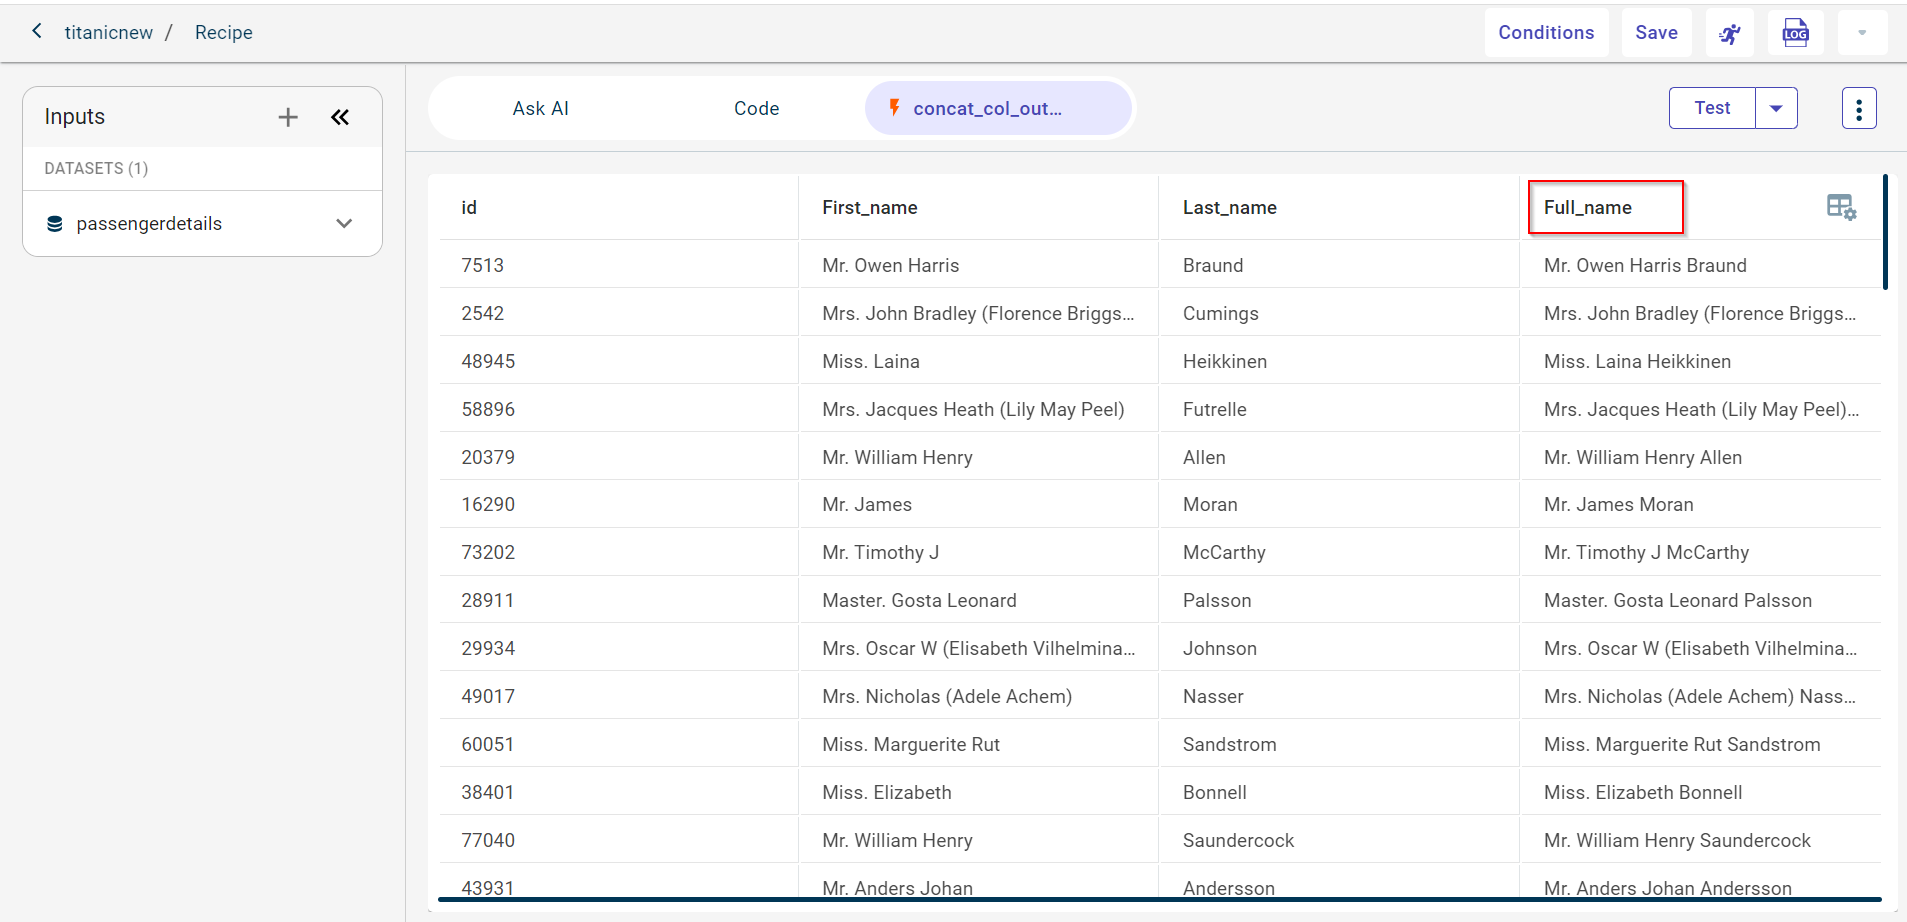
In this example, we want to generate a new column called full name after concatenating two columns that is first name and last name.
Check the canvas
Go back to the canvas to view the output.
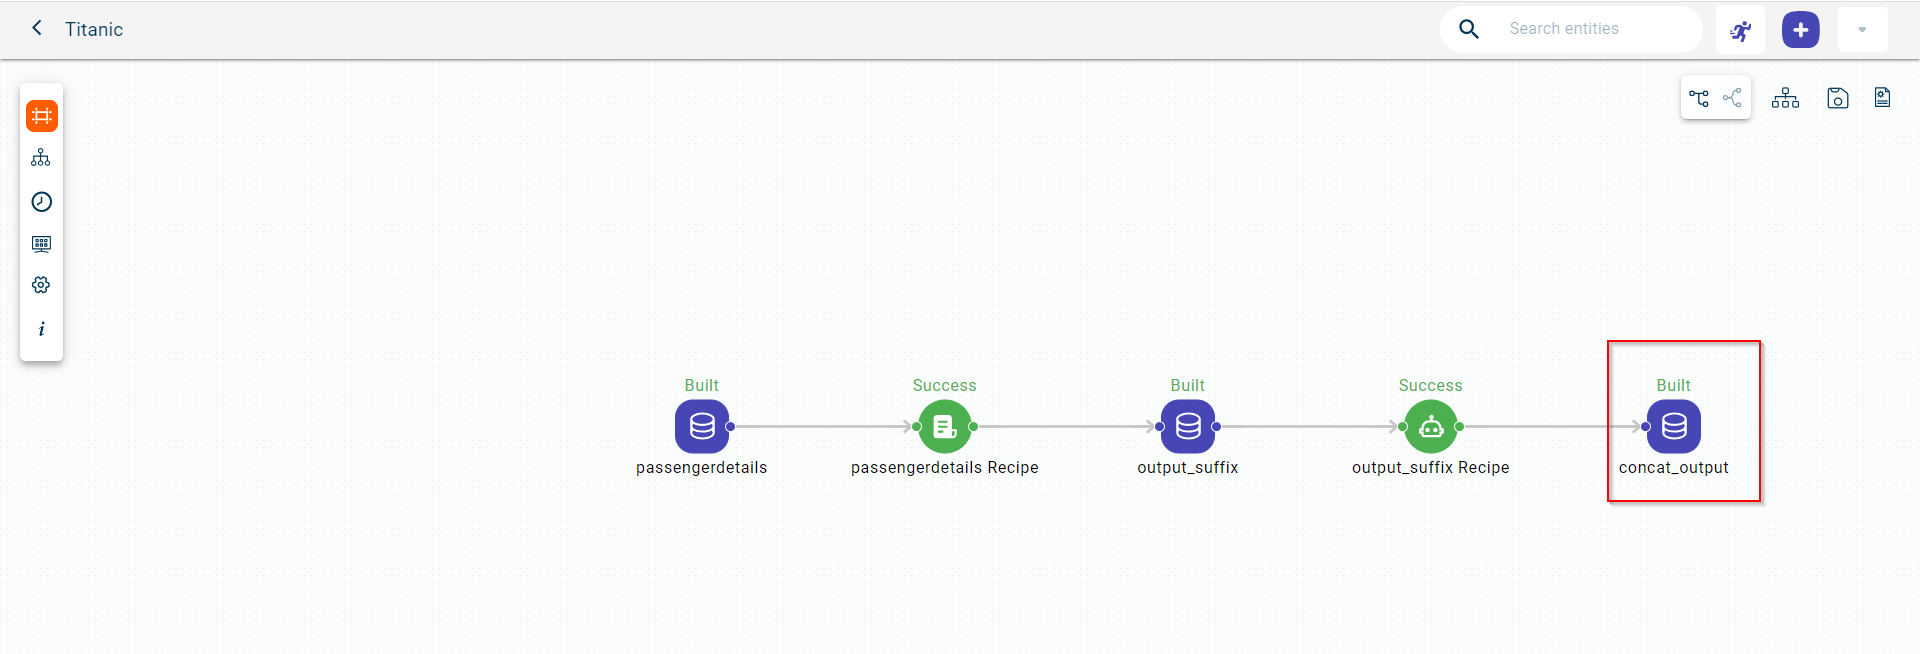
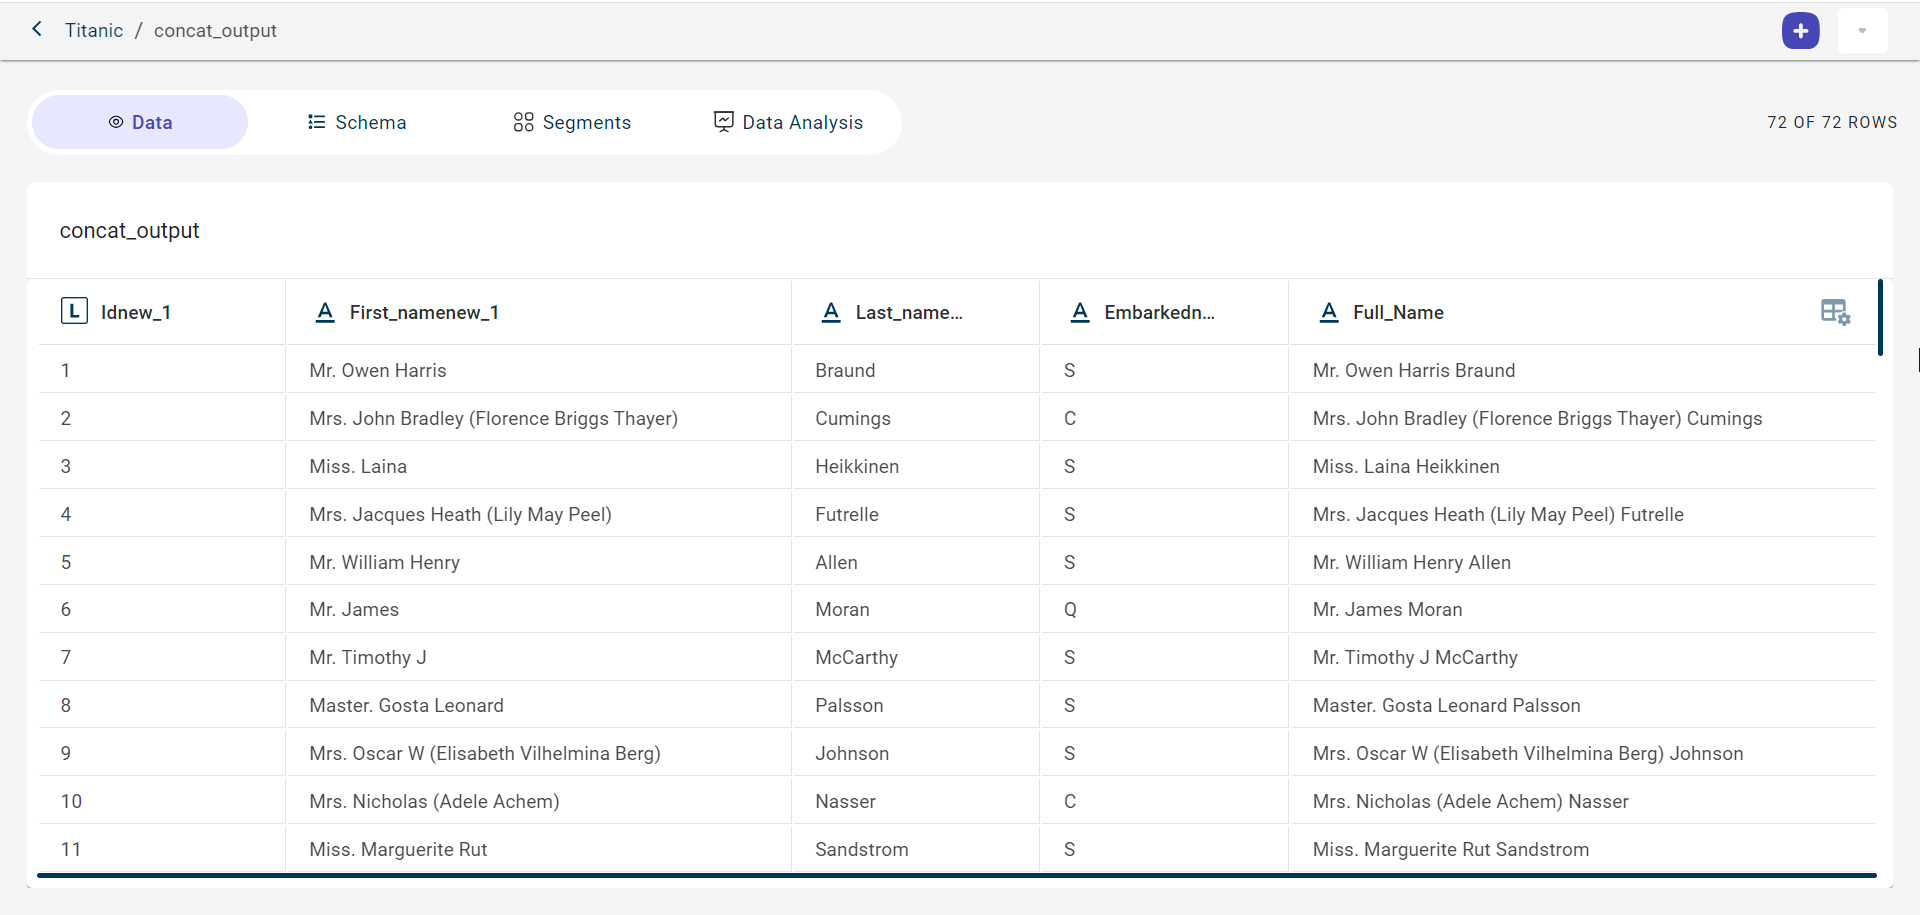
Click the dataset block on the canvas. This opens the pull-out window.The output dataset will include an extra column resulting from the concatenation process that is the ‘name’ column.
Click View to see a dataset generated after concatenating two columns.
Note
To check recipe logs, click on the recipe block on the canvas and then select the Logs icon  from the side panel. This displays a detailed record of both successful and failed recipe executions. For additional options, use the kebab menu to either export the logs as a text file or open them in a new browser tab for a more comprehensive view.
Viewing Canvas Nodes in AI Assisted recipe
Use this procedure to view and access canvas nodes from the AI assisted recipe.
1 Click on the dataset block and select AI Assisted Recipe, or choose an existing AI Assisted Recipe. This will open the Ask AI tab.
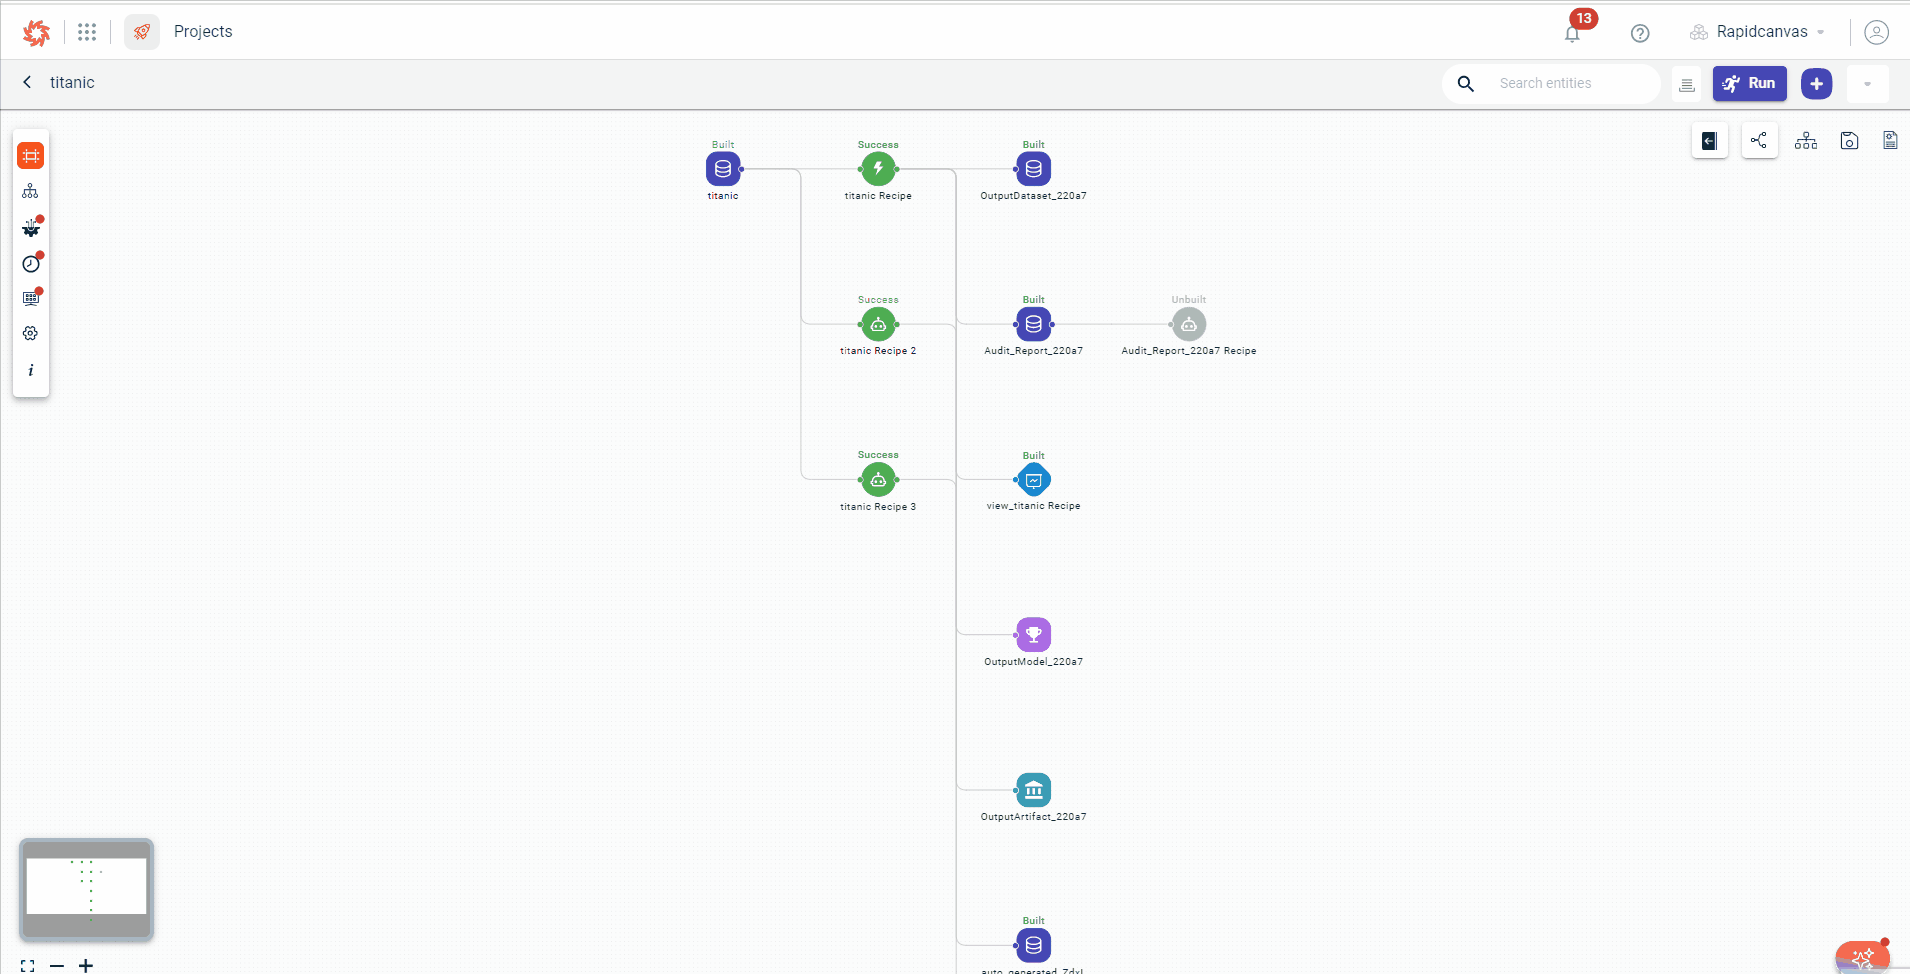
On the left, click Canvas Nodes to expand and view a list of entities or components on the canvas, such as datasets, recipes, artifacts, and models. You can switch between different project components.
Note
Use the search option to search for the entity you want.
Click on the entity you wish to view on the canvas, and it will open in a new tab.
Click View Code on the AI Assisted Recipe to open the code generated by Ask AI in a sub-tab under the Code tab.
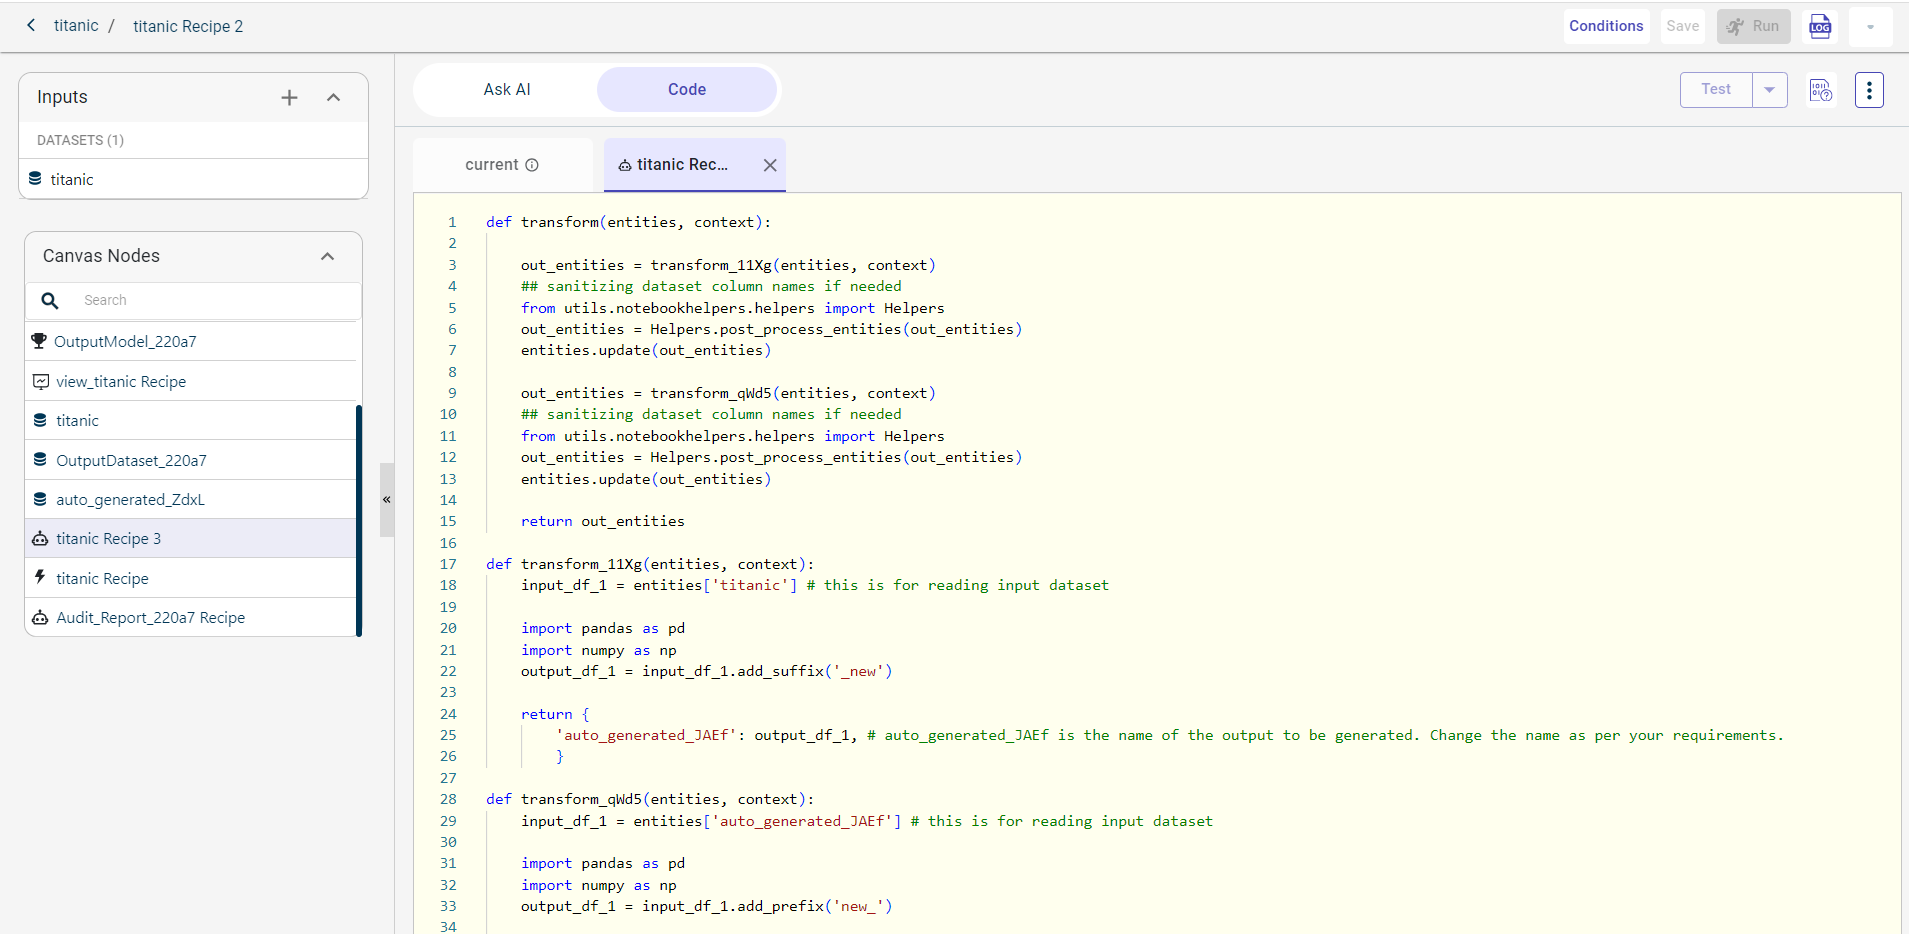
On the Current tab, you can write your own code based on business requirements, referencing the code generated by Ask AI. The auto-suggestion feature is available to assist you while coding, offering suggestions for file names, artifacts, and methods to help speed up the process and reduce errors.
Editing the chart output
After generating the chart, you can use the edit option to customize it. This allows you to modify elements such as the chart’s colors, type, and title. Follow the steps below to edit your chart:
Enter a prompt to generate the chart. You can use the slash option to select the output type, then type your query.
Click the Edit option on the chart to open the Chart Edit window.
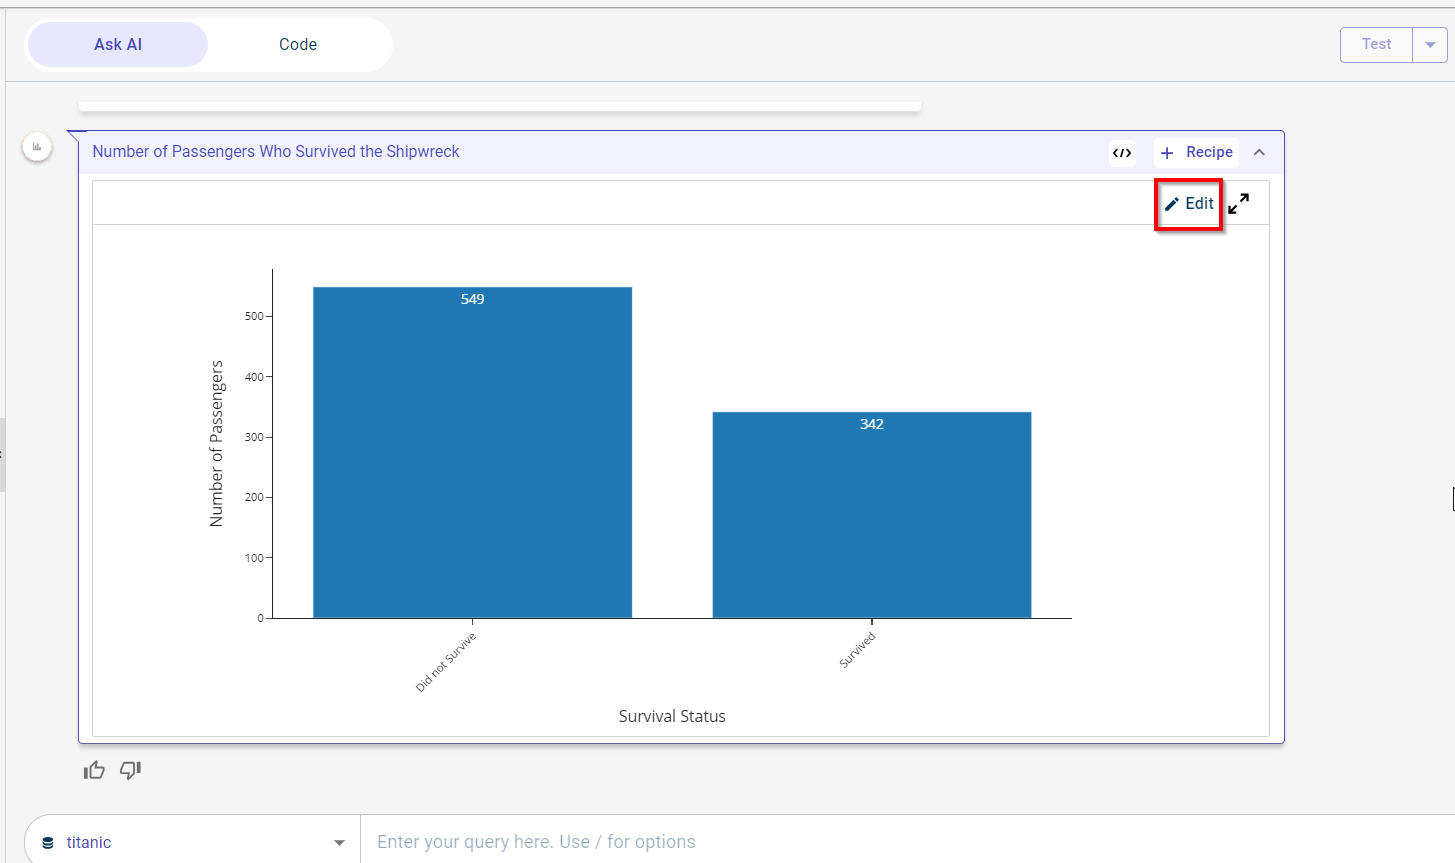
Enter the prompt on how you want the chart to be modified. Here, we are entering the query to make the chart colorful and change its title to Number of passengers by Survival status.
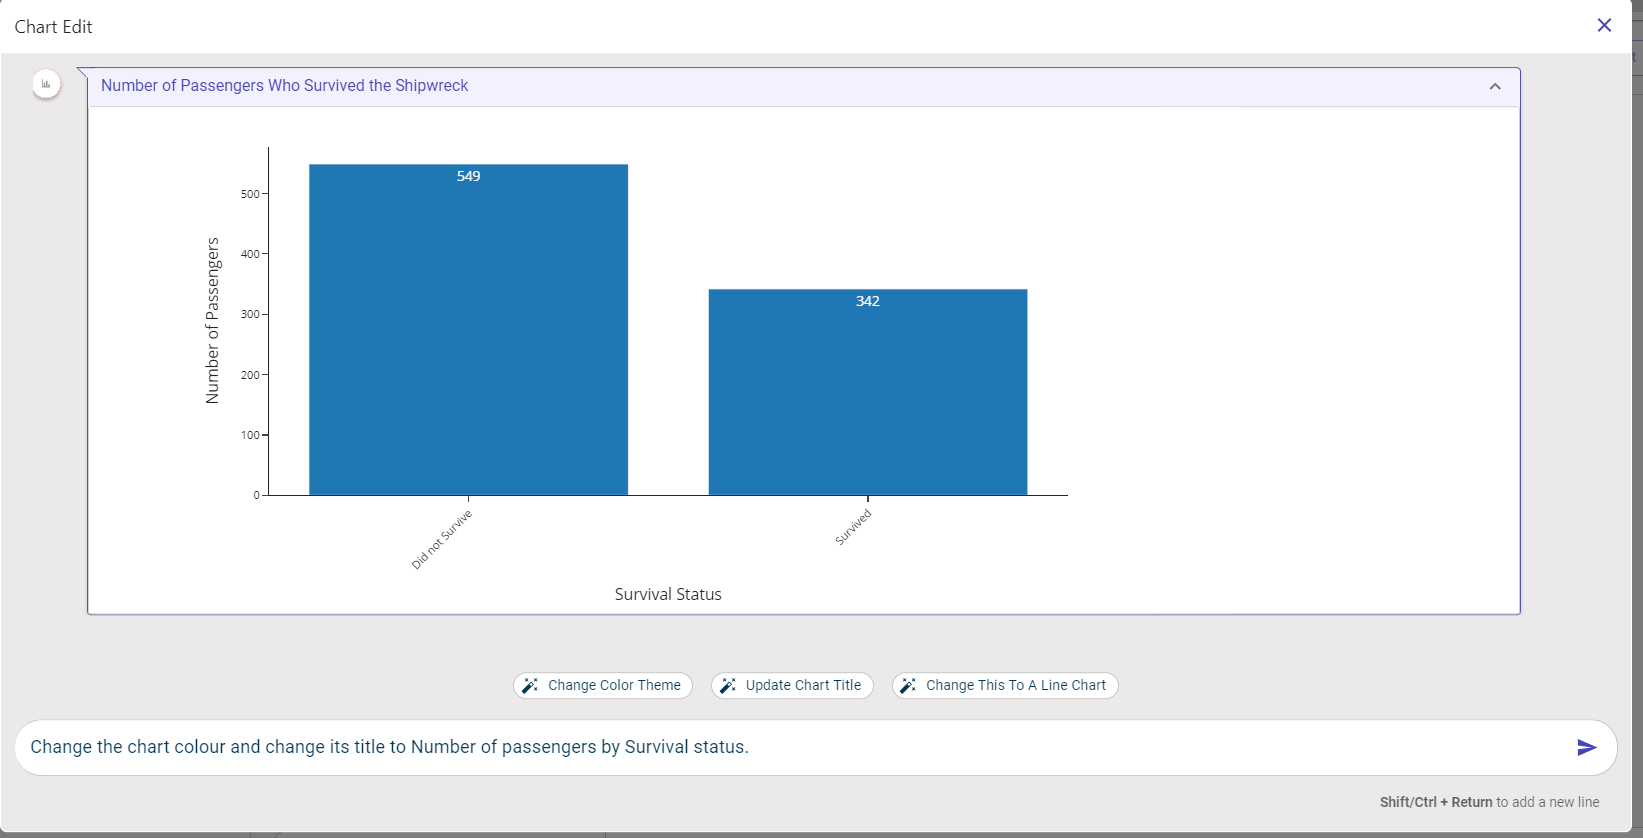
You can now see the chart color and title being updated in the screenshot below:
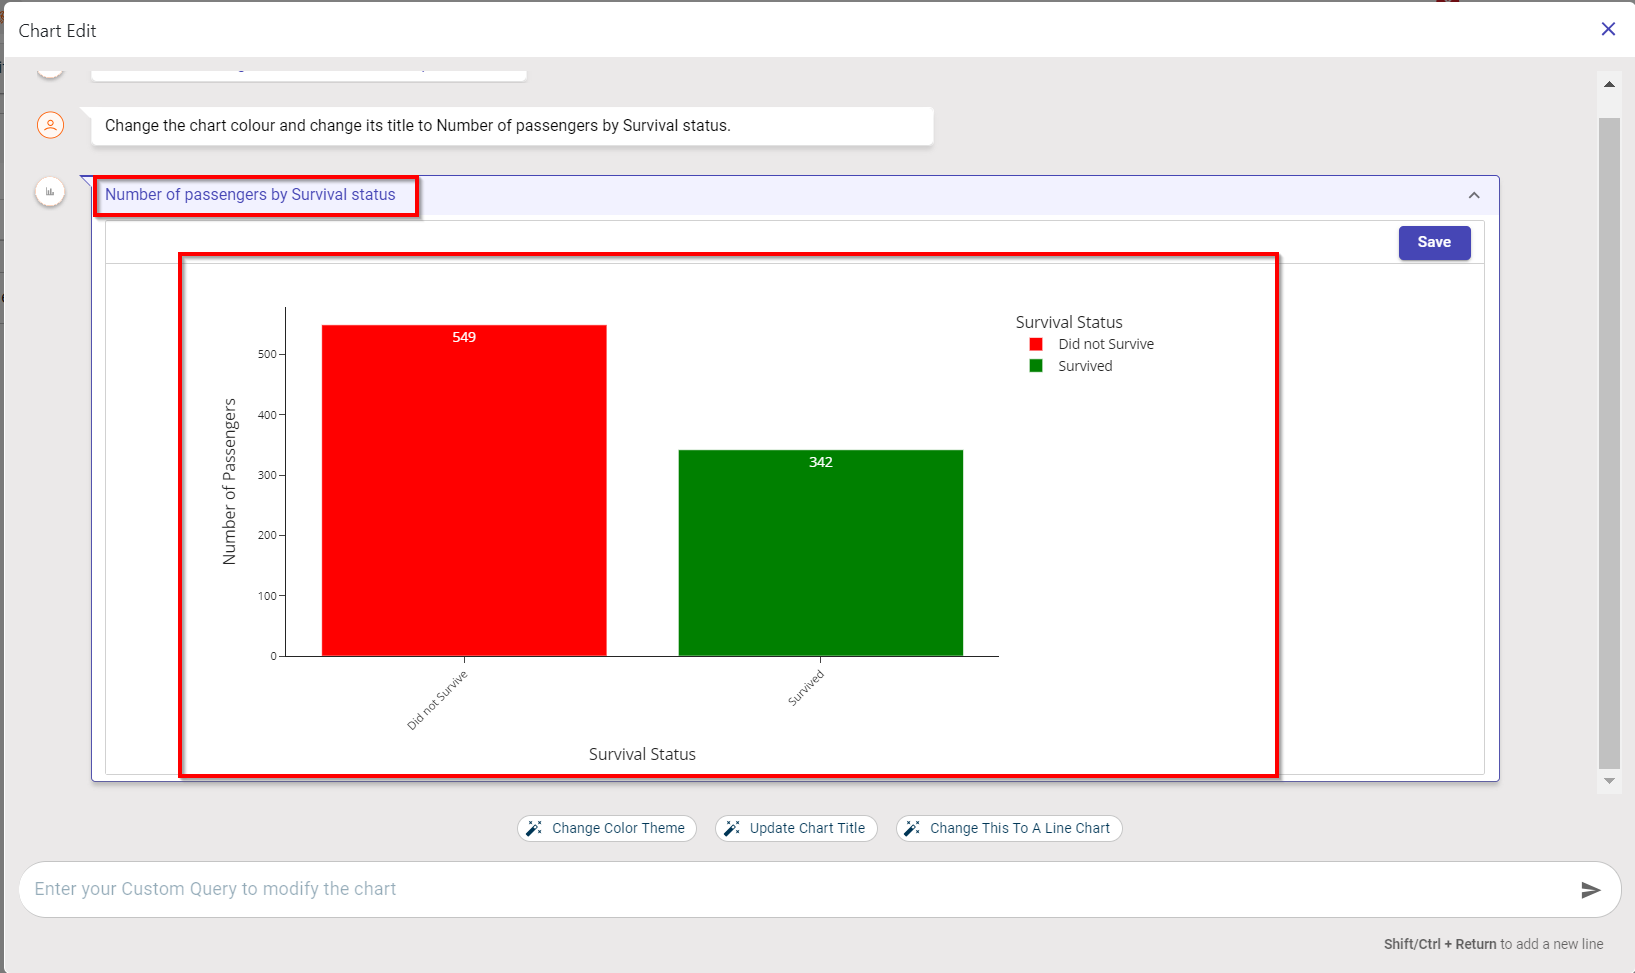
Click Save to save the changes to the chart.
Duplicating AI-Assisted Chat Conversations from the Original Project
When you duplicate a project, not only are DataApps, Prediction Services, and Environments copied, but you can also duplicate the AI-Assisted Chat Conversations from the original project.
However, please note that the duplicated chat will need to be re-run or refreshed to generate updated results in the new project. To do so, you must navigate to the AI-Assisted Recipe Node within the data pipeline of the copied project.
Use this procedure to refresh the chat conversations in the duplicated projects:
Click on the duplicated project from the projects dashboard. This takes you to the canvas.
Select the AI-assisted recipe node. This opens the AskAI tab. If there are any conversations that happened in the original project, those will be copied in the chat window.
Note
Please note that you must upload the data file in the dataset node to re-run the queries.
Click Refresh Chat to re-run the previous queries in the chat window and generate updated results. A confirmation message will appear.
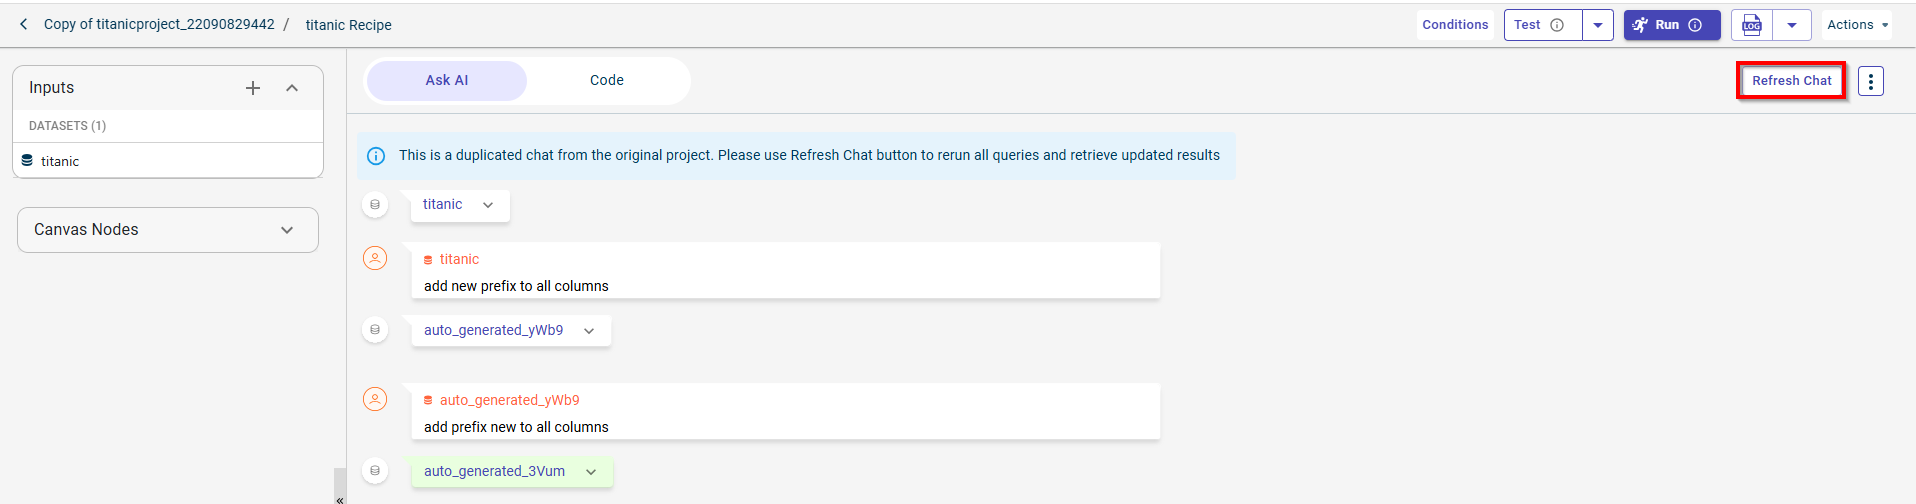
Click Yes to execute the queries.
Other recipe categories in AI-assisted recipes
In AI-assisted recipes, you can also use code and snippets (default) to perform data transformations.
Code
You can use the Code option in the AI-assisted recipe to write Python code and define logic for data transformation in the provided code editor. Subsequently, run this code recipe in the pipeline to transform the data and produce a dataset or a chart output.
Before running the code recipe in the data pipeline or flow, you can use the Test option to test the code and view the output. If the output is what you are expecting, you can run the custom code recipe in your flow.
If you want to add a code recipe to the flow, see Adding an AI-assisted recipe.
..Adding code snippets to the data pipeline
..Use this procedure to add code snippets to the data pipeline or flow. First, search for the code syntax in the code snippets list to get the syntax within which you must add the logic and run the data transform or recipe.
..To add and run a code snippet:
..1. Click the dataset block on the canvas to open the pull-out window.
..2. Click the plus icon and select the AI-assisted recipe in the pull-out window. This takes you to the Ask AI tab.
..3. Click the ellipses icon and select Snippets. This displays the SNIPPETS button.

..4. Click SNIPPETS.
This open the search box to find the template you are looking for to clean and prepare the data.
..5. Search for the Syntax within which the logic (code snippet) must be added. Click Copy to copy the syntax and paste in the Code tab.
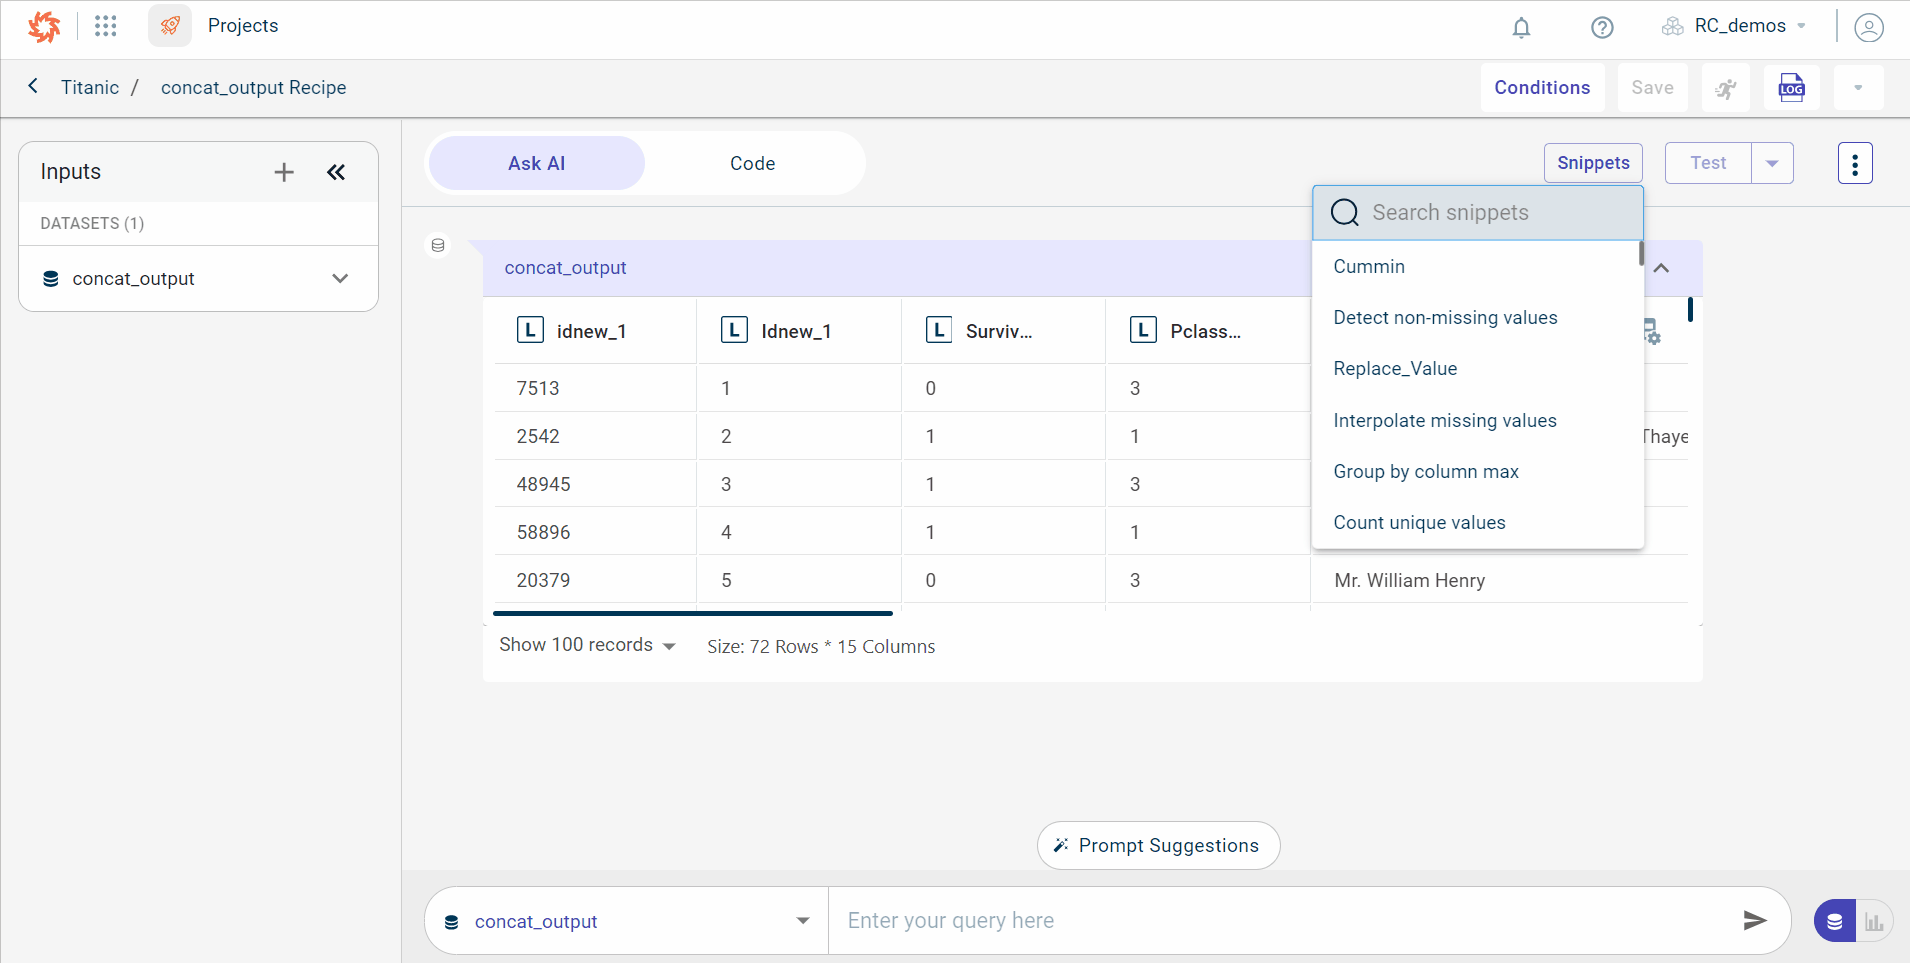
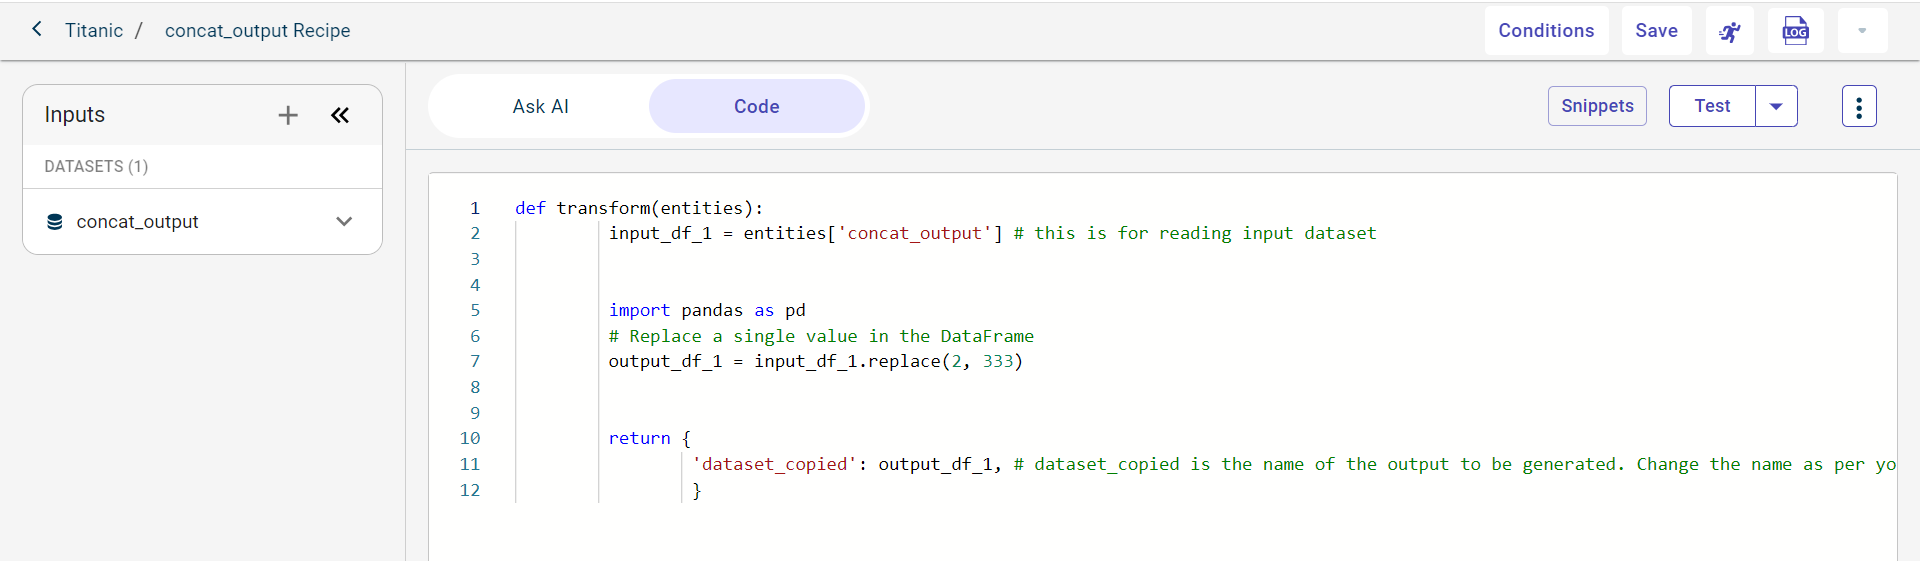
..6. Select the template based on the data transformation you want to perform. If we want to replace a value in the dataset, search for replace value snippets.
..7. Click Copy corresponding to the code block you want to use.
..8. Click the Code tab to paste the copied code snippets in the coding workspace.
..Now, add the dataset name in which you want to replace the value. Also, you must add the new value with which you want to replace the existing value.
..9. Click TEST to test the code and view how the output looks before you save and run this recipe in the data pipeline. You can use the Stop button to halt the recipe execution at any point during its test run.
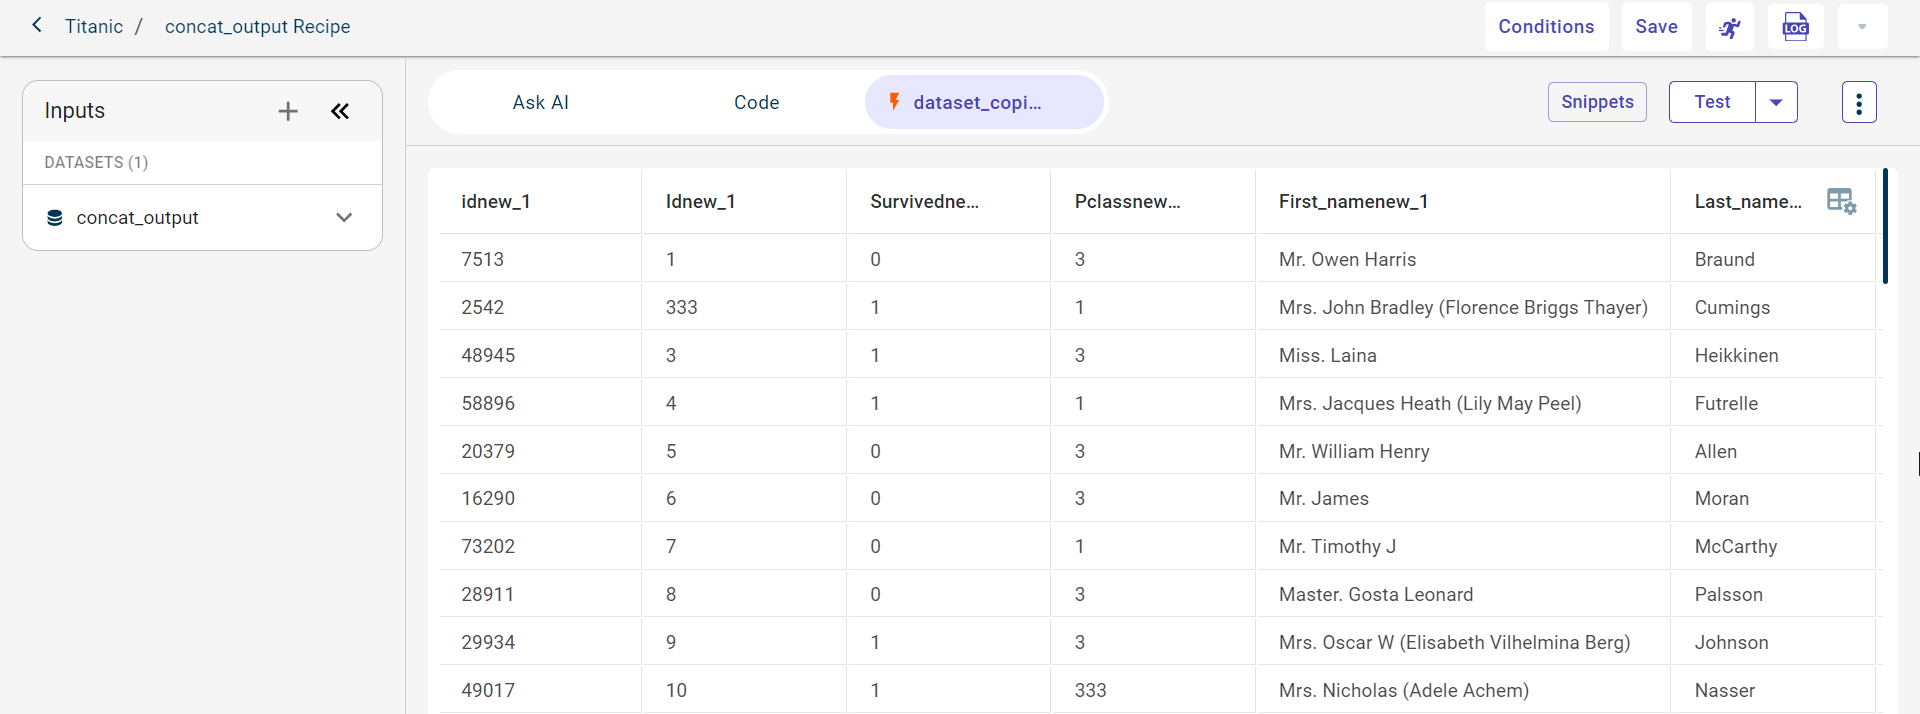
..10. Click Save to save the code recipe. This enables the run button. ..11. Click the Run button to run the recipe and generate the output to see on the canvas.
Writing logic for the template from scratch
Use this procedure to write the data transformation template from scratch.
Click the dataset block on the canvas to open the pull-out window.
Click the plus icon
and select the AI-assisted Recipe recipe in the pull-out window. This takes you to the Ask AI tab.Click the Code tab.
Write the logic for the code recipe in the provided coding space using Python.
Copy the code recipe generated by the AskAI into the Code tab and click Edit in Notebook to edit the code in the Jupyter Notebook editor.
Click Save Back To Recipe.
Click Test to test the code you have written.
Click Save Code and then click the Run button to run this transformation in the data pipeline.
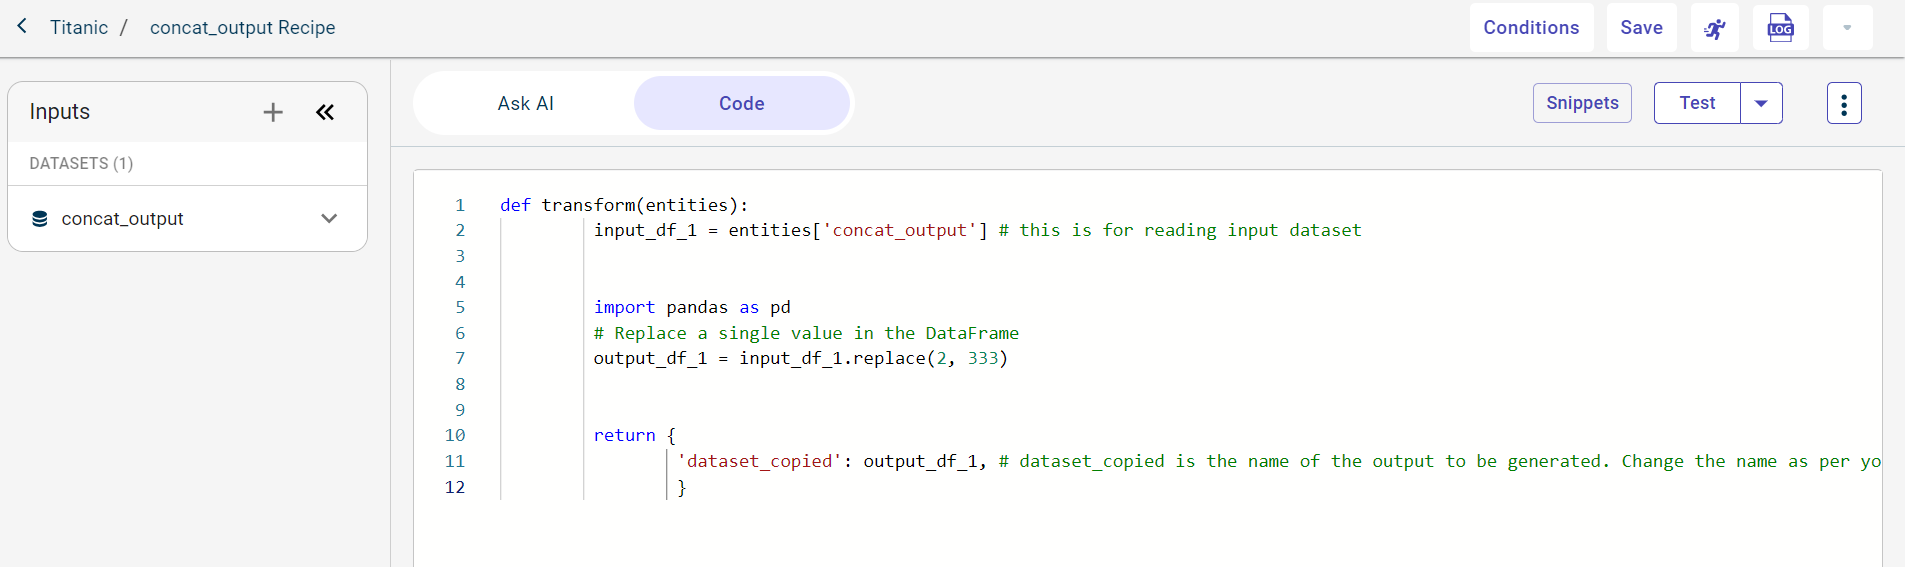
Use this procedure to write a logic to generate an artifact from the code tab and add the generated artifact to the data pipeline.
Click the dataset block on the canvas to open the pull-out window.
Click the plus icon
and select the AI-assisted Recipe recipe in the pull-out window. This takes you to the Ask AI tab.Click the Code tab and provide the below code to generate the artifact.
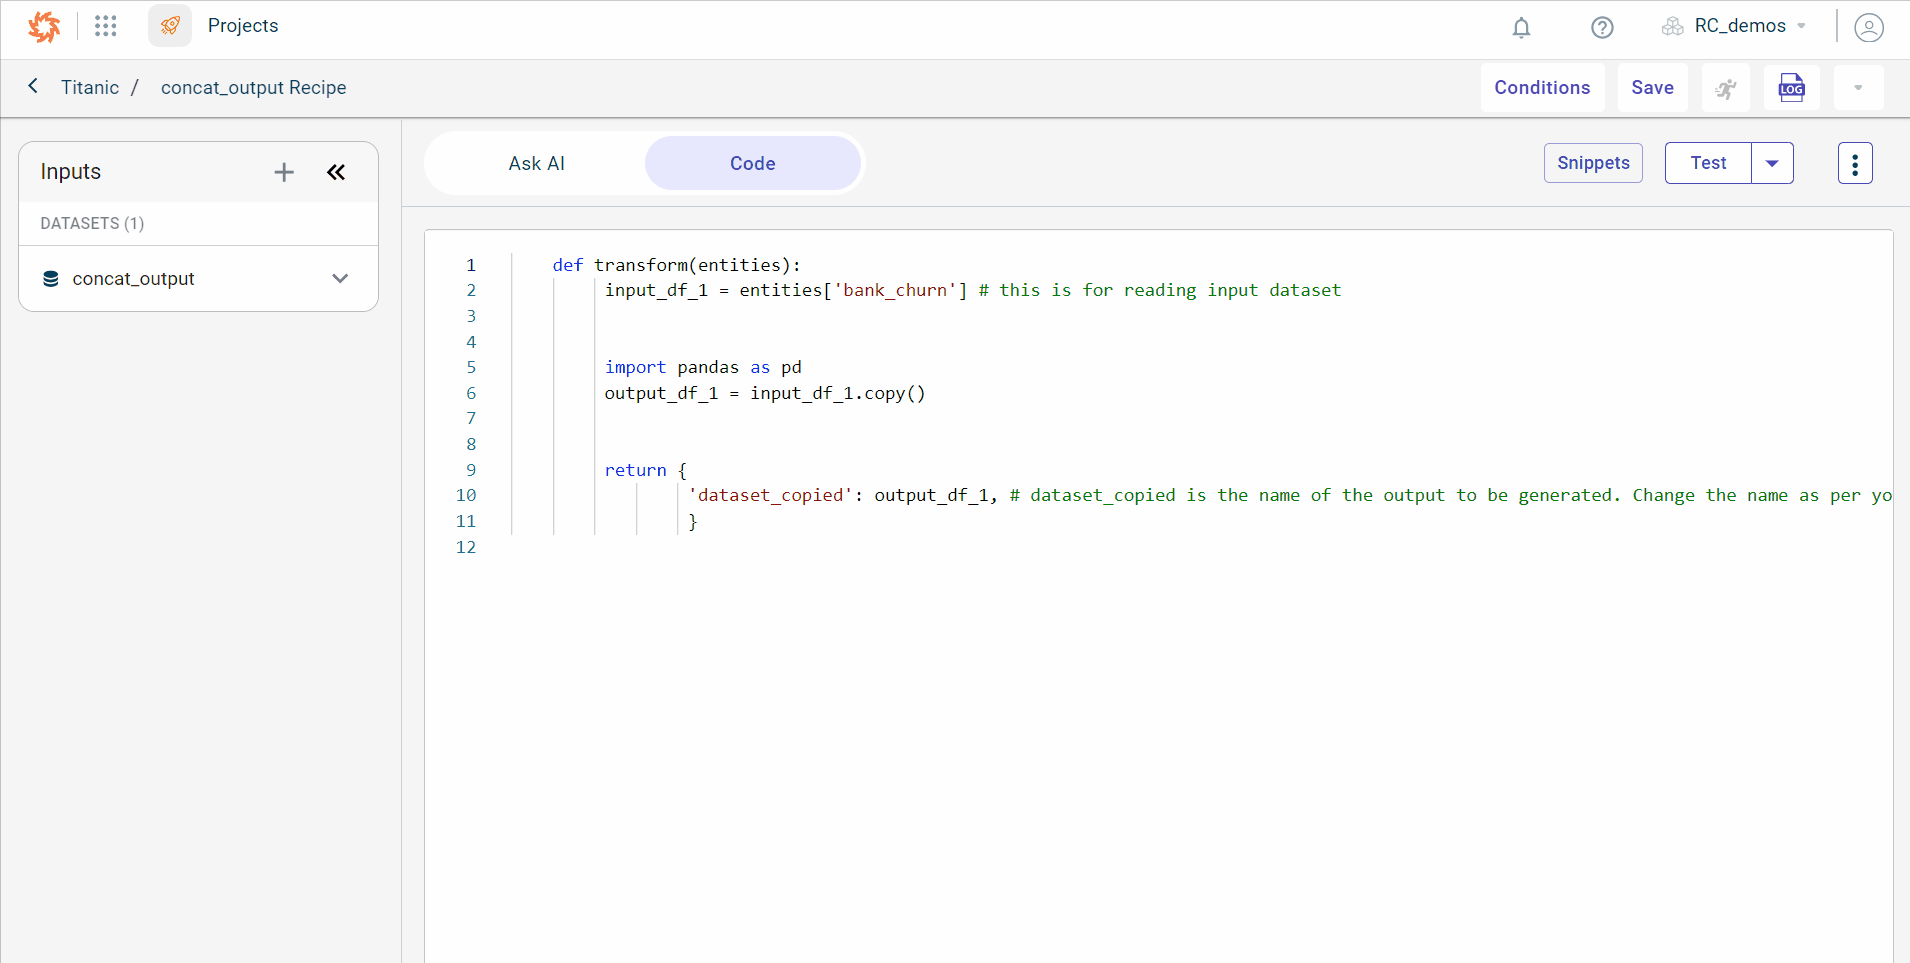
def transform(entities, context):
from utils.notebookhelpers.helpers import Helpers
from utils.dtos.templateOutput import ArtifactOutput

input_df_1 = entities['output_1'] # this is for reading input dataset

import pandas as pd
import numpy as np
output_df_1 = input_df_1.drop(['Age'], axis=1)

artifactsDir = Helpers.getOrCreateArtifactsDir(context, artifactsId = "test-artifact")
output_df_1.head(10).to_csv(artifactsDir + '/test.csv')

return {
    'output_2': output_df_1, # output_2 is the name of the output to be generated. Change the name as per your requirements.
    "test-artifact": ArtifactOutput()
    }
Important
You can test the artifact code by using the Test option.
Click Save and then click the Run icon to add the generated artifact to the data pipeline.

Use this procedure to write a logic to generate an ML model from the code tab. You can later use this model on the similar datasets to make predictions.
Click the dataset block on the canvas to open the pull-out window.
Click the plus icon
and select the AI-assisted Recipe recipe in the pull-out window. This takes you to the Ask AI tab.Click the Code tab and provide the below code to generate the model.
Use this procedure to add global variables to store artifacts and models built on the source dataset in a project.
Click the dataset block on the canvas to open the pull-out window.
Click the plus icon
and select the AI-assisted Recipe recipe in the pull-out window. This takes you to the Ask AI tab.Click the Code tab and provide the below code to add global variables.
def transform(entities, context):
from utils.notebookhelpers.helpers import Helpers

input_df_1 = entities['titanic'] # this is for reading input dataset


import pandas as pd
import numpy as np
output_df_1 = input_df_1.drop(columns=['Sex'])

print("value of global variable:")
print(Helpers.get_global_var(context, "test-var"))

return {
    'output_1': output_df_1, # output_1 is the name of the output to be generated. Change the name as per your requirements.
    }
Click Save and then click the Run icon to add the global variables.
..Snippets
..There are default snippets available to use for data cleaning and data preparation. You can test the code snippet before running the code recipe in the flow using the test option.
..If you want to write logic for data transformations using Python from scratch, see Writing logic for template from scratch.
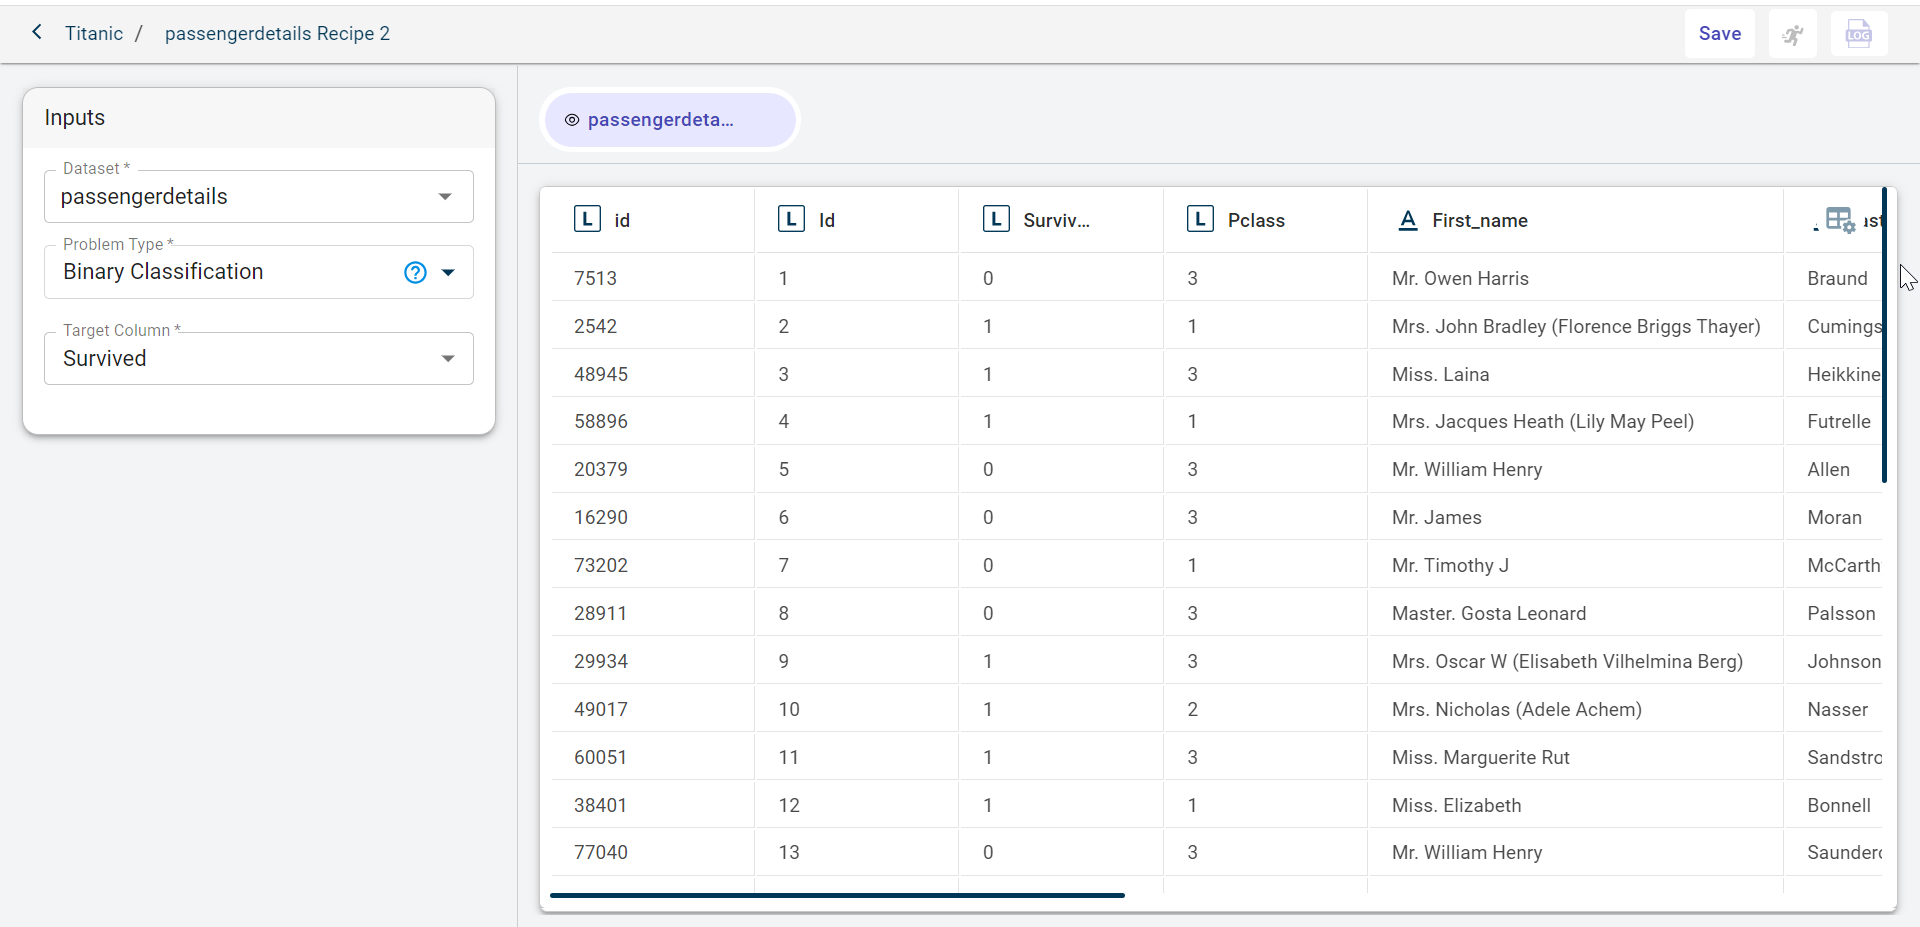
Rapid model recipe
You can use the rapid model recipe to solve an ML problem that falls into one of these categories, such as classification, regression, and binary classification, by creating an ML model on the historic dataset.
Developing ML models using the Rapid Model recipe
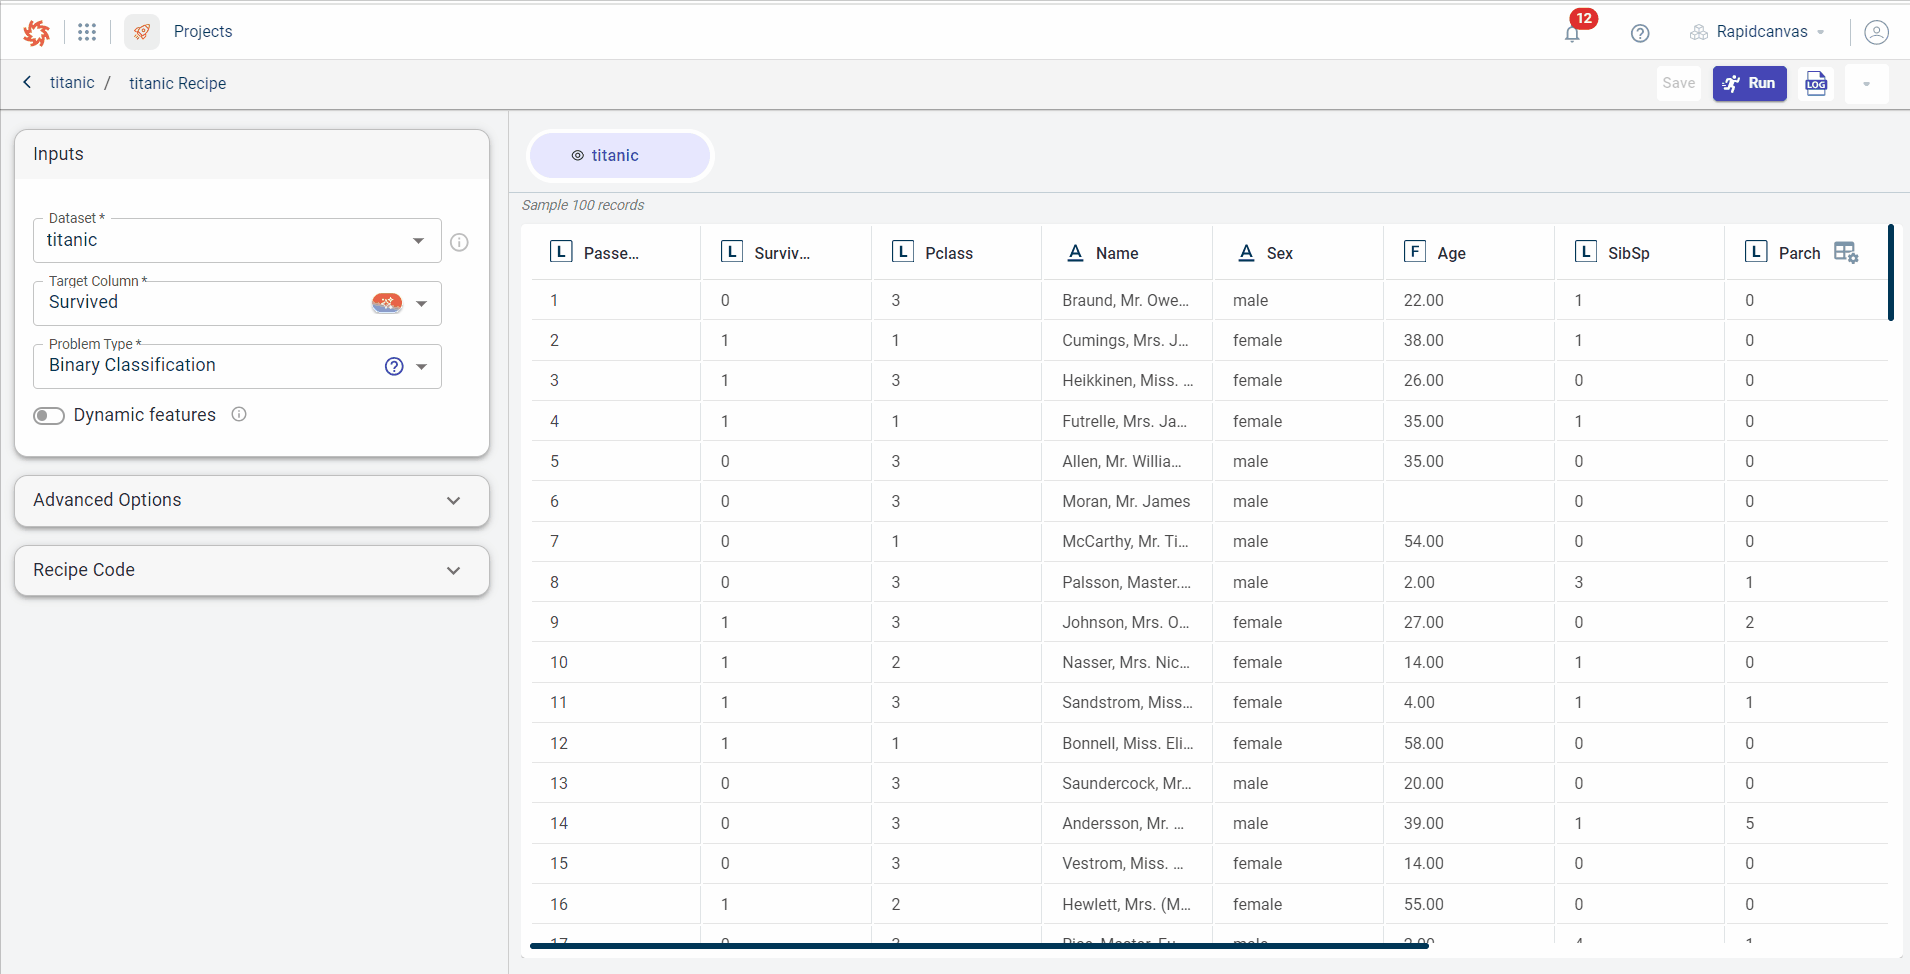
Use this procedure to build simple ML models using the Rapid model recipe type. This type of recipe eliminates writing the code template or using the predefined templates to perform data transformations. The platform performs all the data transformation steps automatically after you select the problem type and target column for the uploaded dataset.
Click the dataset block on the canvas to open the pull-out window.
Click the plus icon
and select the Rapid Model Recipe recipe. This takes you to the recipe screen.
Select the dataset on which you want to perform the transformations and build ML model. By default, the dataset gets populated. However, if you want to run this recipe on any other dataset, select from the drop-down.
Select the target column on which you want to make predictions or build models by typing in search box. If there is no target column for Anomaly detection and Clustering, you can select I don’t have a Target Column option.
Note
Click the AI Guide icon corresponding to the target column field to open the AI Guide chat window. Using this integration, you can identify the most appropriate column you want the model to predict in the uploaded dataset or query the dataset to learn about the missing values in a particular column or other details.
Example Use Case:
Imagine you are in the process of building a predictive model using the Rapid Model recipe. You have loaded a dataset on the canvas but are unsure which column should be set as the target variable. Here’s how the AI Guide can help:
In the AI chat interface, ask, “What should be the target column for this dataset?”
Receive a Recommendation: The AI analyzes the dataset and provides a recommendation for the most suitable target column based on the data characteristics.
Problem Type is auto-detected by the platform based on the selected target column. Supported problem types by the platform:
Binary Classification
Regression
MultiClass Classification
Timeseries Forecasting
Anamoly Detection
Clustering
Note
If the selected problem type is Binary Classification, then Dynamic features toggle is displayed. Enabling this toggle displays the Business context field where you can provide the business context to use the problem type as Binary experimental.
Click to expand the Advanced inputs option. This will display the Freeze columns field, allowing you to select the columns that you want to keep intact and prevent them from being dropped or manipulated during the data pre-processing phase in the rapid model recipe. This Advanced Inputs option is displayed for clustering, Anomaly detection, regression, binary classification and Multi-class classification problem types.
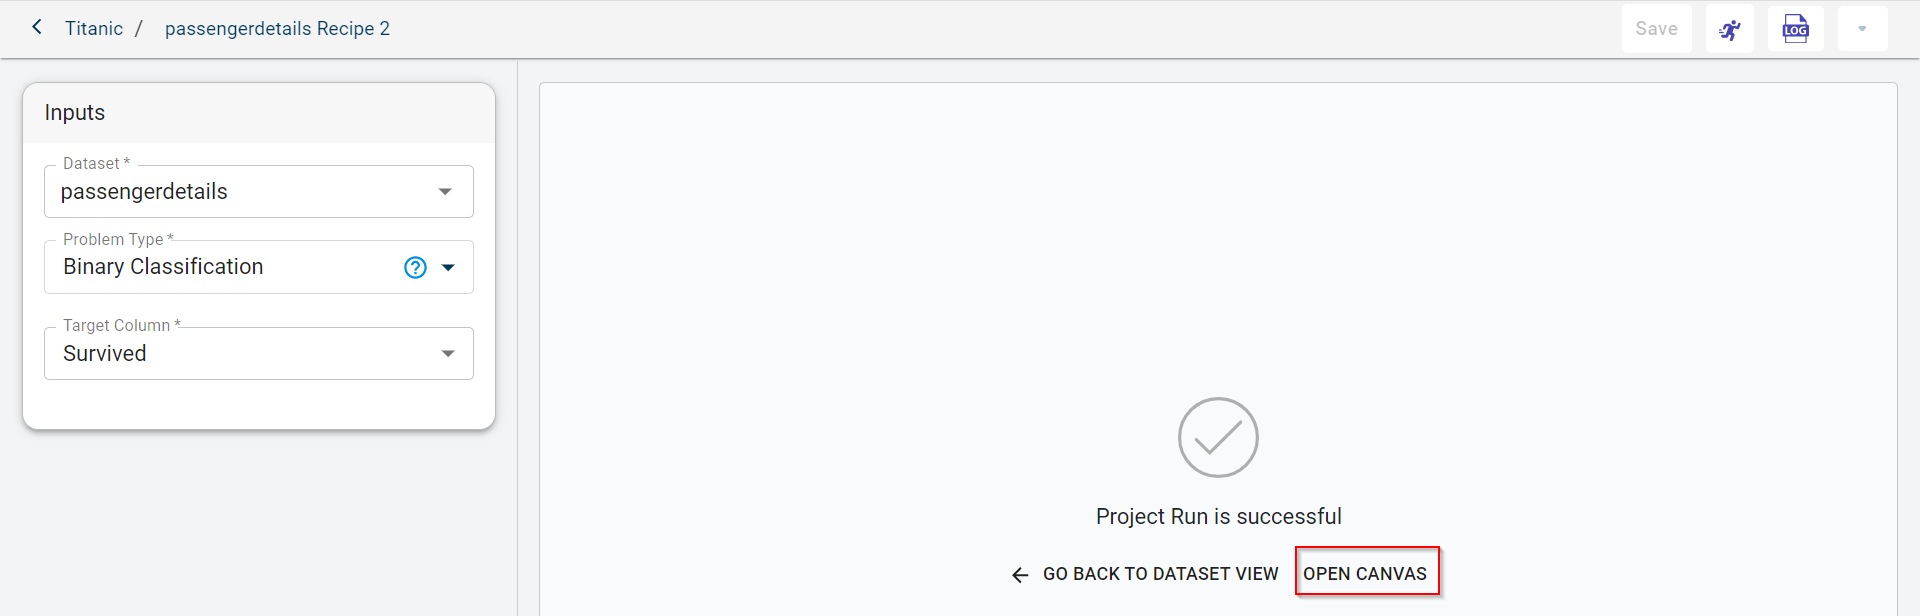
Click Save and then click the Run button to run the recipe. If needed, you can stop the recipe run at any time by clicking the Stop button.
Keyboard Shortcuts:
Ctrl+T (or Cmd+T on Mac) → Test a recipe
Ctrl+R (or Cmd+R on Mac) → Run a recipe
Ctrl+S (or Cmd+S on Mac) → Save code changes
Note
The status is set to Running until the model is built.
To check the logs of this recipe model, click the Logs icon.
Once the project run is successful, the link is displayed to open the canvas.
Click OPEN CANVAS. If you want to go back to the dataset view to rerun the recipe by changing the target column, you can click GO BACK TO DATASET VIEW.
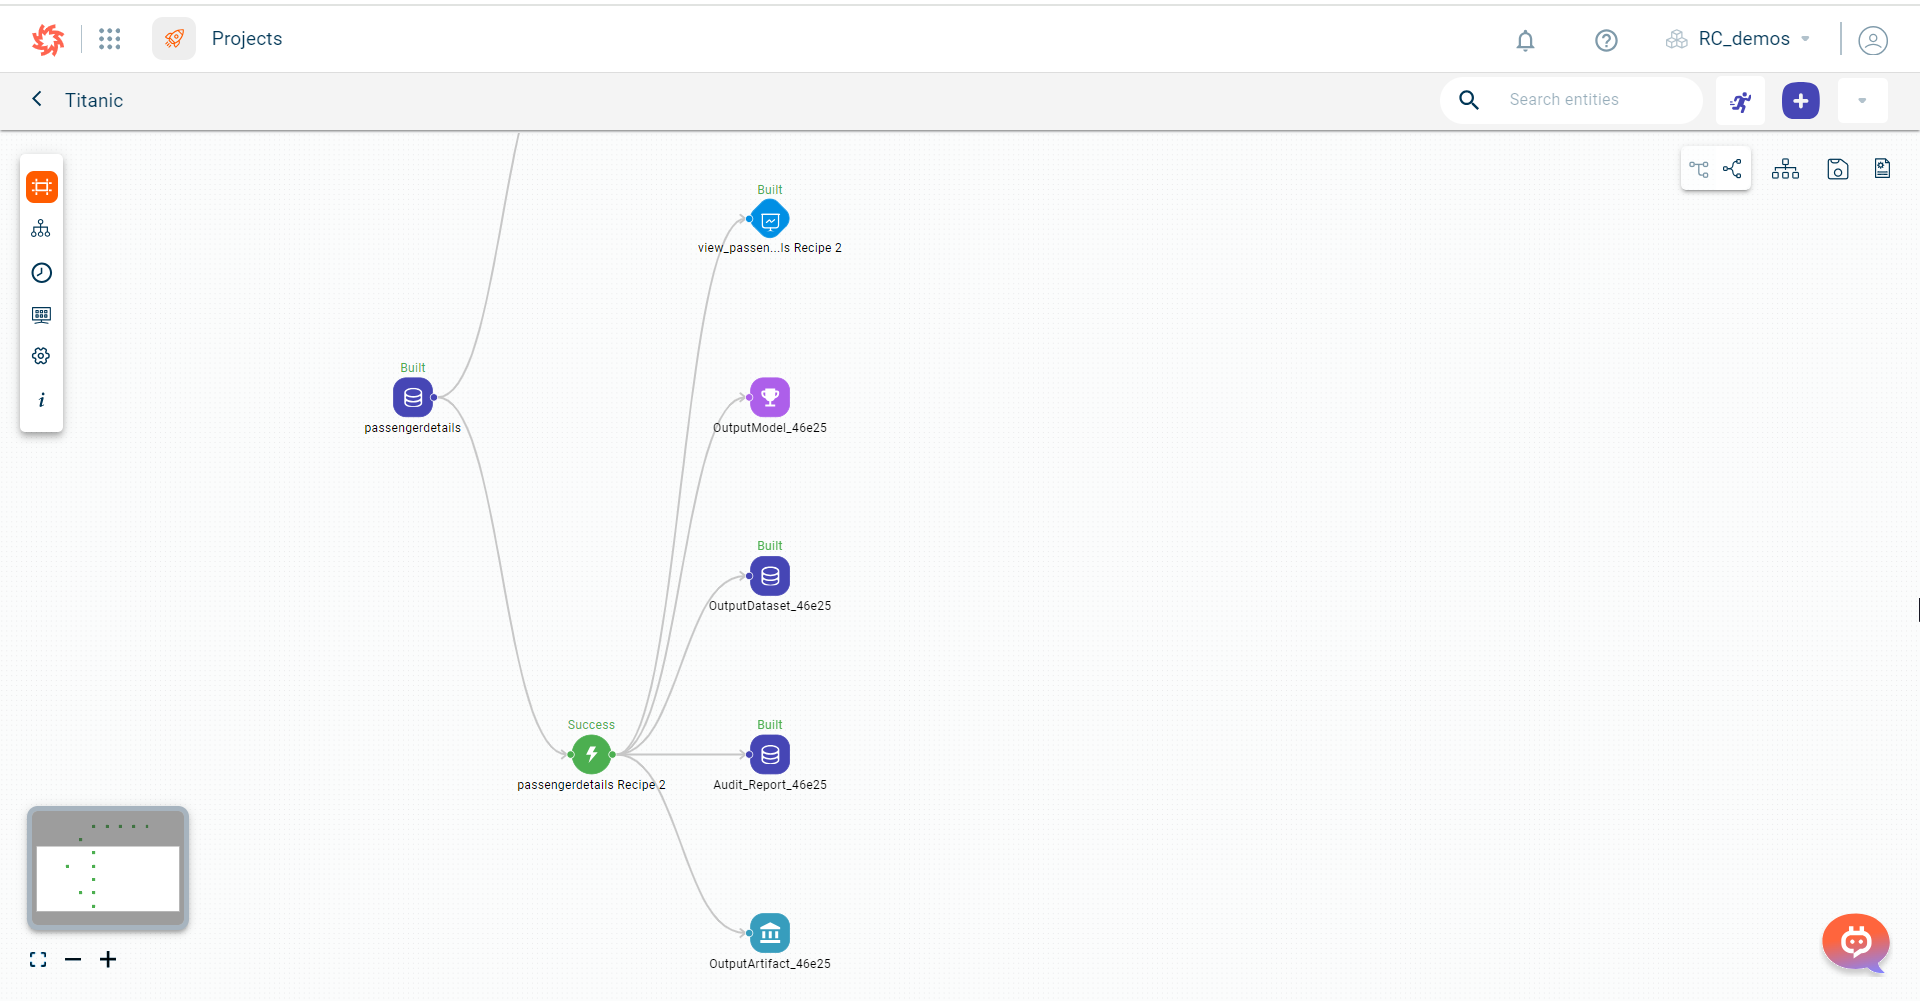
You can see the output dataset, chart, model and artifact generated as outputs after running this recipe.
Editing Recipe code in Rapid Model recipe
Use this procedure to edit the default rapid model recipe code in the Jupyter Notebook according to your specific requirements.
To edit the rapid model recipe:
Click on the rapid model recipe component or block on the data pipeline in a project. This opens the Rapid model recipe page.
Click the Recipe code to expand.
Click the Edit in Notebook button. This takes you to the Jupyter Notebook editor where you can edit the rapid model recipe code.
Click Save Back to Recipe to save the changes made to the code. Once saved, the updated recipe will be added to the data pipeline.
Click Run to execute the data pipeline with the updated recipe and view the new output.
Note
You can revert the changes at any time using the Revert option, which is available while editing the code in Jupyter Notebook.
Developing a model for time series forecasting problem type
Use this procedure to develop a model for time series forecasting problem type.
Click the dataset block on the canvas to open the pull-out window.
Click the plus icon and select the Rapid Model option.
Select the target column for prediction. Based on this column, the problem type will automatically be set. If it’s a time series forecasting problem, three additional fields will appear.
Select the date column that serves as the time reference for your predictions. This column should contain time-indexed data (such as dates or timestamps) which will help establish the forecasting timeline.
5. Specify the predict period to set the forecast horizon. For example, if you select 10 days, the model will generate predictions for a 10-day period. 5. Set the frequency of predictions within the forecast period. This setting determines the intervals at which forecasts will be produced. Possible values:
D (calendar day frequency)
W (weekly frequency)
M (month end frequency)
Q (quarter end frequency)
A (year end frequency)
H (hourly frequency)
T (minutely frequency)
S (secondly frequency)
In the Advanced Options section, expand the menu to access the time span field. Here, you can specify a custom interval within the prediction period.
For example, if the predict period is set to 10 days and the time span is set to 3 days, the system will generate forecast outputs every 3 days, rather than each day within the period. This option is useful when specific time intervals are preferred over daily predictions, providing insights at the most relevant intervals.
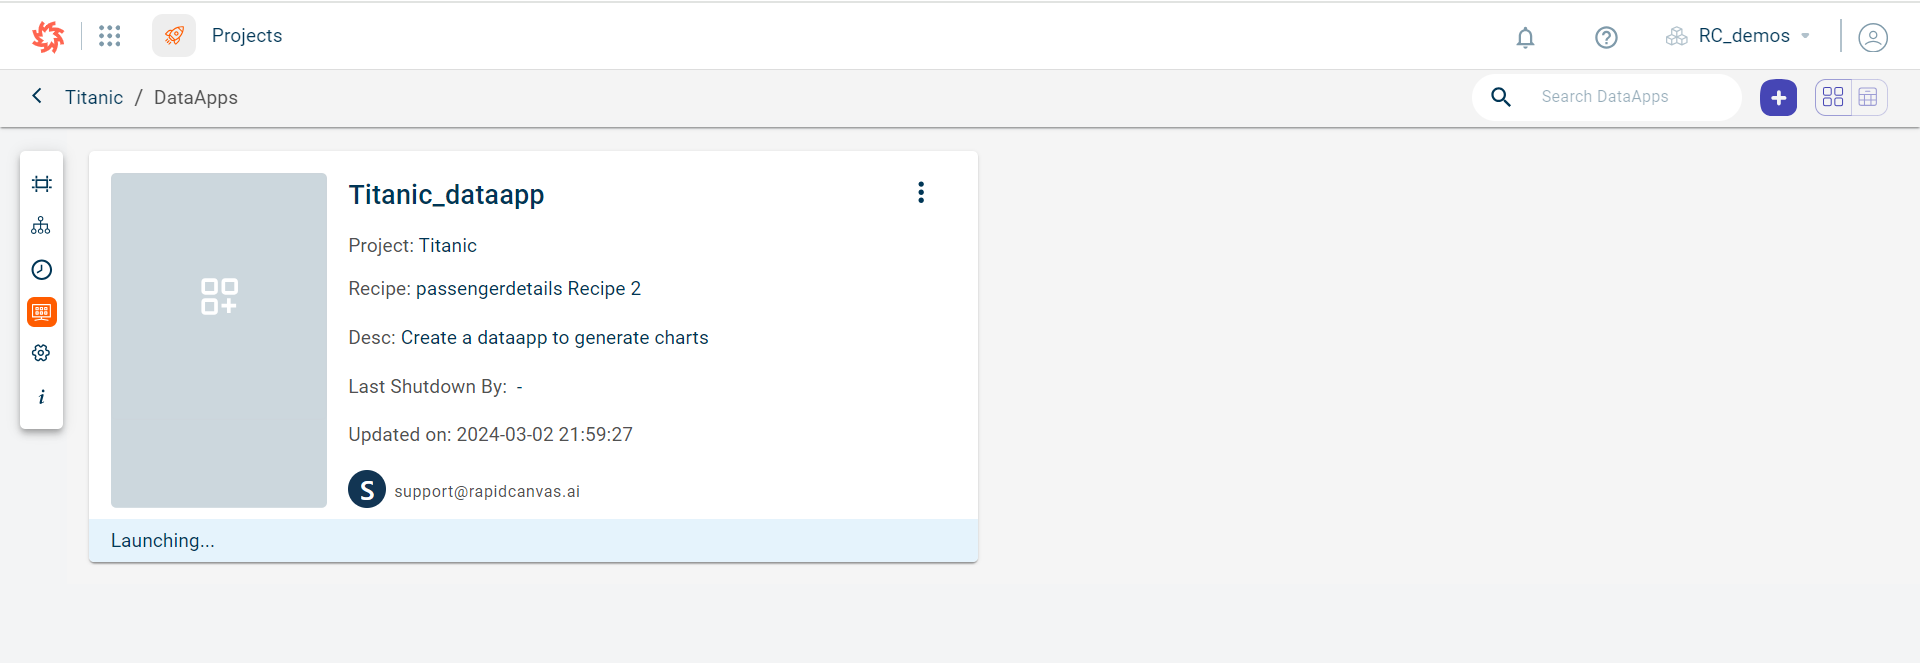
Adding a DataApp for Binary classification problem type
Use this procedure to create a Dataapp for binary classification, regression, binary experimental, and multi class classification problem types in the Rapid model recipe.
Prerequisites:
Create a prediction service for the model to create an App template. Prediction services
You can create a prediction service for the model directly from the canvas by clicking on the model block. This opens the side panel. Clicking on the Prediction service button takes you to the prediction service page.
To create a DataApp for binary classification problem type:
Select the project in which you want to create a DataApp. You can only create DataApps for the binary classificaiton problem type in the Rapid Model recipe.
Select Datapps from the project navigation menu. This opens the page to create a DataApp.
Click the plus icon
. The Create DataApp window is displayed.

Specify this information:
- DataApp Name:
The name of the DataApp.
- DataApp Description:
It is optional. The description for the DataApp.
- Recipe Name:
Select the recipe you want to run in the DataApp.
Click Create to create the DataApp.
Click the DataApp to view the feature importance, model performance, what-if analysis and predictions.
Template recipe
The ready-to-use or system templates allow you to transform the data without writing the Python code on the UI. Using these standard templates, you can prepare the data, clean the data, add features, and split the data for testing and training the data and to build models. Running each recipe will transform the data in the flow.
By default, there are hundreds of system templates available. You can use them to transform the data and build simple to complex machine learning flows and subsequently models. You can also create custom templates at the project and tenant levels from Notebook and use them in your flows.
If you want to add a standard template to the flow, see Adding a standard transform or template within a recipe.
Adding a Template recipe
Use this procedure to add a transform within a template.
Select the project to upload a dataset. For more information, see Connectors
Click on the dataset block to run various data transformations on this dataset and build an ML model.
Use any of these options to add a transform within a template recipe:
Click the plus icon
Select the dataset block. This opens the side panel. Click the plus icon
Select the dataset block to open the side panel in which you click View. This opens the dataset page. Click the plus icon
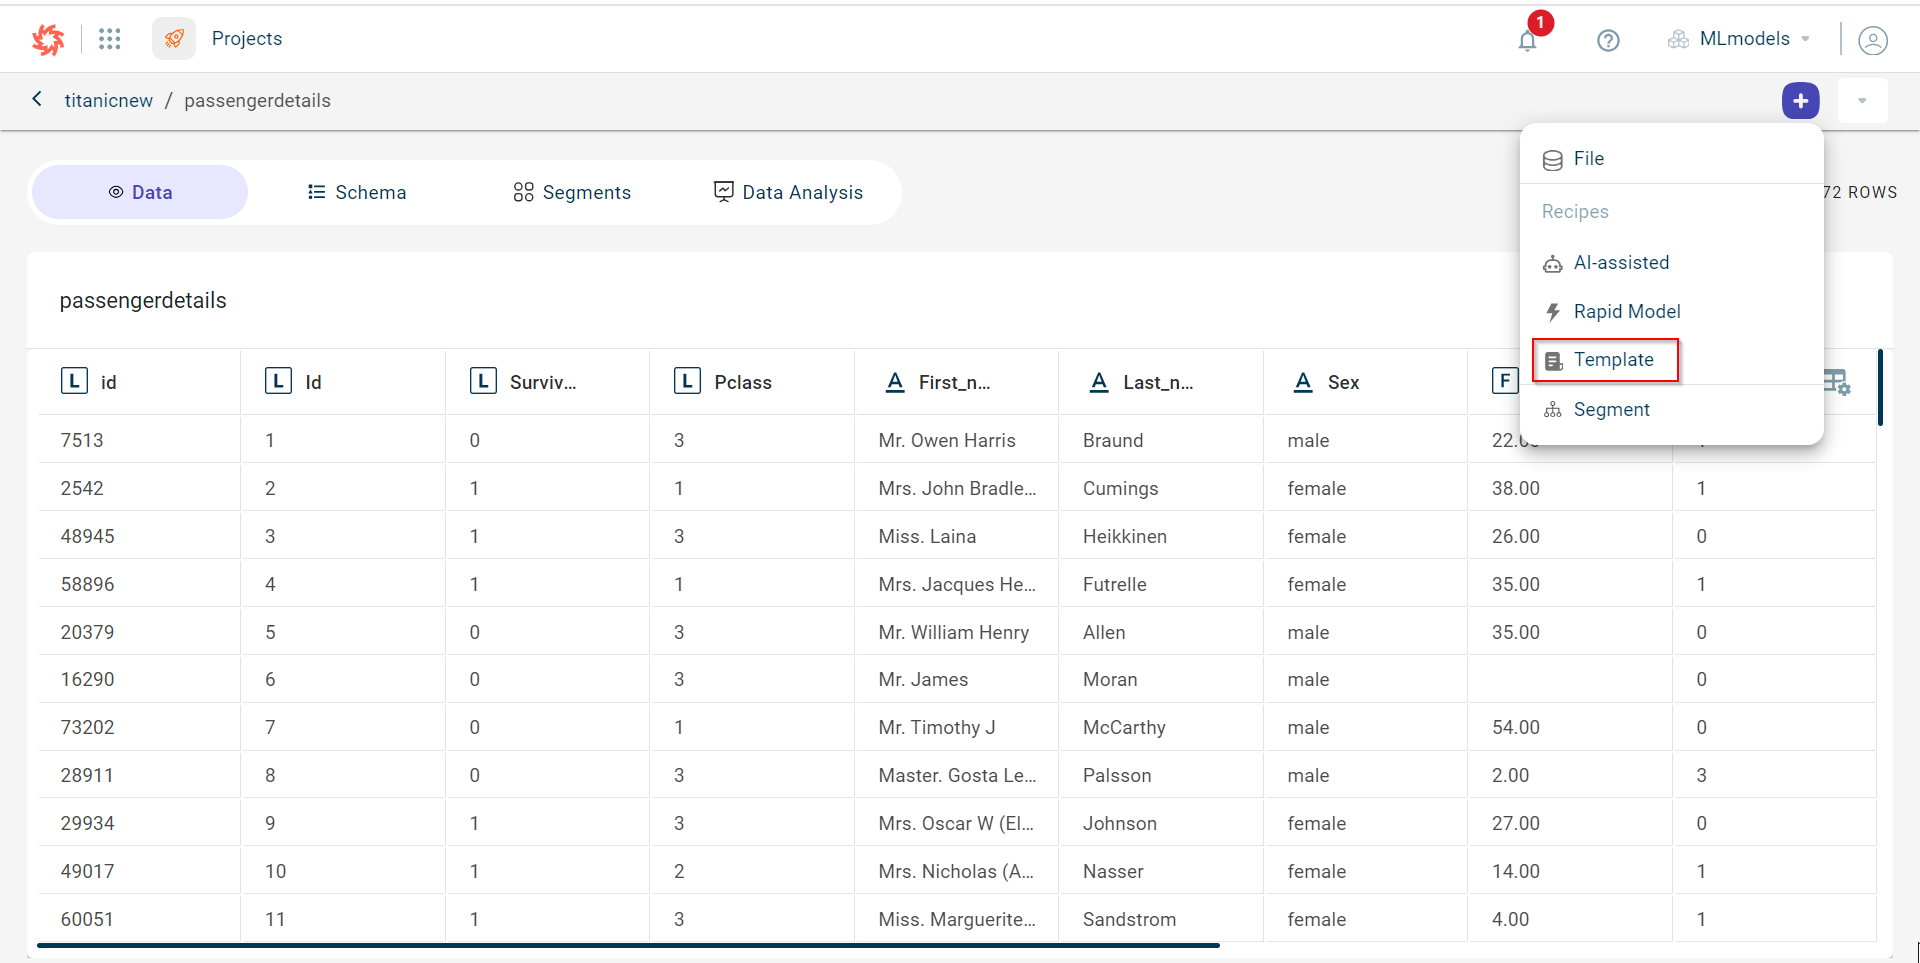
The page where you can add data Transformations is displayed.
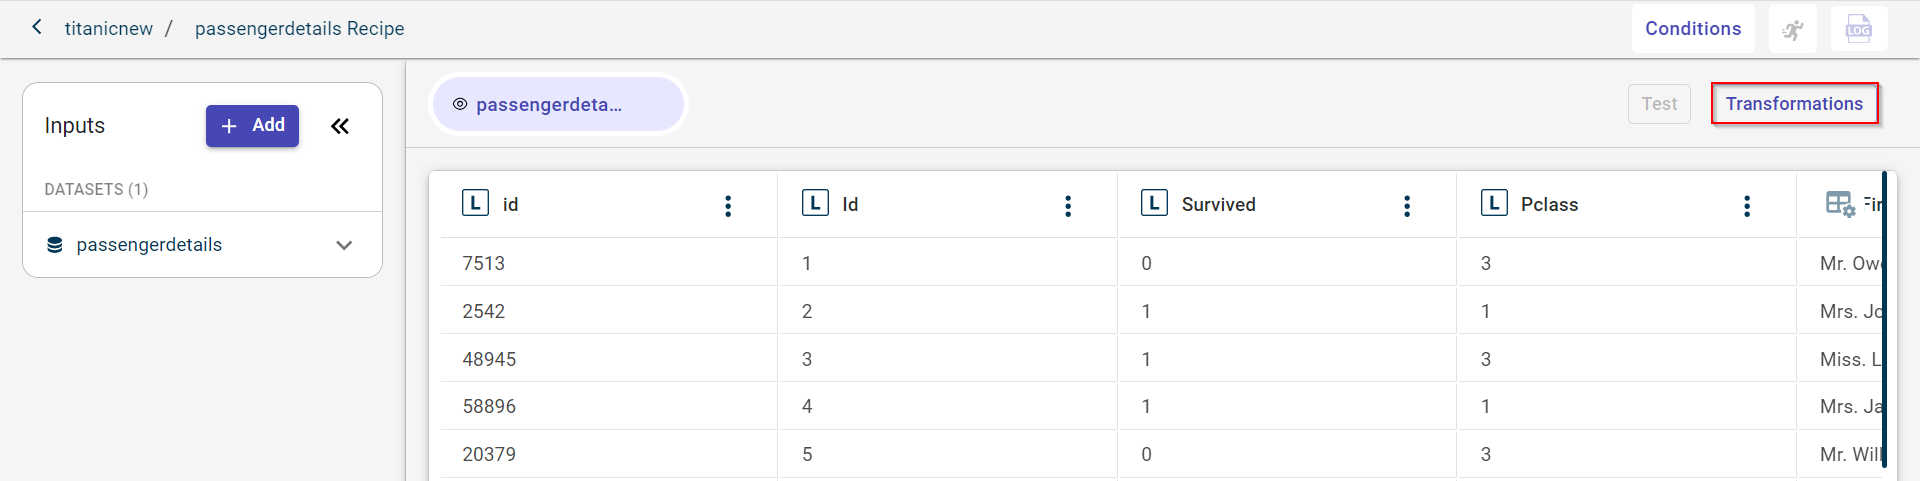
Click Transformations.
Note
If you want to run a transform on a dataset, you must click on the dataset and add the recipe.
The Transformations side panel is displayed.
Search for the transforms or templates you want to add to the ML flow or data pipeline on the canvas:
There are set of templates available for each stage of machine learning model. All the templates associated with a particular stage are assigned to a specific tag. Possible tags:
Data Cleaning
Data Preparation
Data Analysis
Beta
Enter the transform name that you want to add to the data pipeline or filter the transforms by tags from the list.

Click on the transform name to open the transform page.
Specify the information in the respective fields of the selected transform. For more information, see Templates library
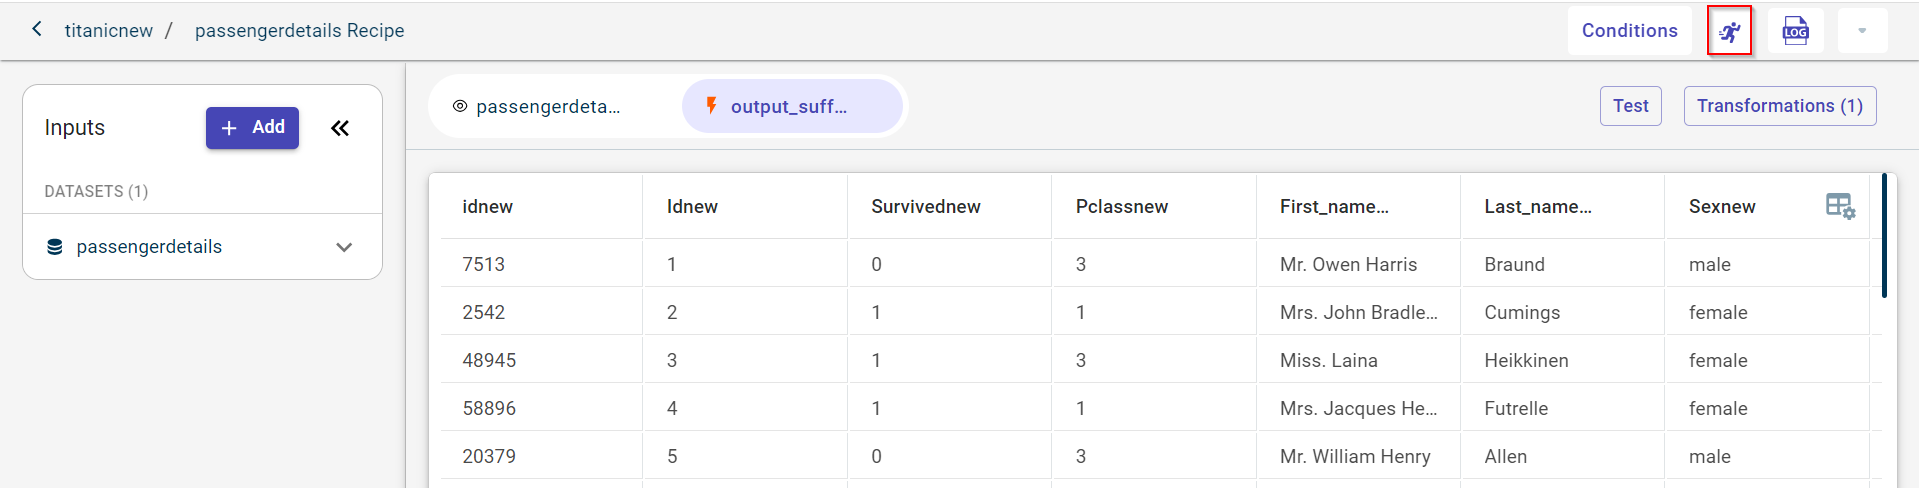
In this example, we have selected suffix to add suffix to all the columns in a dataset.
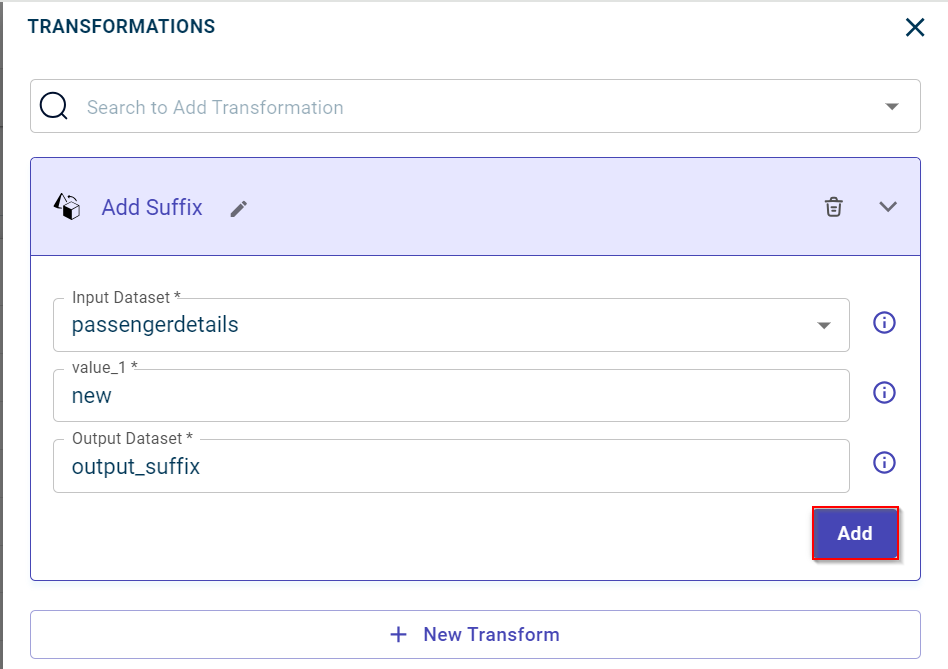
Click Add to add the transform to the data pipeline and close the transform window.
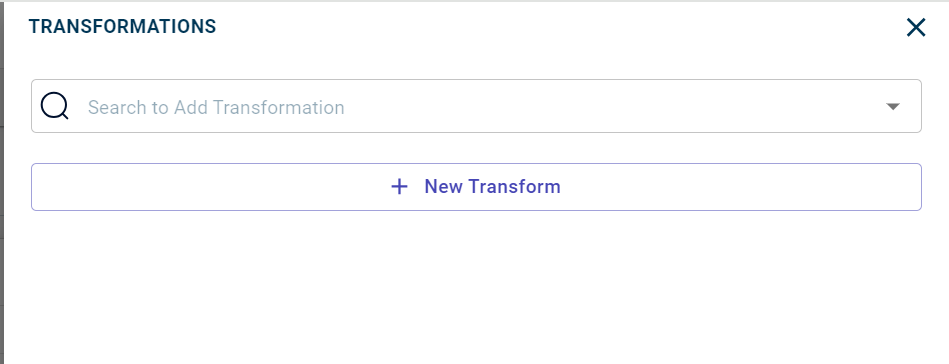
You can also add multiple transforms simultaneously, using the +New Transform.
Use the Edit in Notebook option, available when adding a transform, to edit the transform code in the Notebook editor as needed. Once you’ve made your changes, click Save Back to Recipe to apply the updates made to the recipe on the Jupyter Notebook editor.
Click Test to test the transform and see the output before running this in the data pipeline. You can use the Stop button to halt the recipe execution at any point during its test run.
Click the Run button to run this recipe in the flow. If needed, you can stop the recipe run at any time by clicking the Stop button. Once the run is successful, this generates an output dataset or a dashboard.
Keyboard Shortcuts:
Ctrl+R (or Cmd+R on Mac) → Run a recipe
Ctrl+S (or Cmd+S on Mac) → Save code changes
Click back button to navigate to the canvas from the transforms screen.
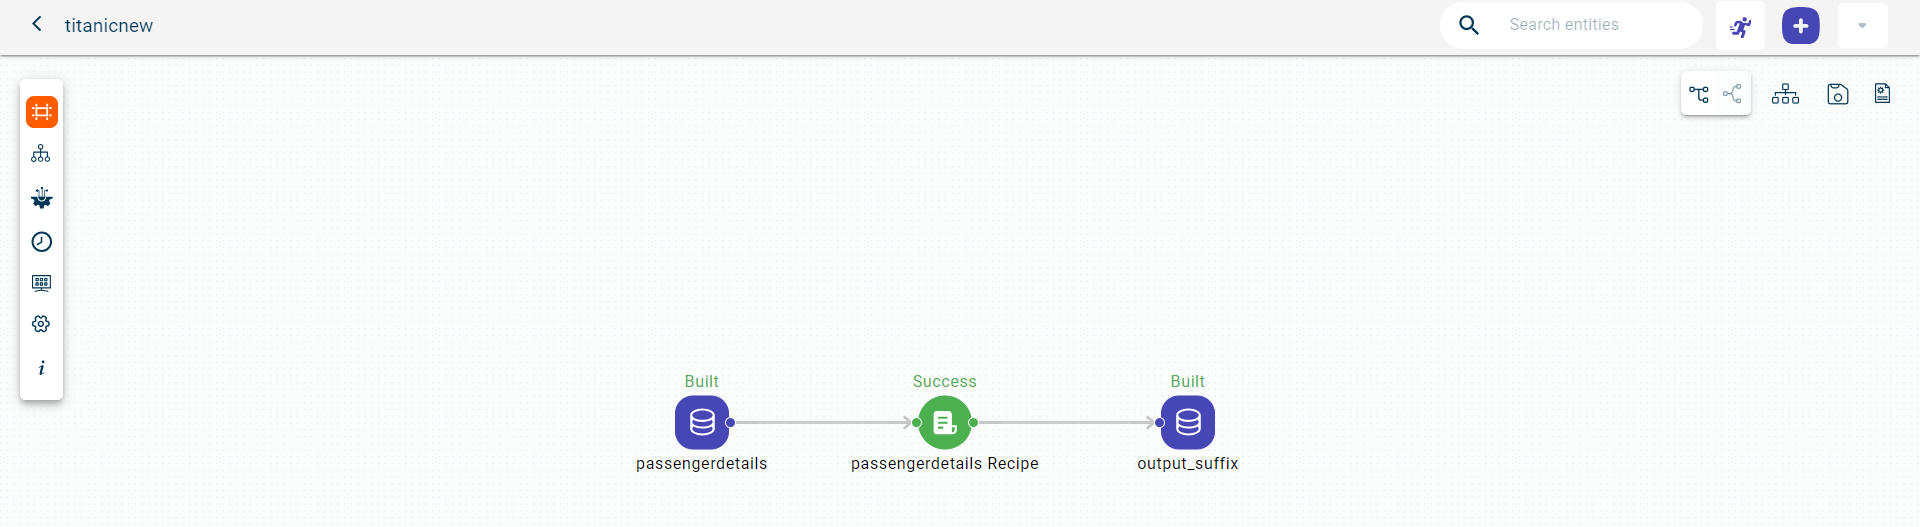
Click the output dataset block. This opens the pull-out window.
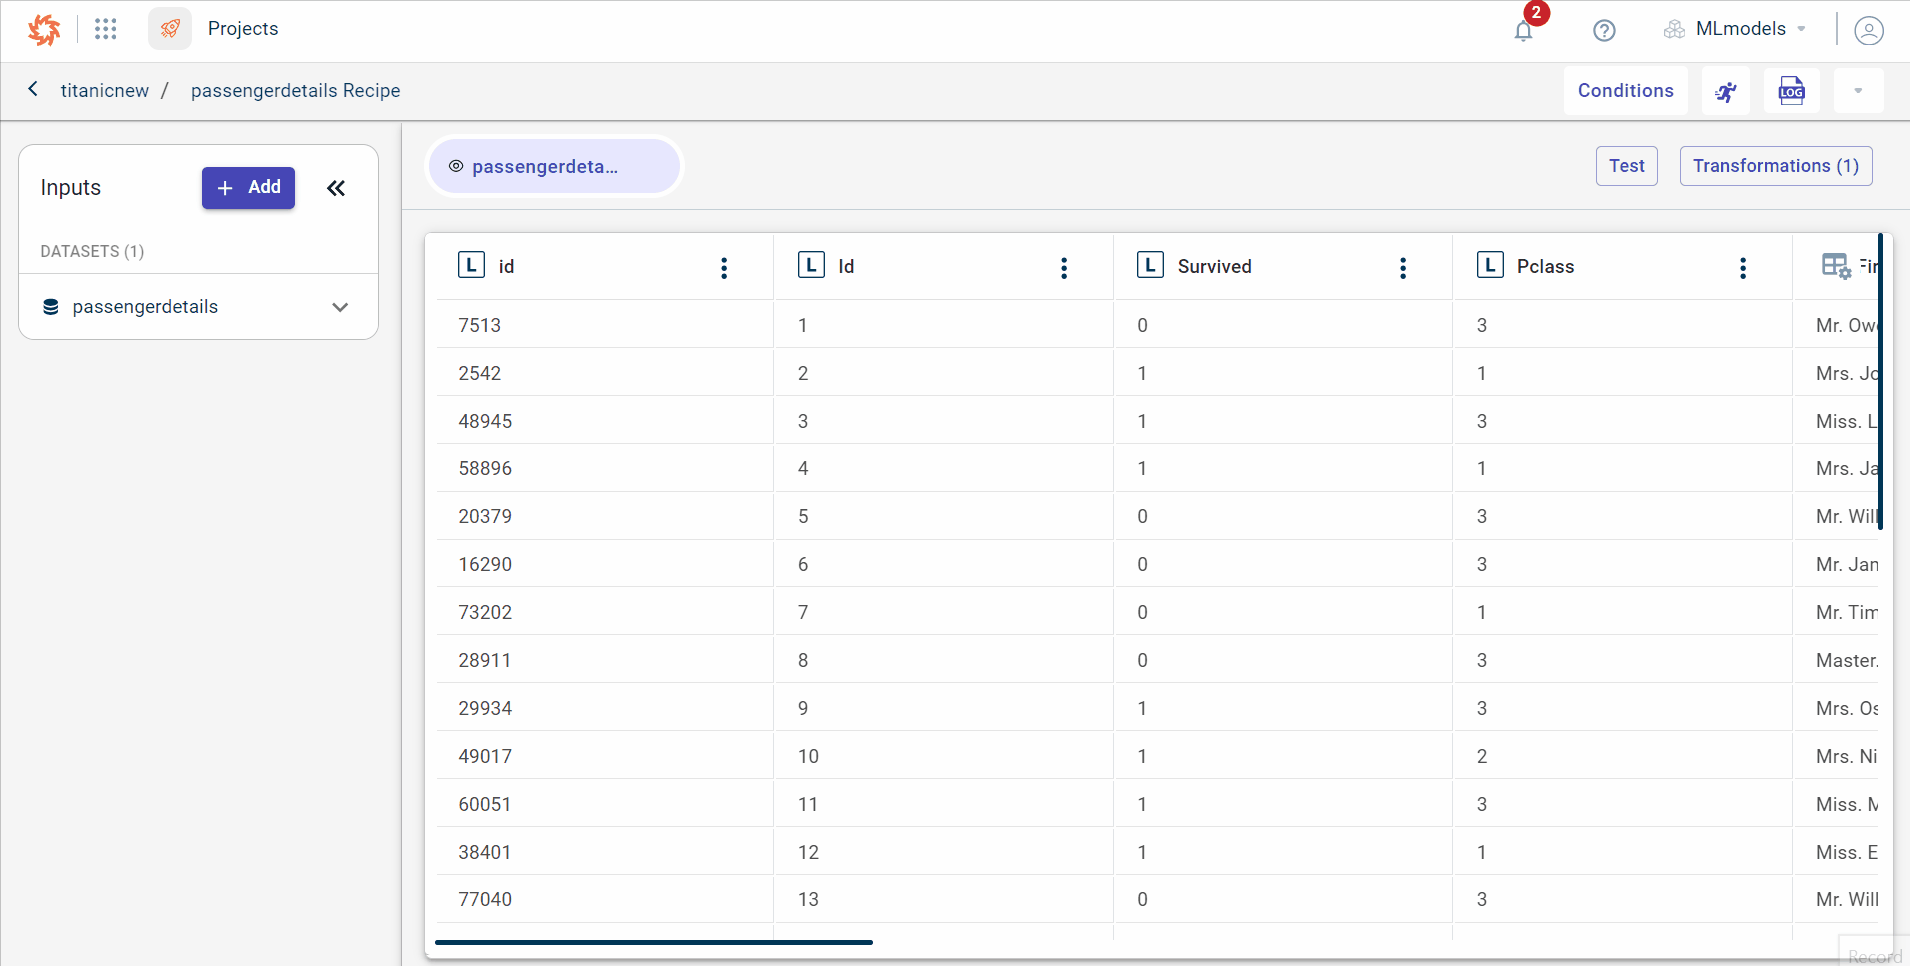
Click View to view the dataset with suffix to each column.
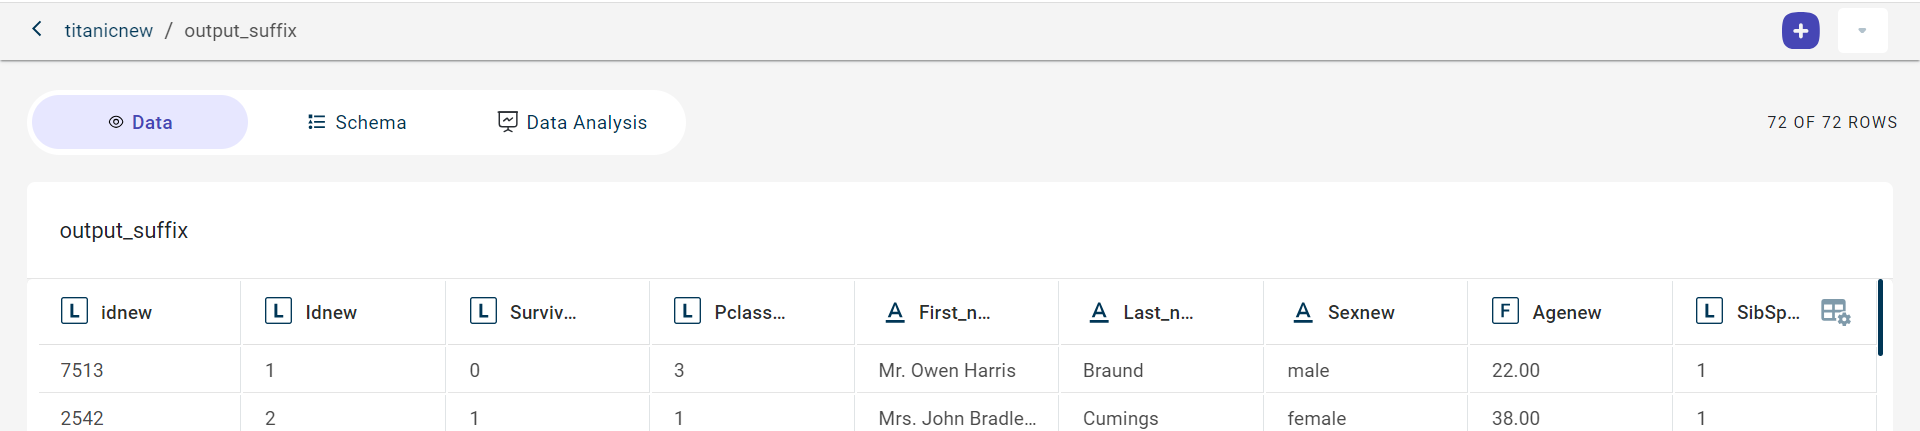
On this View data page, you can:
Click the Actions drop-down to export the output dataset to a csv file, using the Export option.
Click the Actions drop-down to delete the generated output, using the Delete option.
Click the plus icon
to perform the following:Append a file to the source dataset, using the File option. This option is only enabled for the source dataset.
Add a template recipe, using the Template option.
Add an AI-Assisted recipe, using the AI-assisted option.
Add a Rapid Model recipe, using the Rapid Model option.
Add an API Connector recipe, using the API Connector option.
Add a segment to the source dataset, using the +Segment option. This option is enabled only for the source dataset.
Viewing and editing the recipe details
Use this procedure to view the recipe details and edit the type of transform used within a recipe.
To view the recipe details:
Select the recipe block that you have uploaded onto the canvas. This opens the pull-out window.
Click inside the recipe name to modify change the recipe name.
View the recipe details on the pull-out window:
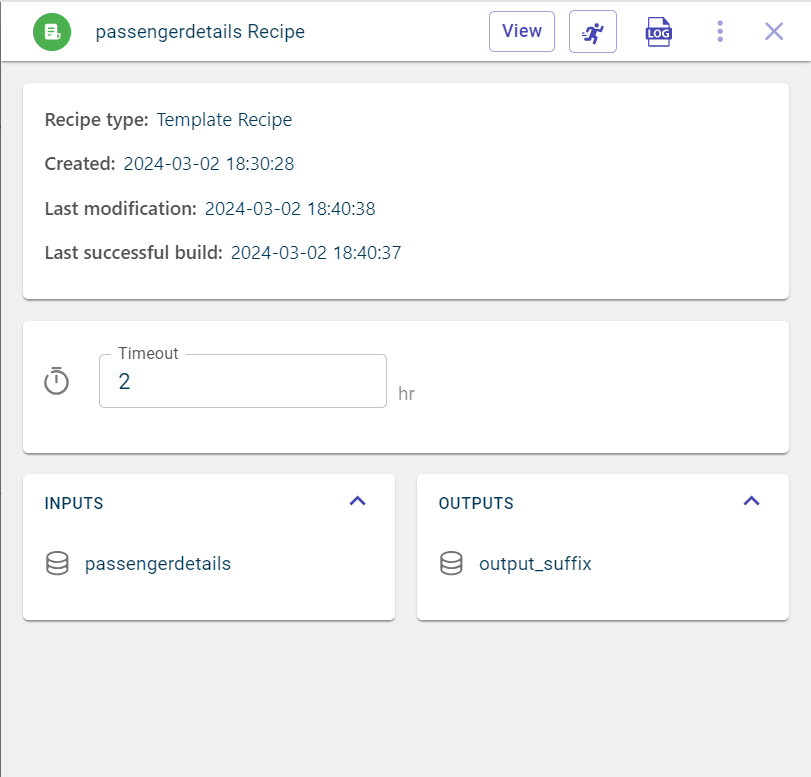
- Recipe type:
The type of recipe used. This is the tag assigned to the transform within this recipe.
- Created:
The date and time at which the recipe was created.
- Last modification:
The last date and time at which the recipe was modified.
- Last build:
The last date and time at which the recipe run was performed.
- Inputs:
The input dataset on which the transformation is applied and the recipe run was performed.
- Outputs:
The output dataset generated after running the recipe.
- Timeout:
The duration after which the recipe stops to run. By default, the duration is set to 2 hours. You can change the duration based on the complexity of the recipe you are running in the flow. If the recipe runs longer than this, the recipe run will be terminated after the set period. It is expressed in hrs.
On this pull-out window, you can also:
View the recipe logs, using the Log icon
 . This shows detailed record of all successful and failed execution of recipe runs. You can view full logs clicking the Logs option to open the logs page in a new browser tab. On this page, you can select View Full Log to access complete logs. Additionally, you can export the logs as a text file by using the kebab menu.
View the recipe details, using the View option. This takes you to the respective recipe page.
Click the ellipses icon
 and select Delete to delete this recipe from the flow.
Run the recipe without navigating to the recipe page, using the Run option.
Click View to review the details of the recipe. The recipe page is displayed.
Click Transformations to view the transforms list in the project and select the transform whose details you want to modify, on the Transforms tab.
Click UPDATE.
Exporting the output dataset
Use this procedure to export the output dataset to a csv file.
To export the output dataset:
Select the dataset block, be it input or output dataset that you want to export to a csv file.
The pull-out window opens.
Click the ellipses icon
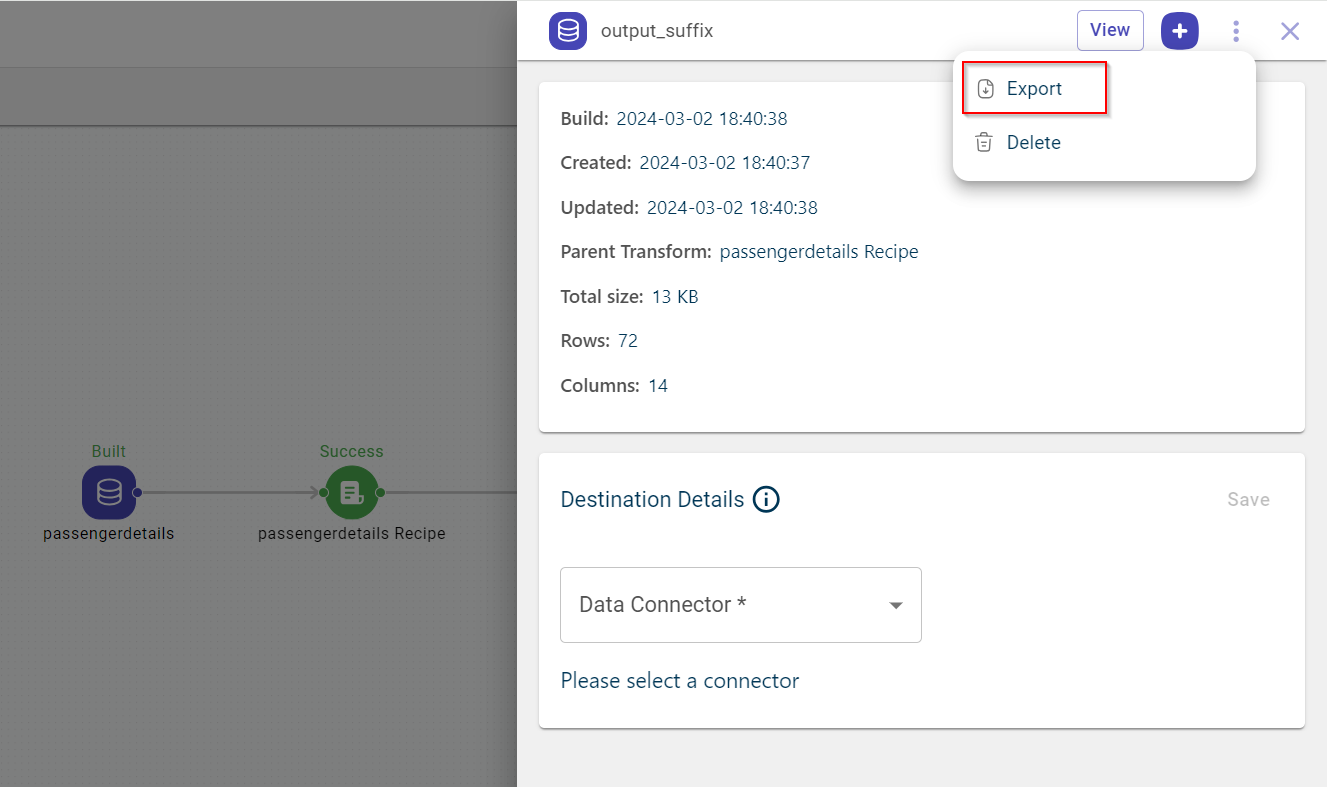
Select the Export option to download the dataset file onto your local system.
Deleting a recipe
Use this procedure to delete a recipe block from the canvas.
To delete a recipe block:
Select the recipe block that you want to delete from the canvas. This opens the pull-out window.
Click the ellipses icon
and select the Delete option to delete the recipe.
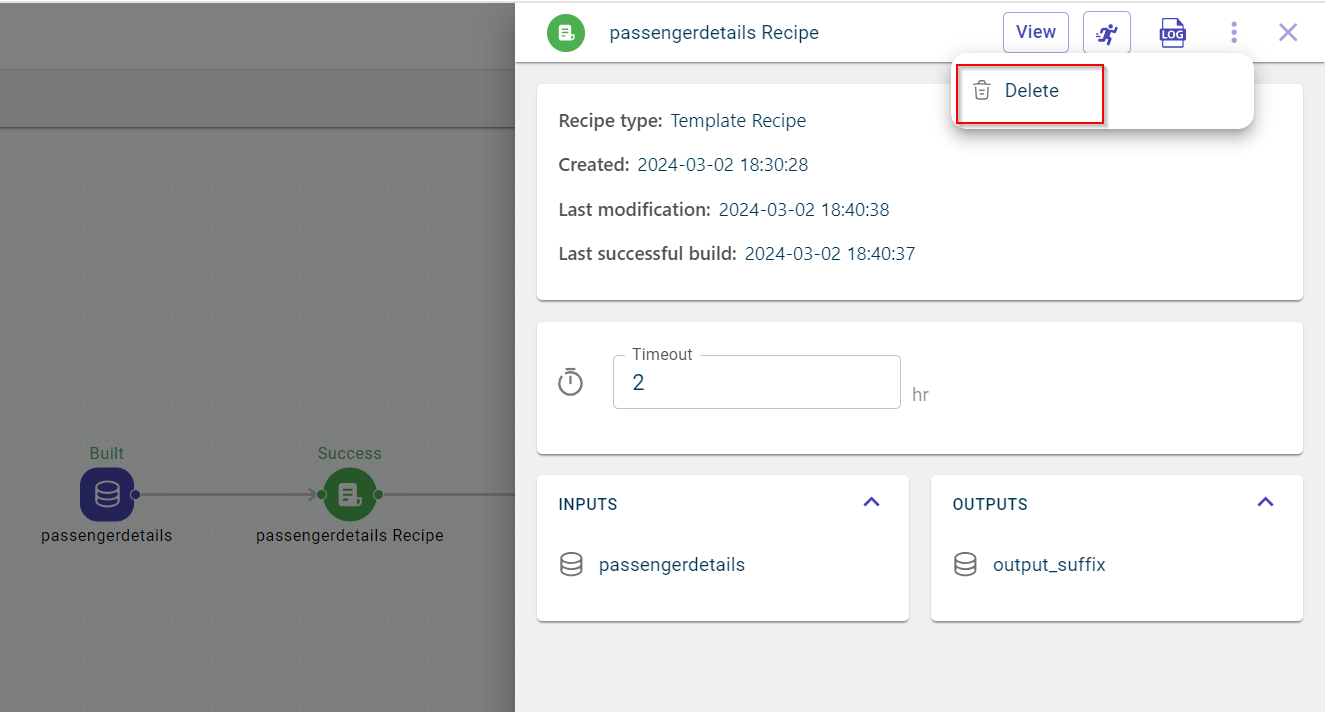
You can also delete the recipe from the Transforms list page, using the delete icon available under Actions drop-down. This page appears when you click View on the side panel window of the recipe block.
A dialog box prompts that deleting the recipe deletes the recipe block, output datasets, and associated recipes.
Click Delete to delete the recipe permanently from the canvas view or click Cancel to discard the action.
Running a specific recipe in the data pipeline
Use this procedure to run a particular recipe in the flow or data pipeline.
To run a recipe block:
Select the recipe block that you want to run from the canvas. This opens the side panel.
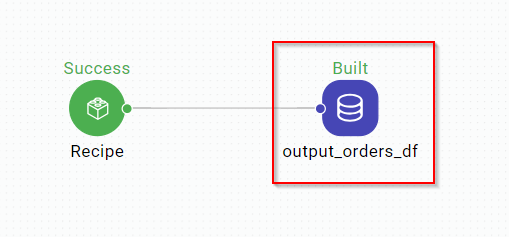
Click Run to run the recipe. The status of the recipe block changes to Running. Once the recipe run is successful, the status changes to Success.
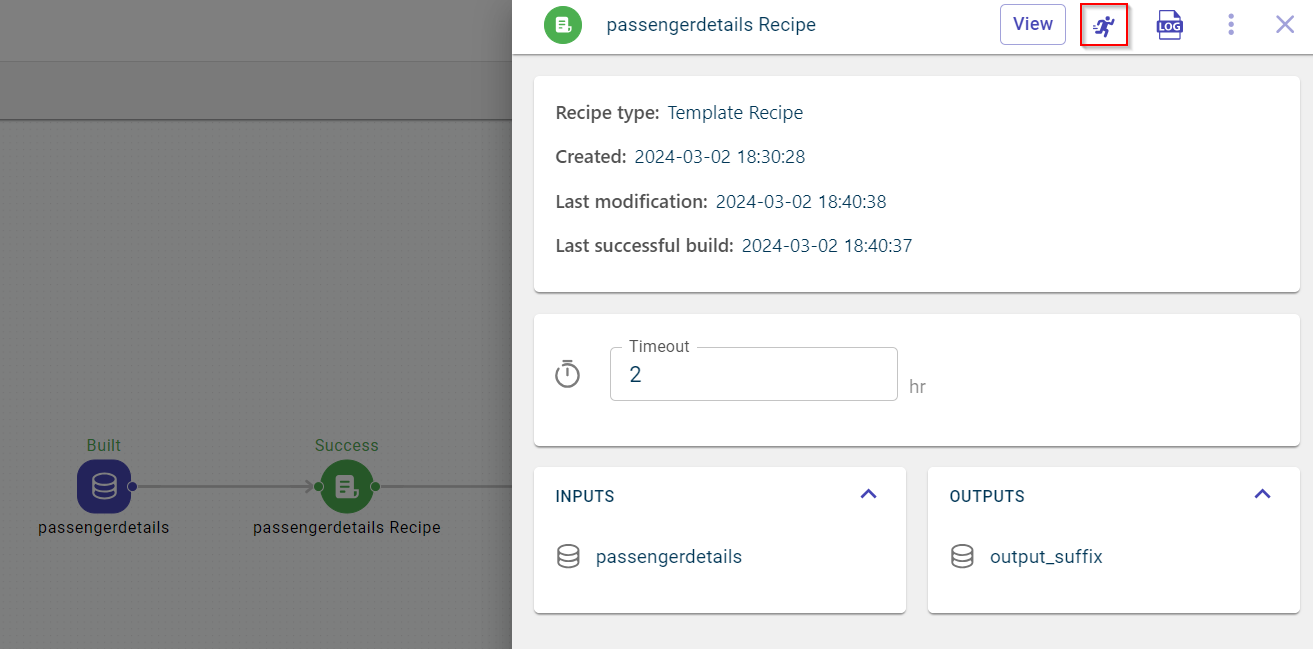
You can also view output (dataset, model, or artifact) generated after running this recipe.
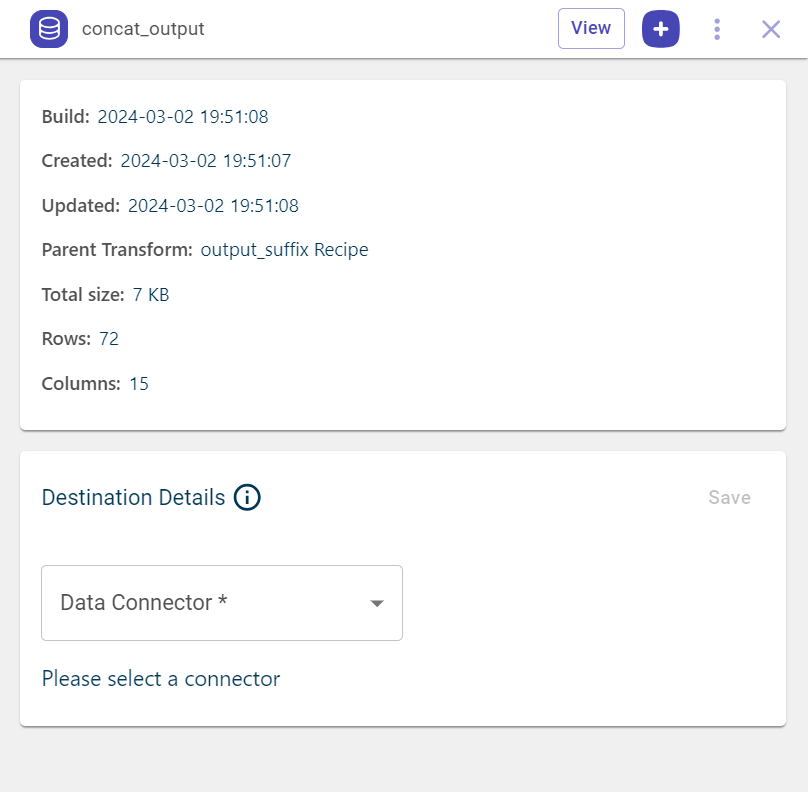
Exporting the output dataset to the connector
Use this procedure to save the output dataset to the configured connector that can be a cloud storage solution or a database.
Select the output dataset block that you want to save to the connector, on the canvas. This opens the side panel.
Select the Data connector from the drop-down. You can only see the connectors you have configured in this tenant.
Enter the destination folder name and file name with which you want to save the file to this folder in this connector.
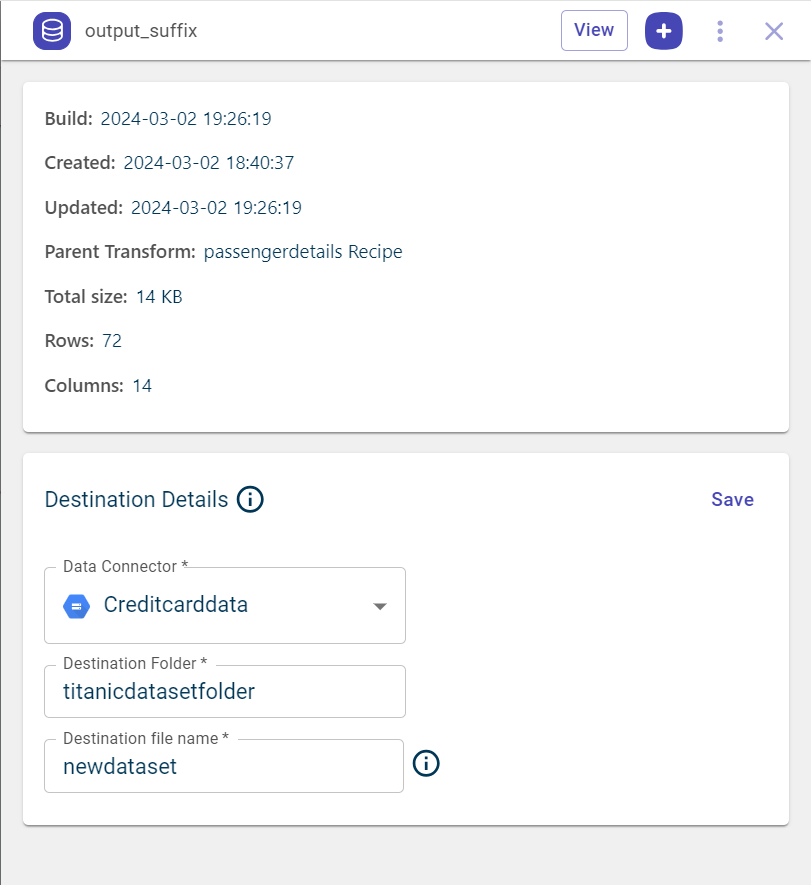
Click Save to save the destination details.
Click Export to export the file to the connector.
You can delete the configured connector for this output dataset, using the delete icon |ico90|.
Code Recipe
The Code recipe allows users to write Python code directly within the platform to generate datasets, eliminating the need to upload a dataset beforehand. It is the only recipe that users can access without pre-uploading a dataset on the canvas. Additionally, the code workspace enables users to test their code before adding it to the canvas, ensuring the code works as intended.
Adding a Code Recipe
Use this procedure to use code recipe on the canvas.
To add and run a code recipe:
Click the plus icon
on the canvas and select the Code Recipe from the list. This opens the Code tab.
Write the Python code to create a dataset or recipe that you want to add to the canvas on the Code tab. Alternatively, click Edit in Notebook to modify the code using the Jupyter Notebook editor. After making changes in the notebook, click Save Back to Recipe to save your updates seamlessly.
You can save your code at key points throughout the development of a recipe, ensuring your progress is preserved and changes are tracked effectively. To learn more, see Managing checkpoints
You can add datasets, artifacts and models available on canvas as inputs to the code recipe, using the plus icon in the Inputs section on the left.
You can view all nodes on the canvas by expanding the Canvas nodes section. Click on individual nodes to inspect them, and use the copy option to replicate node names for use in code.
In the following example, you can see the code to fetch a dataset by making an API call:

Click Conditions to add conditions within the recipe, where each condition is defined using a Key, an Operator, and a Value. The Key is predefined in the Project Settings, while you can specify the Value of your choice. The code is executed only when the defined condition is met.
Click Save Code to save the code. This enables the Test option. Use this option to test if the code is working as expected. You can use the Stop button to halt the recipe execution at any point during its test run.
Once the test is successful, the output will be displayed on the other tab.

Keyboard Shortcuts:
Ctrl+T (or Cmd+T on Mac) → Test a recipe
Ctrl+R (or Cmd+R on Mac) → Run a recipe
Ctrl+S (or Cmd+S on Mac) → Save code changes
Click Run to run the code to create a dataset. If needed, you can stop the recipe at any time by clicking the Stop button.
After running the code successfully, the generated dataset gets added to the canvas.
Managing Checkpoints
Checkpoints allow you to save your code at key stages, preserving progress and offering flexibility during development. You can tweak your code, create new checkpoint versions, and switch between them effortlessly. Once you’re satisfied with a version, you can save it to the current tab and run the recipe.
This feature is exclusively available in the code recipe under the Code tab. You can create up to five checkpoints and seamlessly navigate between them as needed.
Follow these steps to create and save a checkpoint:
Open the Code Recipe:
Click the plus icon
on the canvas and select API Connector from the list. This will open the Code tab.
Write and Save Code:
Write your code in the Code tab and click Save Code CheckPoint to save it as a checkpoint. Once saved, the checkpoint is displayed as a new tab.
If you want to delete a checkpoint, use the Delete Checkpoint option available on the checkpoint tab.
Run Checkpoint Code:
To execute the code saved in a checkpoint, you must first click Save Code to Current on the respective checkpoint tab.
Use this procedure to switch between existing checkpoints:
Open the API Connector:
Click the plus icon
on the canvas and select Code recipe from the list. This will open the Code tab.
Switch Checkpoints:
On the Current tab, click the Save Code CheckPoint drop-down to view all created checkpoints. Select the checkpoint you want to switch to.
To edit a checkpoint, use the Edit option corresponding to it in the drop-down menu.
To delete a checkpoint, use the Delete option next to it in the drop-down menu.
A maximum of five checkpoints can be created at any given time.
Switching between checkpoints is seamless and allows you to experiment with different versions of your code without losing prior progress.
Finalized code must always be saved to the Current tab to run the recipe successfully.
Code Assist in Code Recipe
The Code Assist feature in the Code Recipe allows users to interact with an AI-powered assistant to generate and understand code without leaving the platform. Users can either:
Provide a code snippet to receive an explanation of the code.
Enter a prompt to generate new code.
This eliminates the need for data scientists and other users to switch to external tools like AskAI chat, as they can now use the Ask Code Assistant directly within the platform.
Model Selection
Users can choose from different AI models to generate responses, ensuring flexibility and accuracy:
GPT-4o
GPT-4 Turbo
GPT-3.5 Mini
Users can switch between these models based on their requirements.
Copying & Clearing Responses
The generated code must be manually copied and pasted into the Code Recipe. Users can clear the conversation history to start fresh. The history also clears automatically when the session expires.
Follow these steps to use Code Assist in the Code Recipe:
Click the plus (+) icon on the canvas and select Code Recipe from the list. This opens the Code tab.
Click Code Assist to open the Code Assist side sheet.
Copy the code snippet from the Current tab and use Ctrl+I (Windows) or Cmd+I (Mac) to paste it into the prompt window. Enter your query to either:
Get an explanation of the code snippet.
Provide a prompt to generate a new code snippet.
Click the Generate button to obtain the AI-generated response.
Manually copy the generated code and paste it into the Current tab at the appropriate place.
Click Save Code to apply the changes.
Additional Options
Click Clear History to restart the conversation.
Click Close to exit the side sheet.
Adding Python libraries in Code Recipe
You can define custom Python libraries within a Code Recipe using the Requirements option. If a recipe has specific dependencies, these libraries override the environment libraries, reducing the risk of failures due to version mismatches—especially when different recipes require different versions of the same library. By configuring libraries at the recipe level, each recipe runs in an isolated environment, ensuring a conflict-free execution. This environment is automatically created before execution and deleted afterward, maintaining a clean setup for every run.
To add Python libraries in a Code Recipe:
Click the plus (+) icon on the canvas and select Code Recipe from the list. This opens the Code tab.
Click Requirements to open the Requirements window.
Enter the Python libraries required to run the recipe.
Click Save.
Note
These libraries will take precedence over the environment-level libraries and will be used when executing the recipe.
RAG recipes
Users can use the Retrieval-Augmented Generation (RAG) recipe to convert data into vectors and store them in a vector database for AI-driven solutions. This feature is available exclusively for Code Recipes and requires users to write custom code. This recipe allows you to either consume or generate vector data. However, previewing of vectorized data is not supported.
Use this procedure to use RAG recipe to convert data into vectors.
Click the plus icon on the canvas and select Code Recipe from the list. This opens the Code tab, where a default code snippet is displayed.
Write the Python code to create a RAG recipe that converts data into vectors.
Click Test to validate the recipe and ensure it runs as expected.
Click Run to execute the recipe. Once the run is successful, you can view the vector output.
See also
glossary