Segments
Segmentation allows you to create models on different segments of the input dataset by splitting this dataset into groups. The data is segmented based on the EDA analysis. After gaining insights from the charts generated doing EDA analysis, users can learn what data segment model will help the business.
The first step in the segmentation process is to create a data segment with conditions and then associate this segment with a scenario inside a project. Subsequently, configure the global variables values for this scenario to save the models created for this data segment into this variable. After the scenario is created for the segmented data, you can run this scenario to execute the entire canvas flow for this segment to create a custom model. This model is further used to train the training dataset and generate metrics.
Creating a custom segment
Use this procedure to create a segment from the input dataset. Segment creation is must to create a scenario.
Select the project within which you want to create scenarios.
Select the input dataset block from the flow. The pull-out window appears.
Click View. The dataset page is displayed.
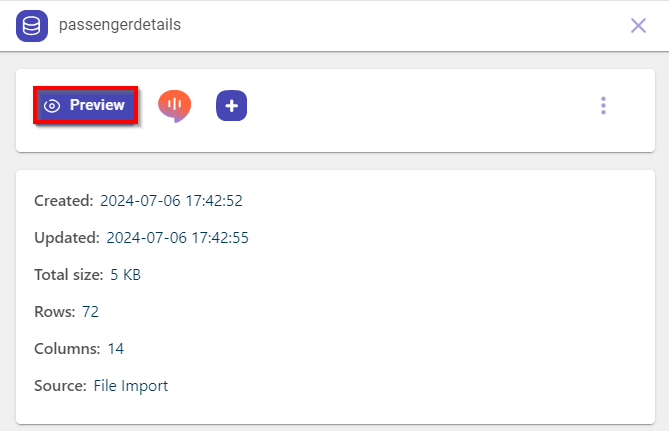
Click the plus icon
 and select Segment.
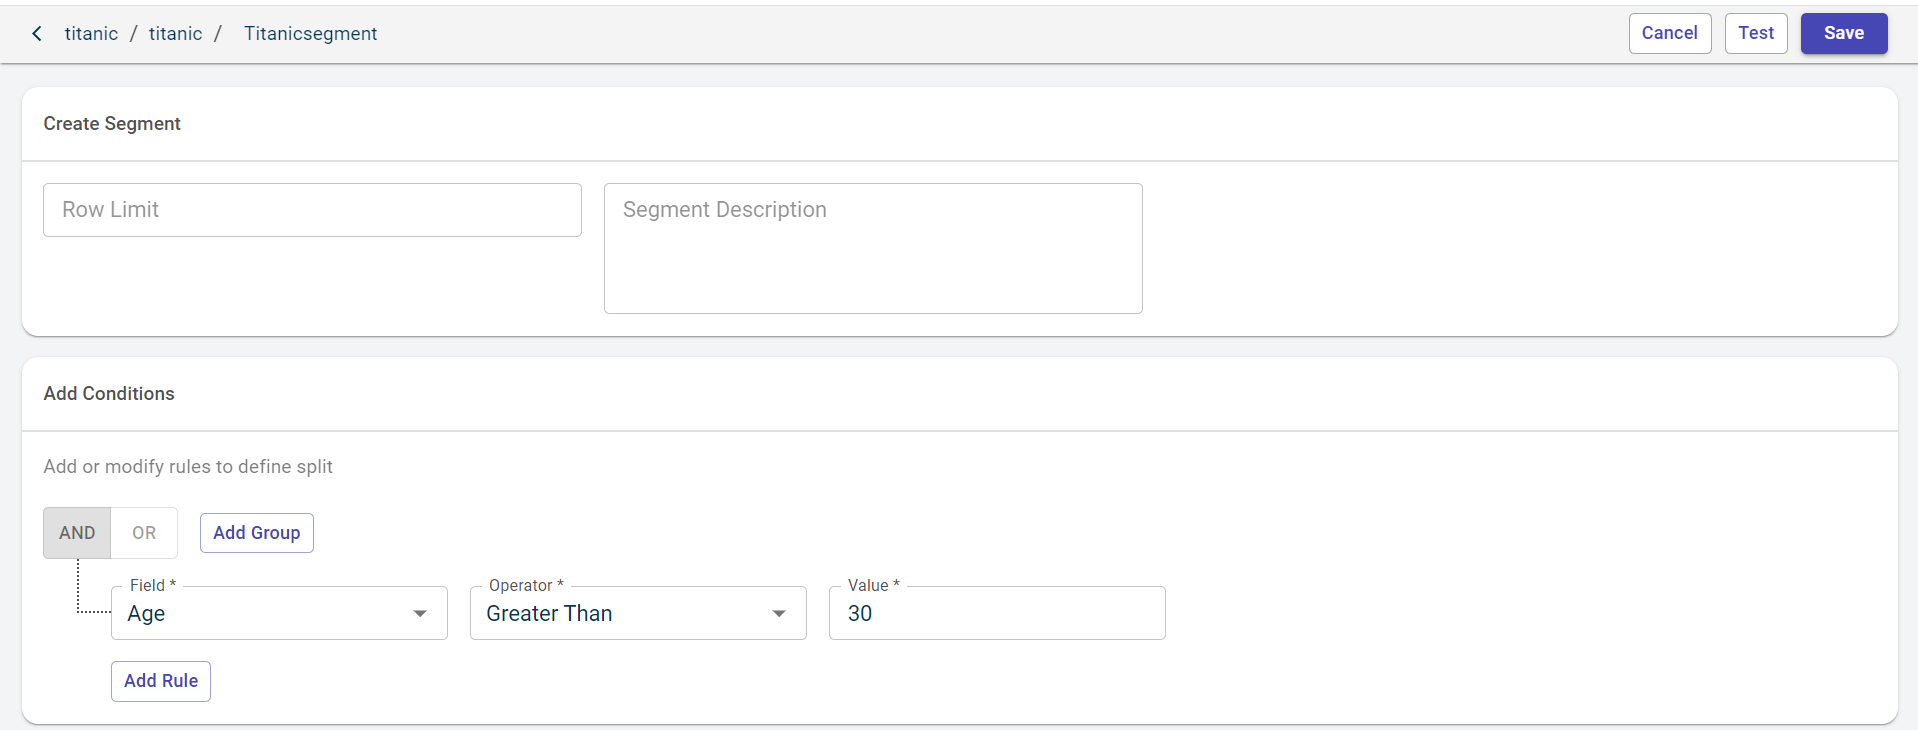
Specify this information in the New Segment section, on the Segments tab:
- Segment Name:
The name of the segment. You can find this option on the breadcrumb.
- Description:
The description for the segment.
- Row Limit:
The number of rows you want to segment from the input dataset.
Add rules for the segment in the Condition Builder section.
Use AND and OR logical operators to add multiple rules using the ADD GROUP option.
AND - This executes the condition only if all the set rules are satisfied.
OR - The executes the condition if one of the rules is satisfied.
Important
You must select the left value, operator and right value to configure the condition for a rule.
Select the column, which is the left value from the field drop-down list. This list populates all the column names in the input dataset.
Select a conditional operator from the list. Possible values:
Greater Than
Less Than
Equal To
Not Equal To
Greater Or Equal
Lesser Or Equal
Is Null
Is Not Null
Provide the right value in the Value field based on the selected field on the left side. The results that match the condition will be displayed.
You can also perform these actions:
delete a condition, using the delete icon corresponding to the condition you want to delete.
add a new rule, using the ADD RULE option.
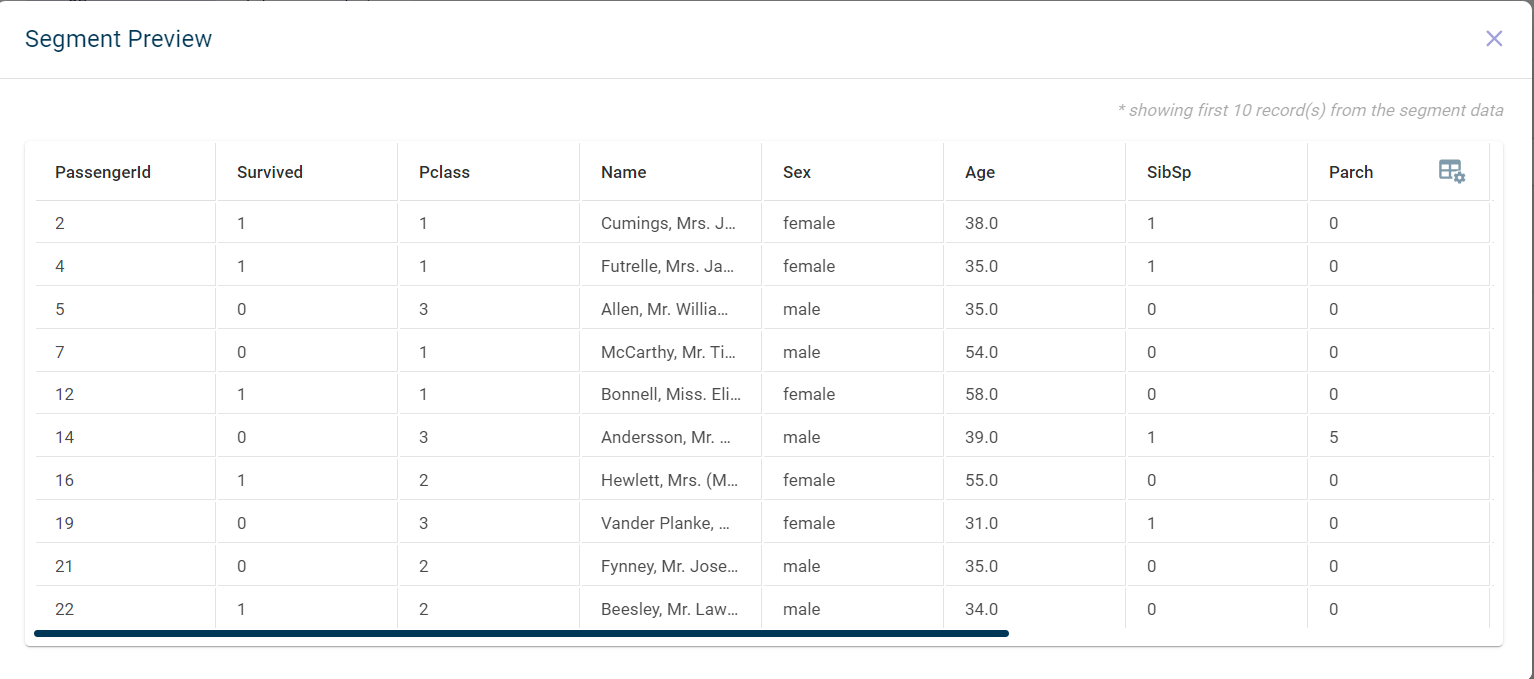
Click TEST to see the segment preview.
For instance, age (column name or left value) greater than (operator) 30 (right value), then the dataset will return with the list of passengers above 30 years.
Warning
The platform considers the names in the dataset starting with @ as a global variable. To avoid this, @ must be added.
Click Save to create the segment.

Managing segments
Use this procedure to manage segments in a project.
Select the dataset block that you have uploaded onto the canvas. This opens the pull-out window.
Click Preview to view the records in the dataset. The records are displayed in the tabular format.
Click the Segments tab to view the list of segments created in this project.
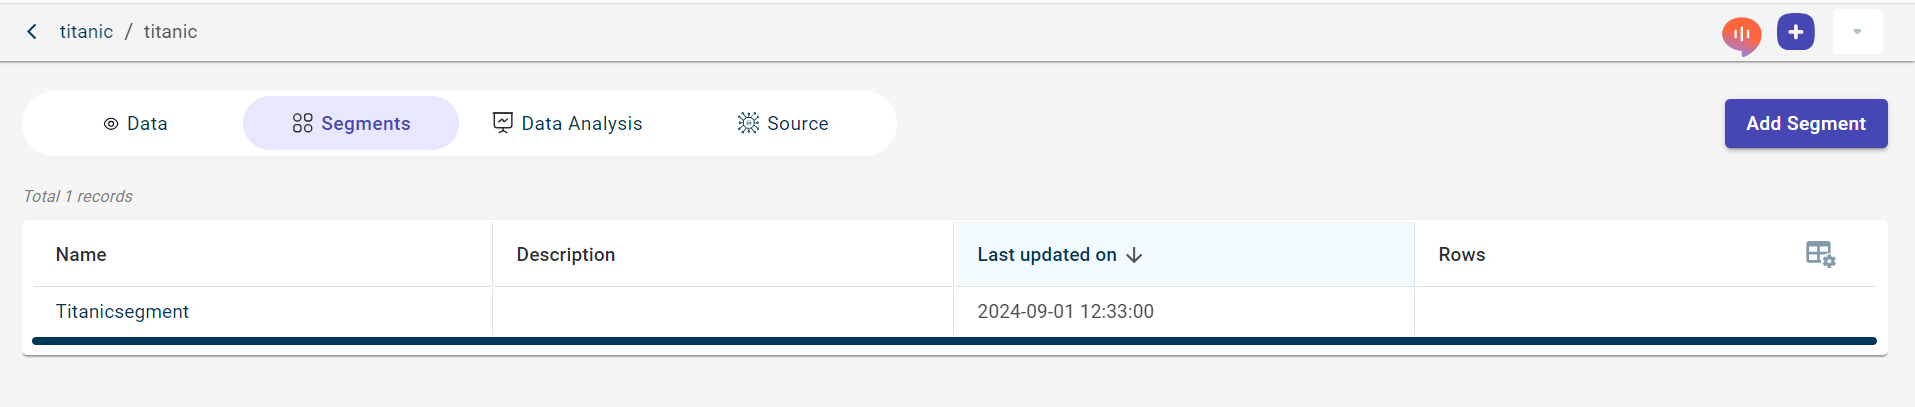
Review this information on the Segments tab:
- Name:
The name of the segment.
- Description:
The description given for the segment.
- Last updated on:
The date and time at which the segment was created.
- Rows:
The number of rows which are to be segmented from the dataset.
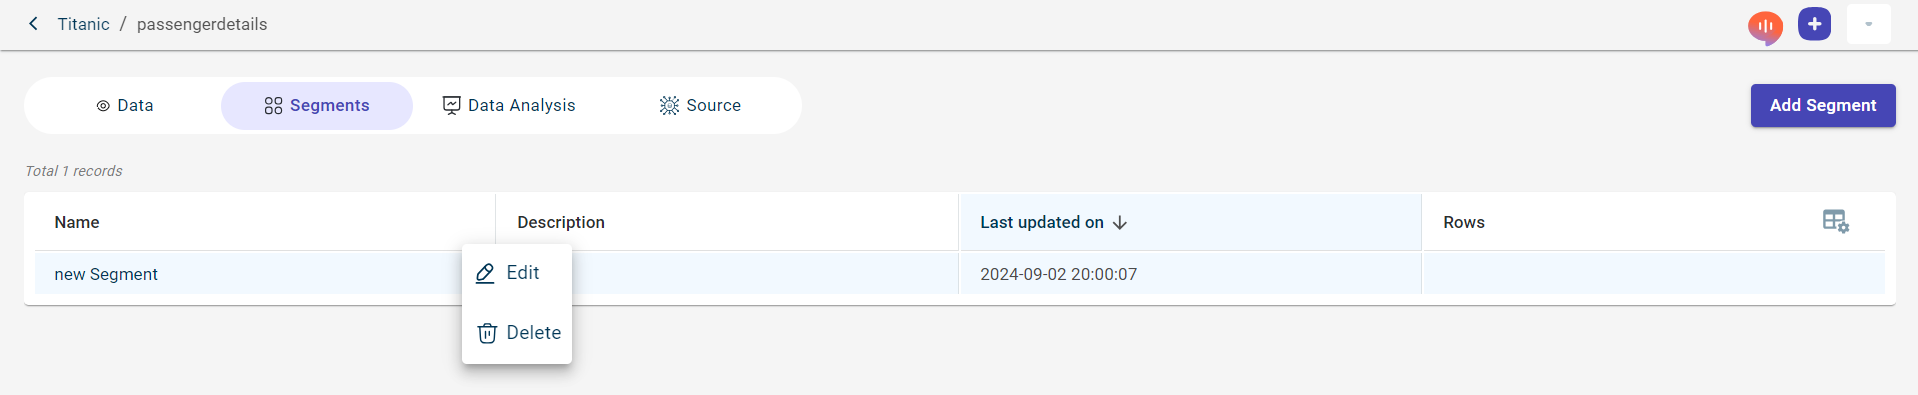
You can perform these actions clicking the ellipses icon corresponding to a specific segment:
edit the segment details, using the Edit option corresponding to the segment you want to modify. This takes you to the New Segment page.
delete a segment, using the Delete option corresponding to the segment you want to delete.
Scenarios
Scenario is created in a project to run the data pipeline on the segmented datasets.
Creating a scenario
Use this procedure to create a scenario and add segment to run the flow with this segment.
To create a scenario:
Select the project to which you want to add a scenario.
Click the Scenarios tab from the project navigation menu on the left.
The Scenarios list page is displayed.

Click the plus icon
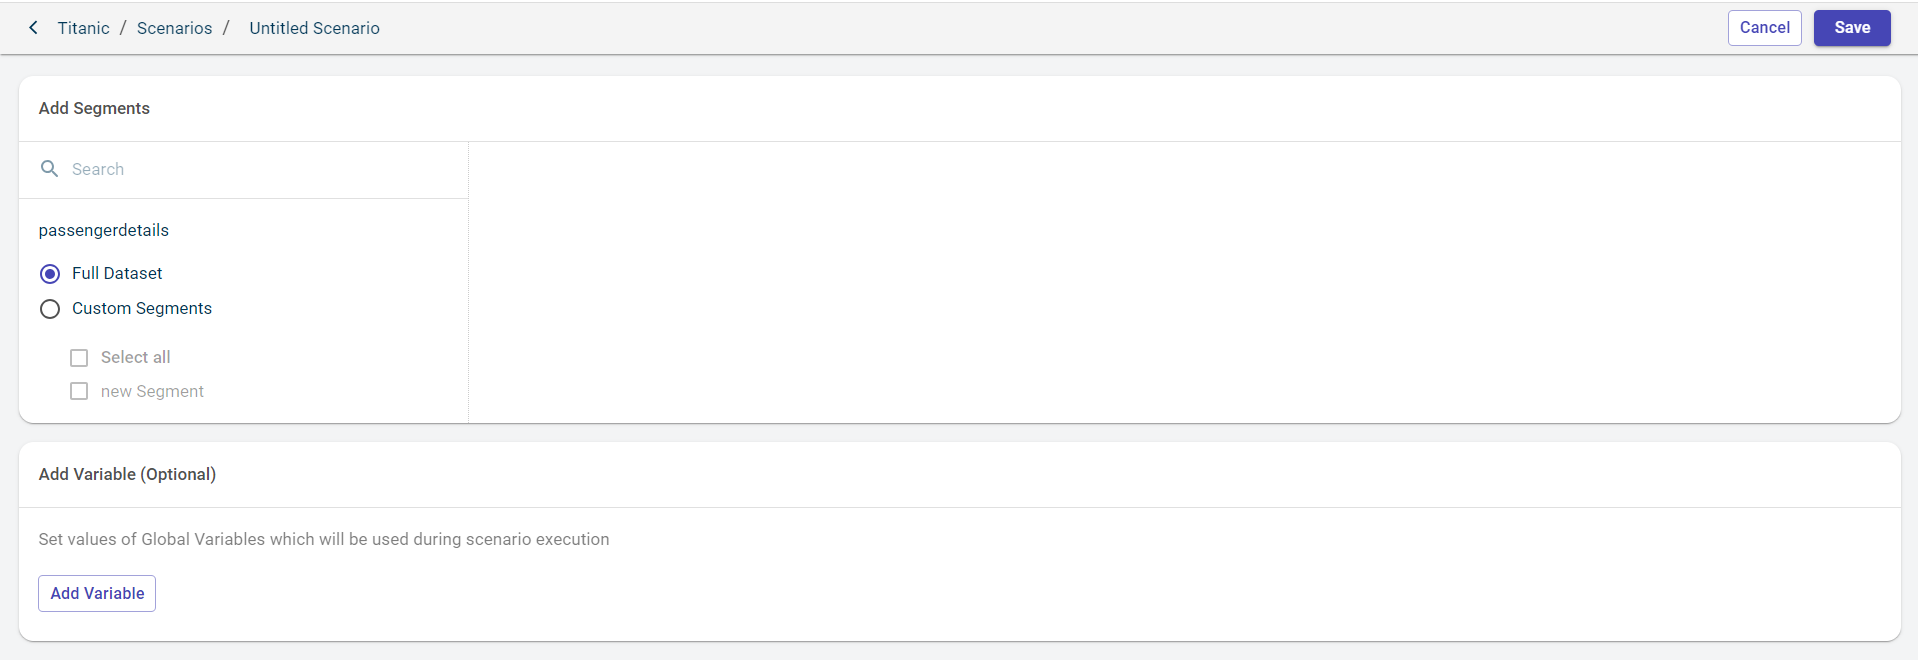
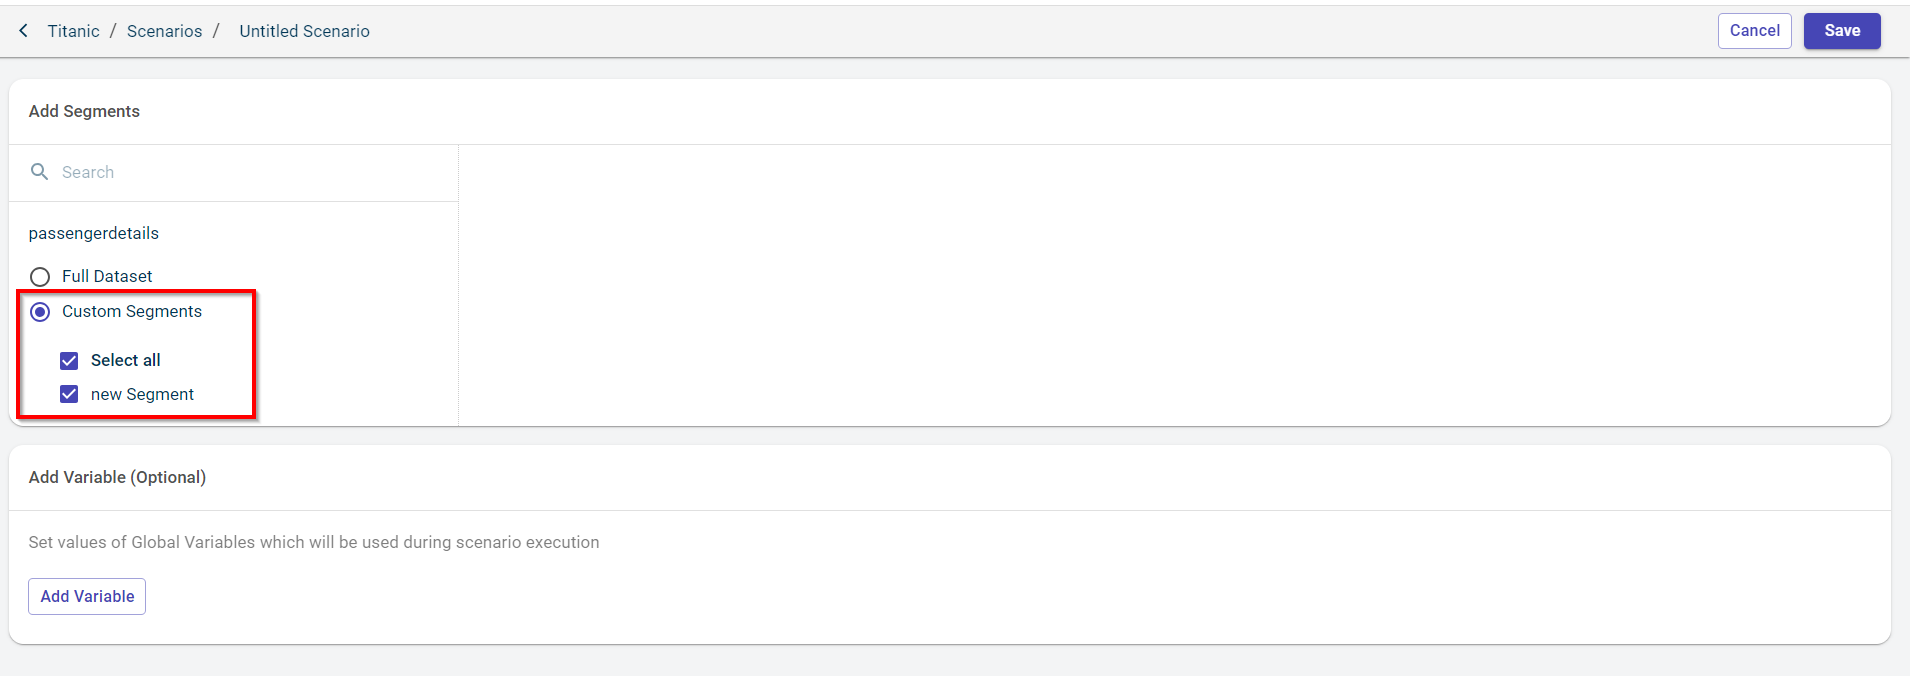
. The Segments list page is displayed to add to the scenario.
Note
You can click on the scenario name and type the custom name you want to provide.
Search for the segment that you want to add to the scenario in the search bar.
Select the Full dataset segment or Custom Segments. Selecting the Custom Segments option will allow you to select the custom segments under custom segments.
If there are multiple custom segments, you can select the check box corresponding to the segment you want to add to the scenario.
For more information to create a custom segment, see Creating a custom segment.
Click the Variables tab. You can only add variables if the global variables are configured in the Project settings.
Click ADD VARIABLE.
Select key from the drop-down list.
Specify the value. For instance, you configure the key as model, then the model created for this segment is stored in this value.
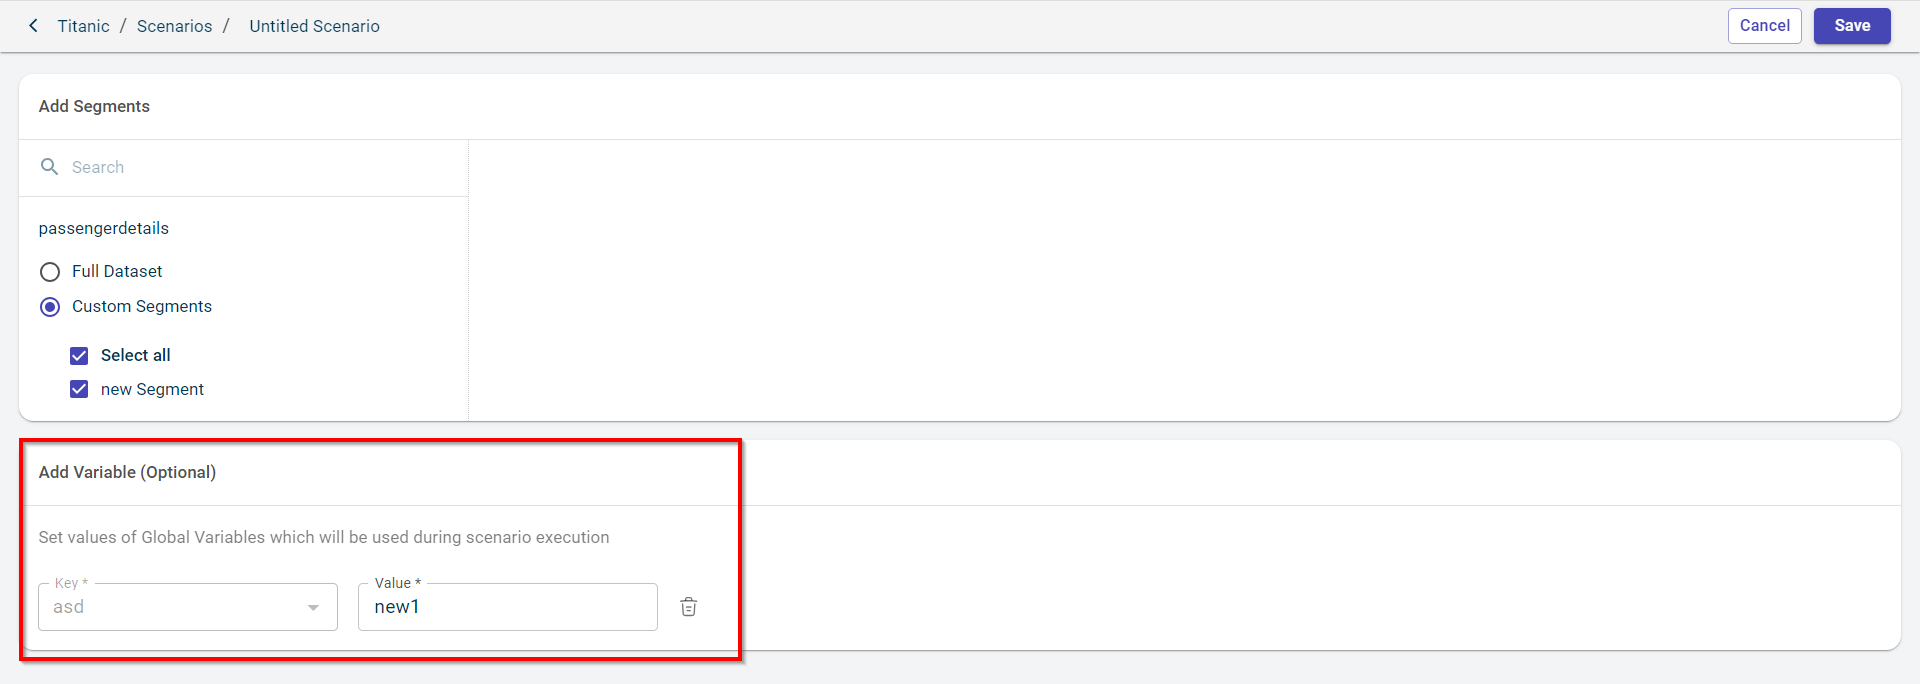
You can see the key values in the drop-down list only if these are configured in the Project settings of the project in which you are creating the scenario.
For more information to configure global variables, see configuring global variables at a project level.
Click SAVE to save the configured segment to this scenario.
Running a scenario with the segmented data
Use this procedure to run the scenario flow with the segmented data.
To run a scenario flow with the segmented data:
Select the project in which you have created the scenarios. You are redirected to the Canvas page.
Click the caret icon and click on DEFAULT to see the scenarios created for this project. You can select the scenario for which you want to execute the data pipeline.
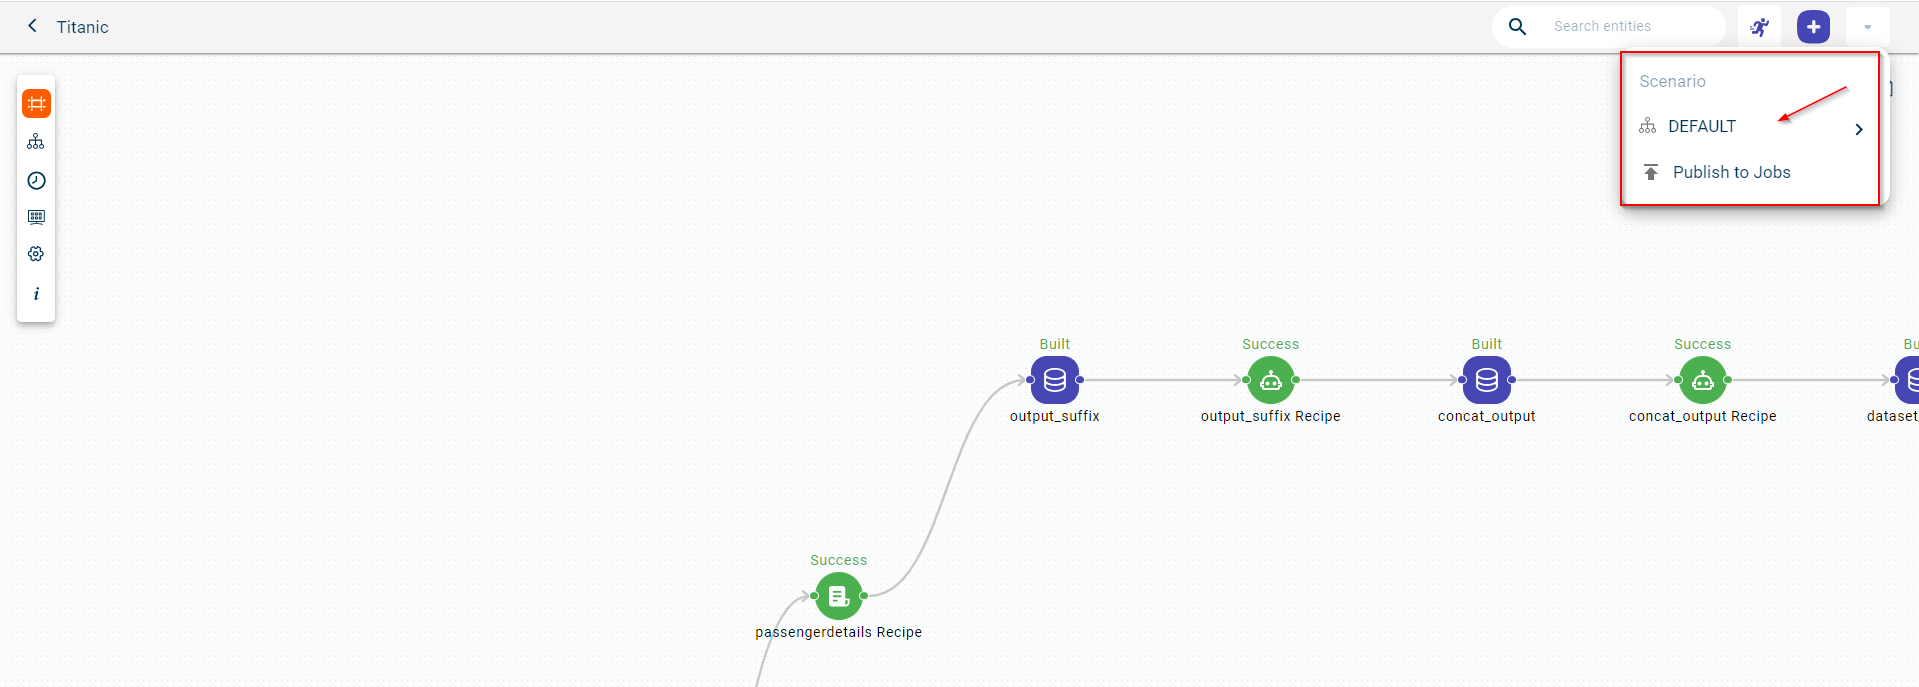
This switches to the flow page of scenario that should be executed.
Click the run icon to run the scenario. Until you run the flow, all the components or blocks on the pipeline will remain in the unbuilt state.
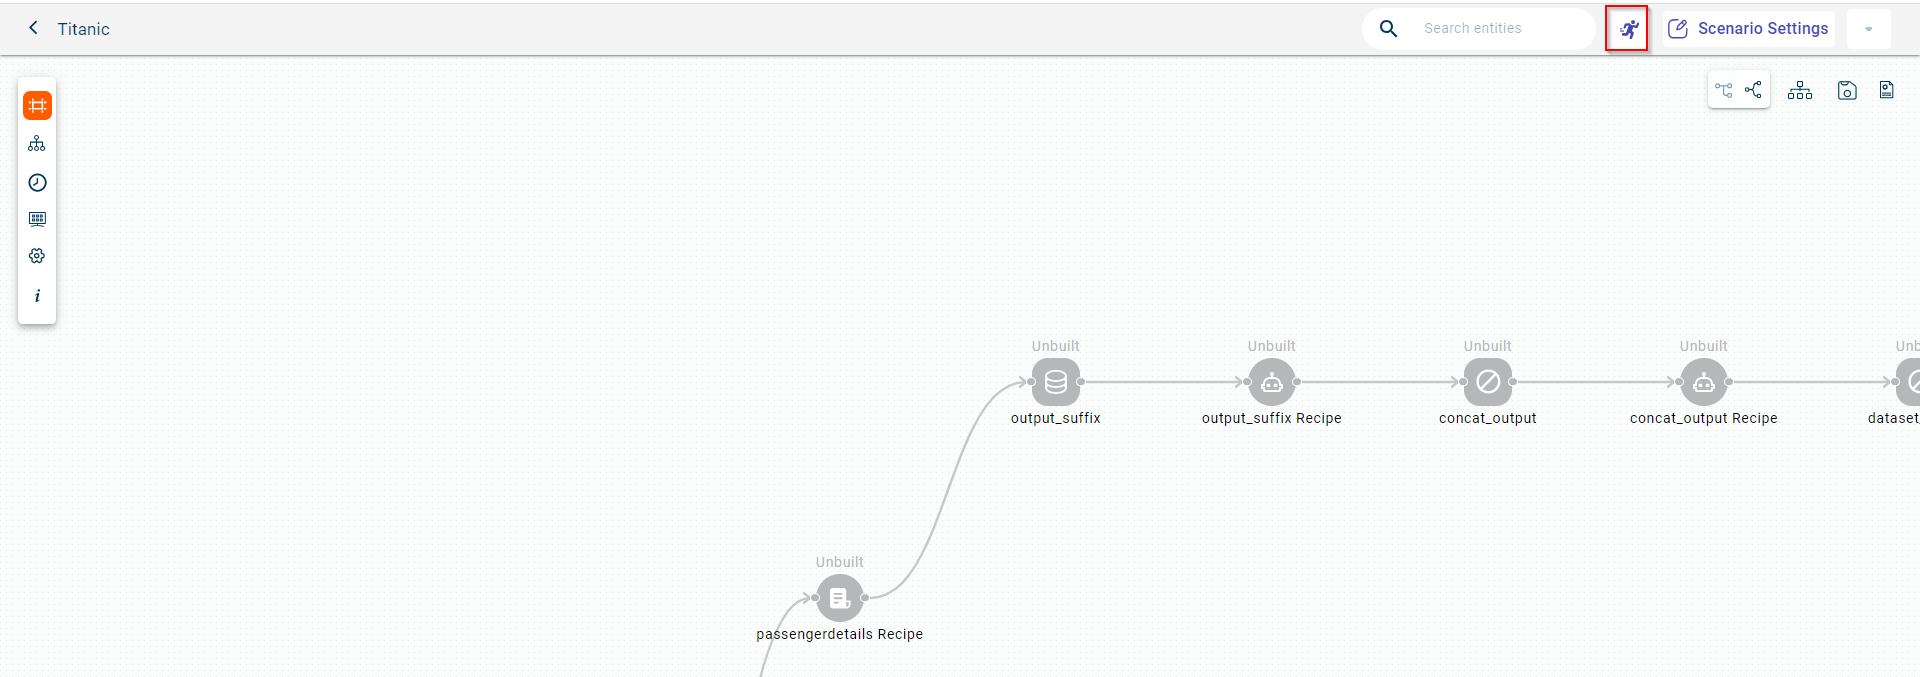
You can use the SCENARIO SETTINGS option to modify the segment details and associated variables.
Managing scenarios
Use this procedure to manage scenarios created in a project.
Select the project to which you want to add a scenario.
Click the Scenarios tab from the project navigation menu on the left.

You only see a default scenario if there are no scenarios created in a project.
Review this information:
- Name:
The name of the scenario.
- Segments:
The segment associated with this scenario.
- Last Updated on:
The date and time at which the scenario was created.
- Status:
The status of the scenario created. Possible values include * Created * Error * Pending * Success
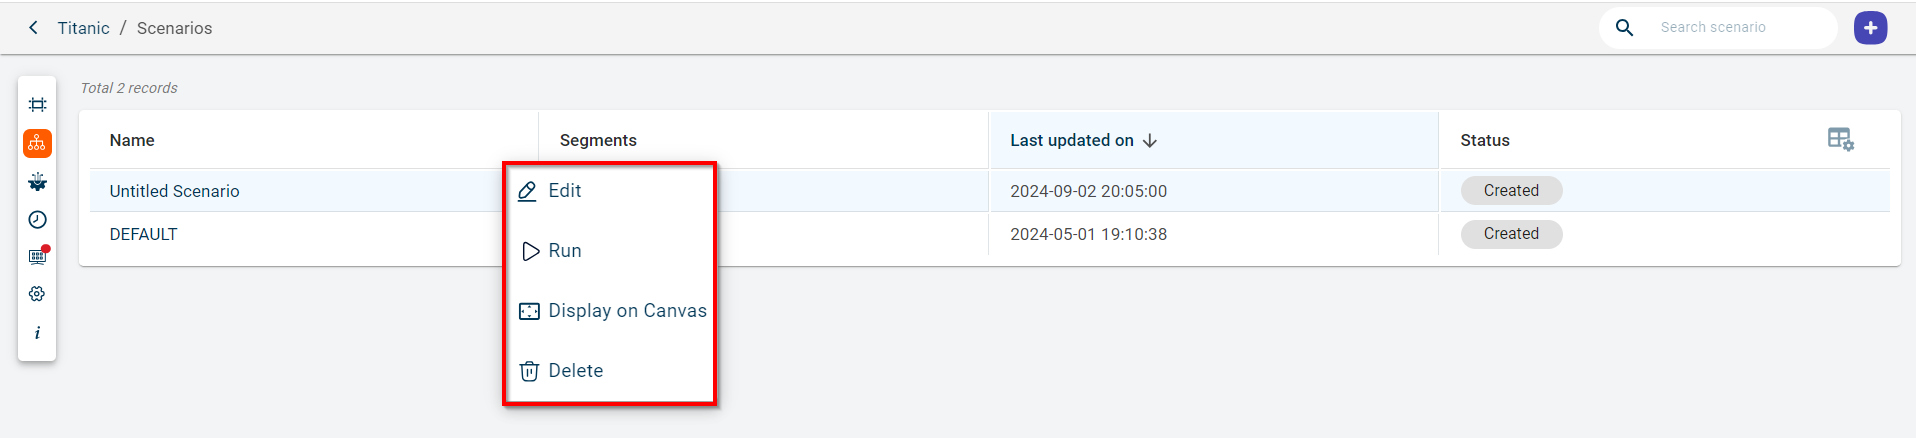
You can perform these actions clicking the ellipses icon corresponding to a specific scenario:
edit the segment details in a scenario, using the EDIT option. This takes you to the segments list page.
run the scenario, using the RUN option. This takes to the canvas page to run the flow for the segmented data in this scenario.
view the canvas page of this scenario in full-screen, using the DISPLAY ON CANVAS icon.
delete the scenario, using the DELETE option.
On the scenarios list page, you can also perform these actions:
Search for a specific scenario by specifying the scenario name in the search bar.
Create a new scenario, using the + Scenario button on this page.